
Table of Contents
Introduction
If you’re interested in robotics or motor control, you’ve likely heard of the Arduino platform. Arduino is an open-source electronics platform that enables easy control of hardware, including motors, lights, sensors, and more. In this guide, we will explore how to use the L298N motor driver with an Arduino to control motors.
The L298N motor driver is a versatile module that allows you to control both DC motors and stepper motors with your Arduino. It’s a popular choice for hobbyists and engineers alike, thanks to its simplicity and power. Whether you’re building a robot or automating a project, this guide will show you how to integrate the L298N with an Arduino board to get your motors running smoothly.
For more information on the basics of motor control with Arduino, check out Arduino Motor Control Documentation. Additionally, if you want to dive deeper into motor driver tutorials, Instructables: Arduino DC Motor Control is a great resource.
Understanding the L298N Motor Driver
The L298N motor driver is an integrated circuit that allows you to control two motors simultaneously. It’s widely used in robotics and other electronic applications because it provides both forward and reverse control for motors, with speed regulation via Pulse Width Modulation (PWM).
Here are the key features of the L298N:
- Dual H-Bridge configuration: Allows two motors to be driven independently.
- Voltage range: Can handle motors operating between 4.5V to 36V.
- Current output: Can deliver up to 2A per motor, making it suitable for small to medium-sized motors.
- Speed and direction control: Enables easy control of motor speed and direction.
This module is highly efficient for tasks such as moving wheels in robots, controlling fans, or driving linear actuators. If you want to explore more about motor drivers in general, the SparkFun Motor Driver Basics guide is a valuable resource.
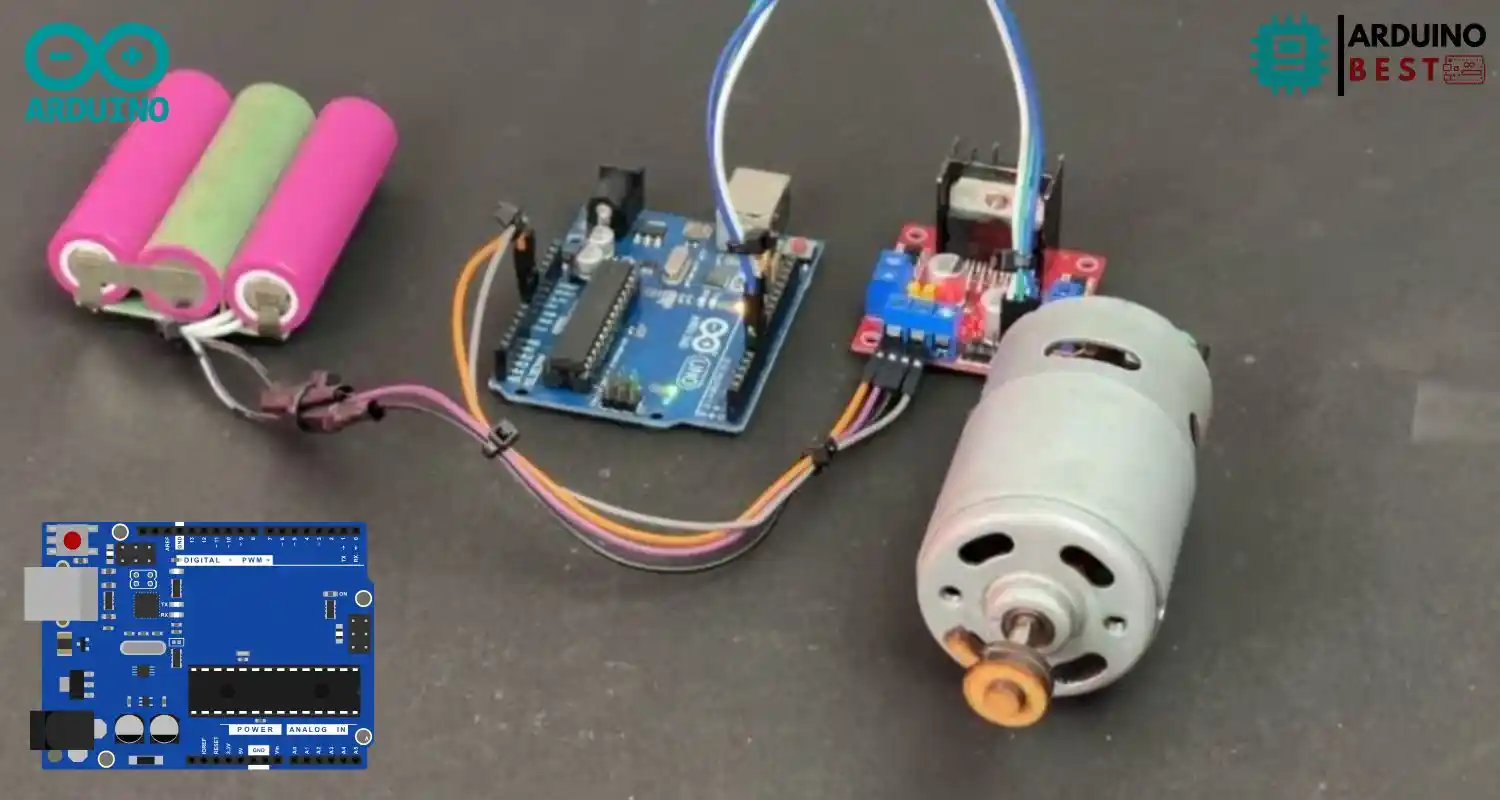
Components Needed
Before diving into wiring and coding, it’s essential to gather the necessary components. Here’s what you’ll need to get started:
- Arduino board (e.g., Arduino Uno)
- L298N motor driver module
- DC motors (or a stepper motor)
- Jumper wires
- Power supply (e.g., 12V battery)
- Breadboard (optional, but useful for prototyping)
Each of these components plays a vital role in ensuring smooth operation and control of your motors. The Arduino will act as the brain, while the L298N motor driver interfaces with the motors, regulating their movement based on the signals from the Arduino.
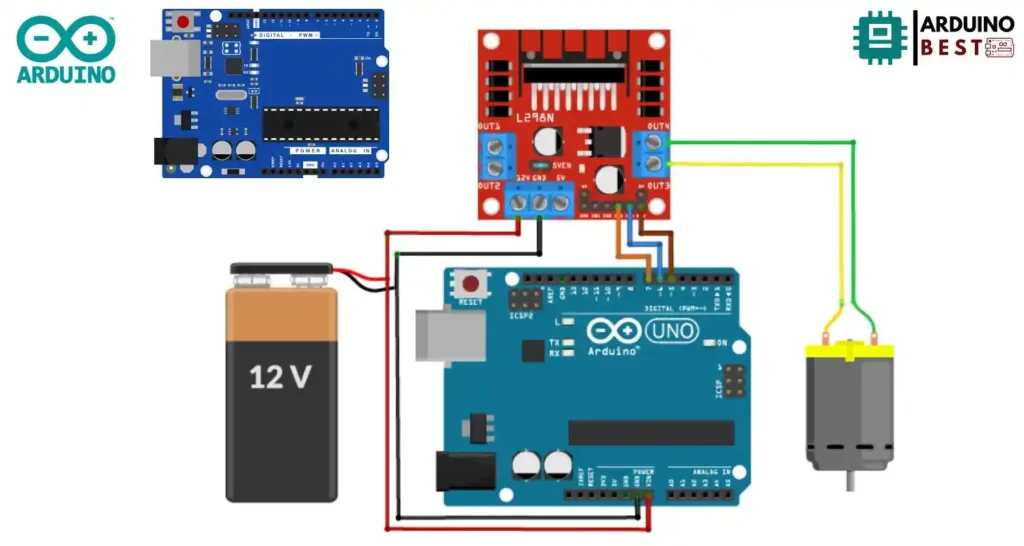
Wiring the L298N Motor Driver to Arduino
Connecting the L298N to the Arduino is straightforward. Here’s a step-by-step guide on how to wire them together:
- Connect the L298N to the Arduino:
- Connect the IN1 and IN2 pins of the L298N to two digital pins on the Arduino (e.g., pins 3 and 4).
- Connect the IN3 and IN4 pins to two more digital pins on the Arduino (e.g., pins 5 and 6).
- The ENA and ENB pins should be connected to the 5V pin on the Arduino.
- Connect the VCC pin to the positive terminal of the motor power supply, and the GND pins should be connected to the ground of both the Arduino and the power supply.
- Motor Connections:
- Connect the output pins OUT1 and OUT2 to the terminals of one motor, and OUT3 and OUT4 to the terminals of the other motor.
Ensure that your power supply is sufficient to drive both the L298N and the motors, and that the Arduino receives power from its USB connection or an external adapter.
Understanding the L298N Pinout
To properly use the L298N motor driver, you need to understand its pinout configuration. The following are the important pins on the L298N:
- IN1, IN2, IN3, IN4: These pins control the direction of the motors.
- ENA, ENB: Enable pins that allow or disable motor operation. Typically, these pins are tied to the 5V line to ensure the motors are enabled.
- VCC, GND: Power supply pins for both the logic and motor power.
- OUT1, OUT2, OUT3, OUT4: Output pins where motors are connected.
Understanding the pinout helps in wiring and coding the system properly to ensure your motors work as expected.
Writing the Arduino Code
Now that you have your hardware set up, it’s time to write the Arduino code. The code will control the motor’s direction and speed.
Here’s a basic structure for controlling the motors:
int motorPin1 = 3; // IN1
int motorPin2 = 4; // IN2
int motorPin3 = 5; // IN3
int motorPin4 = 6; // IN4

void setup() {
  pinMode(motorPin1, OUTPUT);
  pinMode(motorPin2, OUTPUT);
  pinMode(motorPin3, OUTPUT);
  pinMode(motorPin4, OUTPUT);
}

void loop() {
  // Rotate motor forward
  digitalWrite(motorPin1, HIGH);
  digitalWrite(motorPin2, LOW);
  digitalWrite(motorPin3, HIGH);
  digitalWrite(motorPin4, LOW);

  delay(2000); // Run forward for 2 seconds

  // Stop motors
  digitalWrite(motorPin1, LOW);
  digitalWrite(motorPin2, LOW);
  digitalWrite(motorPin3, LOW);
  digitalWrite(motorPin4, LOW);

  delay(2000); // Stop for 2 seconds
}
In this example, the motor will rotate forward for 2 seconds and then stop for 2 seconds. You can modify this code to rotate the motors backward, or even use PWM (Pulse Width Modulation) for speed control.
Uploading and Testing the Code
Once the code is written, the next step is to upload it to the Arduino. Here’s how to do that:
- Open the Arduino IDE.
- Select the correct board type (e.g., Arduino Uno).
- Connect your Arduino to your computer via USB.
- Upload the code.
After uploading the code, observe the motor’s behavior. If everything is wired correctly, the motor should run forward and stop as programmed. If it doesn’t work, double-check your connections and ensure that the L298N is receiving adequate power.
Advanced Control Techniques
Once you’ve mastered the basics, you can explore advanced techniques such as controlling the motor’s speed using PWM. PWM allows you to adjust the motor’s speed by rapidly turning the motor on and off at varying intervals.
Additionally, you can integrate sensors, such as encoders, to give feedback on the motor’s position, or use remote control modules (e.g., Bluetooth) to control the motor wirelessly.
Troubleshooting Common Issues
Even with the best planning, you may encounter some issues. Here are some common problems and how to fix them:
- Motor not spinning: Check the power supply and ensure that the motor is properly connected.
- Motor only moves in one direction: Verify that the IN1, IN2 pins are correctly wired and check the code for any errors in logic.
- Arduino not powering up: Make sure the Arduino is connected to a power source and the L298N has a suitable power supply.
FAQs
Q1: Can I use the L298N with stepper motors?
Yes, the L298N can control stepper motors, although for more precise control, you might consider a dedicated stepper motor driver.
Q2: What is the maximum voltage and current the L298N can handle?
The L298N can handle up to 36V and can provide up to 2A per motor.
Q3: Do I need a separate power supply for the motors?
Yes, using a separate power supply for the motors is recommended to prevent overloading the Arduino’s power output.
Q4: How can I control the motor speed?
Motor speed is controlled using PWM, which can be adjusted via the ENA and ENB pins.
Q5: Can I use the L298N with a 5V Arduino board?
Yes, the L298N can be used with a 5V Arduino, but make sure that the motor voltage doesn’t exceed the L298N’s limits.
Conclusion
The L298N motor driver is a powerful and versatile tool for controlling motors in Arduino projects. With its ability to drive both DC motors and stepper motors, it opens up numerous possibilities for automation, robotics, and other motor-driven applications. By following the steps outlined in this guide, you can quickly set up the L298N with your Arduino and begin experimenting with motor control.
Whether you’re working on a simple motor control project or building a more complex system, the L298N offers flexibility in terms of motor direction, speed, and control. With additional techniques such as PWM for speed regulation and sensor integration for feedback, you can create sophisticated systems tailored to your needs.
Remember, while the L298N is easy to use for basic applications, it can also be expanded for more advanced projects. From controlling multiple motors to integrating wireless control options, there’s no limit to what you can achieve. By mastering the basics and building on that knowledge, you’ll be well-equipped to take your Arduino motor control projects to the next level.
For more in-depth information and tutorials on Arduino motor control, you can always refer to the Arduino Motor Control Documentation and Instructables: Arduino DC Motor Control, which provide detailed insights into the intricacies of motor driver setups. With these resources at your fingertips, you’re ready to tackle any motor control challenge!.