
Table of Contents
Introduction
The ESP8266 is a powerful microcontroller with built-in Wi-Fi capabilities, making it ideal for IoT projects. When paired with the BME280 sensor, which measures temperature, humidity, and pressure, it becomes a versatile tool for environmental monitoring. This guide will walk you through integrating the ESP8266 with the BME280 using the Arduino IDE.
Understanding the Components
ESP8266 Microcontroller
The ESP8266 is a low-cost Wi-Fi microchip with full TCP/IP stack and microcontroller capability. It’s widely used in IoT applications due to its:
- Built-in Wi-Fi
- Low power consumption
- Compatibility with the Arduino IDE
Common variants include the NodeMCU and Wemos D1 Mini.
BME280 Sensor
The BME280 is a sensor developed by Bosch that measures:
- Temperature: -40°C to +85°C
- Humidity: 0% to 100%
- Pressure: 300 hPa to 1100 hPa
It communicates via I2C or SPI protocols, making it flexible for various applications.
Setting Up the Arduino IDE for ESP8266
Installing the ESP8266 Board Package
- Open the Arduino IDE.
- Navigate to
File>Preferences. - In the “Additional Board Manager URLs” field, add: bashCopyEdit
http://arduino.esp8266.com/stable/package_esp8266com_index.json - Go to
Tools>Board>Boards Manager. - Search for “ESP8266” and install the latest version.
Installing Required Libraries
To interface with the BME280, install the following libraries:
- Adafruit BME280 Library
- Adafruit Unified Sensor Library
In the Arduino IDE, go to Sketch > Include Library > Manage Libraries, then search and install the libraries mentioned above.
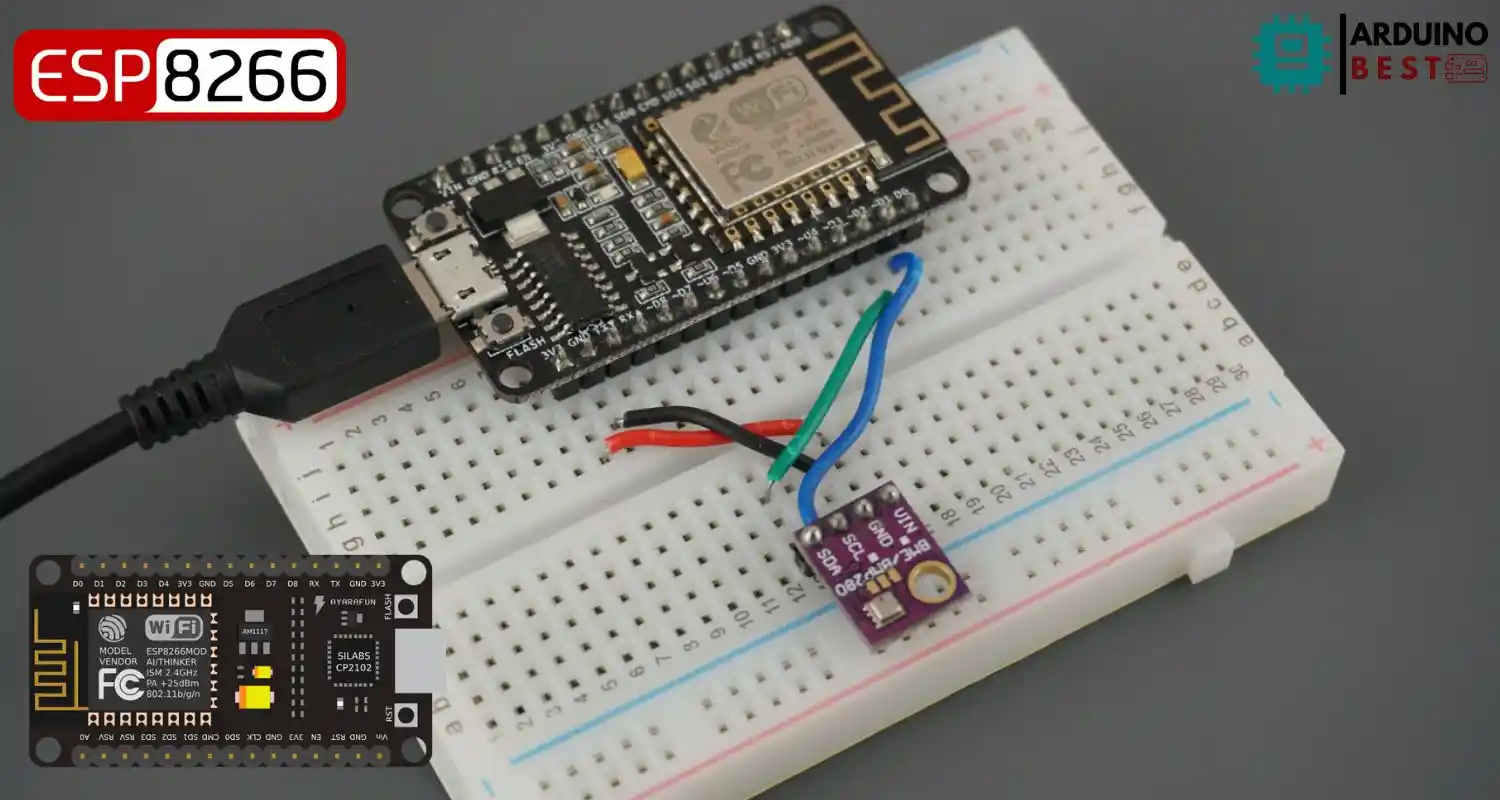
Wiring the BME280 to ESP8266

I2C Connection
For I2C communication:
- Connect BME280 SDA to ESP8266 D2 (GPIO4)
- Connect BME280 SCL to ESP8266 D1 (GPIO5)
- Connect BME280 VCC to ESP8266 3.3V
- Connect BME280 GND to ESP8266 GND
Ensure that your BME280 module operates at 3.3V to match the ESP8266 voltage levels.
Writing the Arduino Sketch
Initializing the Sensor
Begin by including the necessary libraries and initializing the sensor:
#include <Wire.h>
#include <Adafruit_Sensor.h>
#include <Adafruit_BME280.h>

Adafruit_BME280 bme;

void setup() {
  Serial.begin(115200);
  if (!bme.begin(0x76)) {
    Serial.println("Could not find a valid BME280 sensor, check wiring!");
    while (1);
  }
}
Reading Sensor Data
In the loop() function, read and display the sensor data:
void loop() {
  Serial.print("Temperature = ");
  Serial.print(bme.readTemperature());
  Serial.println(" *C");

  Serial.print("Pressure = ");
  Serial.print(bme.readPressure() / 100.0F);
  Serial.println(" hPa");

  Serial.print("Humidity = ");
  Serial.print(bme.readHumidity());
  Serial.println(" %");

  delay(2000);
}
Creating a Web Server to Display Readings
Setting Up Wi-Fi Connection
Connect the ESP8266 to your Wi-Fi network:
#include <ESP8266WiFi.h>

const char* ssid = "your_SSID";
const char* password = "your_PASSWORD";

void setup() {
  WiFi.begin(ssid, password);
  while (WiFi.status() != WL_CONNECTED) {
    delay(500);
  }
}
Building the Web Server
Create a simple web server to display the sensor readings:
#include <Wire.h>
#include <Adafruit_Sensor.h>
#include <Adafruit_BME280.h>

/*#include <SPI.h>
#define BME_SCK 14
#define BME_MISO 12
#define BME_MOSI 13
#define BME_CS 15*/

#define SEALEVELPRESSURE_HPA (1013.25)

Adafruit_BME280 bme; // I2C
//Adafruit_BME280 bme(BME_CS); // hardware SPI
//Adafruit_BME280 bme(BME_CS, BME_MOSI, BME_MISO, BME_SCK); // software SPI

unsigned long delayTime;

void setup() {
  Serial.begin(9600);
  Serial.println(F("BME280 test"));

  bool status;

  // default settings
  // (you can also pass in a Wire library object like &Wire2)
  status = bme.begin(0x76);
  if (!status) {
    Serial.println("Could not find a valid BME280 sensor, check wiring!");
    while (1);
  }

  Serial.println("-- Default Test --");
  delayTime = 1000;

  Serial.println();
}

void loop() {
  printValues();
  delay(delayTime);
}

void printValues() {
  Serial.print("Temperature = ");
  Serial.print(bme.readTemperature());
  Serial.println(" *C");

  // Convert temperature to Fahrenheit
  /*Serial.print("Temperature = ");
  Serial.print(1.8 * bme.readTemperature() + 32);
  Serial.println(" *F");*/

  Serial.print("Pressure = ");
  Serial.print(bme.readPressure() / 100.0F);
  Serial.println(" hPa");

  Serial.print("Approx. Altitude = ");
  Serial.print(bme.readAltitude(SEALEVELPRESSURE_HPA));
  Serial.println(" m");

  Serial.print("Humidity = ");
  Serial.print(bme.readHumidity());
  Serial.println(" %");

  Serial.println();
}
This setup allows you to access the sensor readings via a web browser on the same network.
Troubleshooting Common Issues
Sensor Not Detected
If you encounter the error “Could not find a valid BME280 sensor, check wiring!”, consider the following:
- Verify all wiring connections.
- Ensure the sensor is powered with 3.3V.
- Use an I2C scanner sketch to confirm the sensor’s address.
For more detailed troubleshooting, refer to this guide: SOLVED: Could not find a valid BME280 sensor.
Incorrect Readings
- Ensure the sensor is not exposed to extreme conditions.
- Check for any loose connections.
- Confirm that the correct I2C address is used in the code (commonly 0x76 or 0x77).
Expanding the Project
Data Logging
To log data over time:
- Store readings on an SD card.
- Send data to cloud services like ThingSpeak or Google Sheets using IFTTT.
An example of logging data to Google Sheets can be found here: Low Power Weather Station Datalogger using ESP8266.
Integrating with Other Sensors
Enhance your project by adding:
- Light sensors
- Rain sensors
- Wind speed sensors
This integration allows for a comprehensive weather monitoring system.
Power Optimization
For battery-powered setups:
- Implement deep sleep modes to conserve energy.
- Reduce the frequency of data readings and transmissions.
FAQs
Q: How do I find the I2C address of my BME280 sensor?
A: Use an I2C scanner sketch to detect connected devices. The common addresses are 0x76 and 0x77.
Q: Why am I getting ‘NaN’ or incorrect readings?
A: Ensure proper wiring and power supply. Also, verify that the sensor is functioning correctly.
Q: Can I use multiple BME280 sensors with one ESP8266?
A: Yes, by assigning different I2C addresses or using SPI communication.
Q: How accurate are the BME280 sensor readings?
A: Temperature: ±1.0°C,
Conclusion
Integrating the ESP8266 with the BME280 sensor using the Arduino IDE is a straightforward and highly practical project for anyone interested in environmental monitoring or IoT applications. With just a few components, you can reliably measure temperature, humidity, and atmospheric pressure, and even display this data through a local web server or log it to the cloud.
This setup is ideal for building custom weather stations, smart home systems, or remote monitoring solutions. Thanks to the flexibility of the ESP8266, you can also scale this project by adding more sensors, optimizing power consumption, or integrating with platforms like ThingSpeak or IFTTT.
Whether you’re a beginner or an experienced developer, this project offers a great balance of simplicity, functionality, and expandability—making it a must-try for anyone working with Arduino and IoT.
Projects ESP8266 nodemcu
1- ESP8266 NodeMCU: A Comprehensive Guide to IoT Development
2- Control LED with ESP8266 NodeMCU: A Beginner’s Guide
3- Integrating a Joystick with ESP8266 NodeMCU: A Comprehensive Guide
4- esp8266 nodemcu with Flame Sensor
5- ESP8266 NodeMCU with Heartbeat Sensor
6- ESP8266 NodeMCU with KY-027 Magic Cup Light
7- ESP8266 NodeMCU with Hall Magnetic Sensor
8- ESP8266 NodeMCU with relay module 5v
9- ESP8266 NodeMCU with Linear Hall Sensor