
Table of Contents
Introduction to IoT-Based Attendance Systems
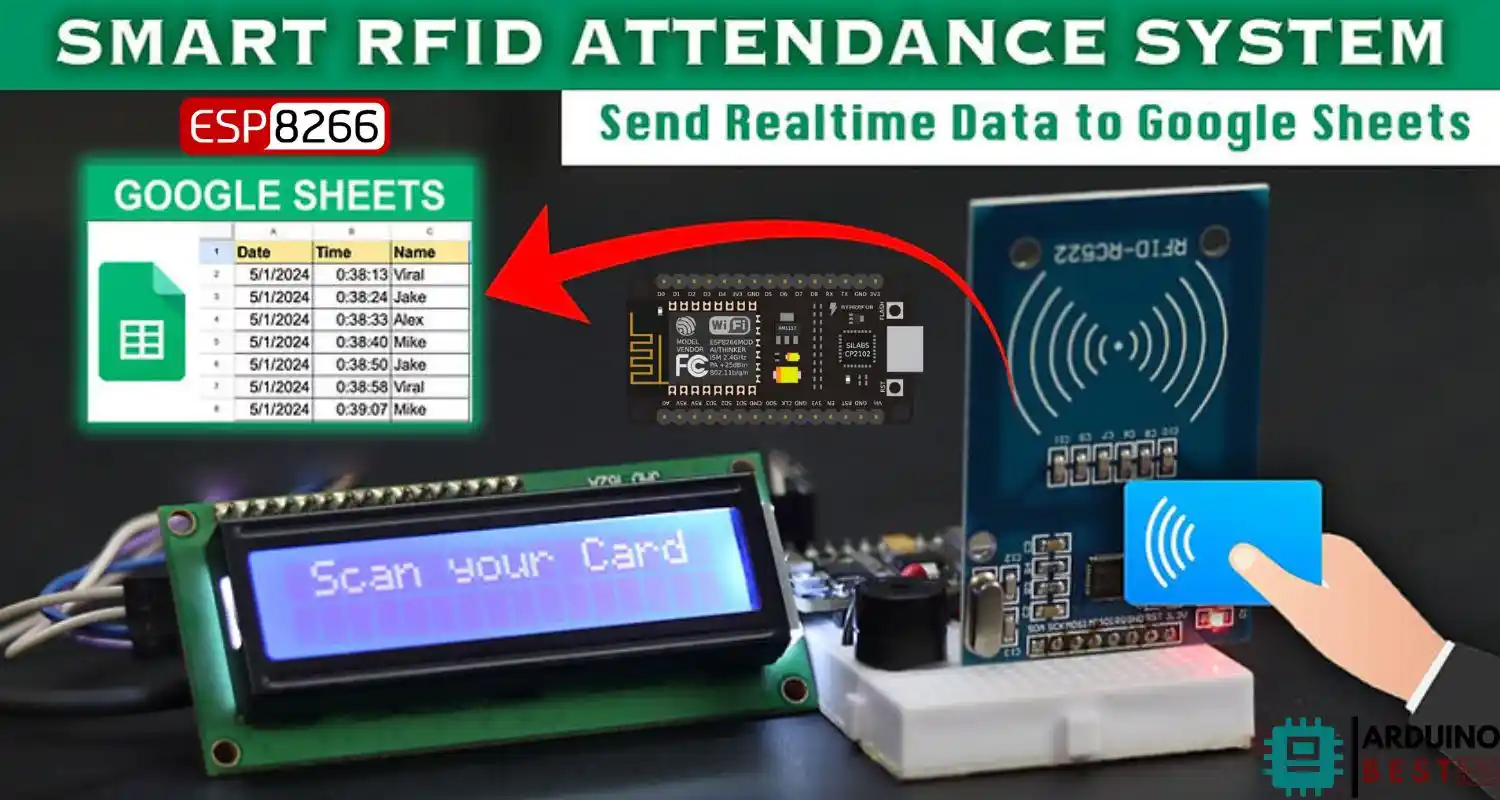
The rise of IoT-based attendance systems is transforming how organizations track attendance. Unlike traditional manual registers or biometric systems, these solutions offer real-time access, automation, and accuracy. With components like the ESP8266 microcontroller and RFID technology, businesses and institutions can now implement smart, cloud-connected systems.
The shift toward systems that integrate Google Sheets allows for seamless, live data logging and easy access from any location. The combination of ESP8266 and RFID offers a powerful, low-cost solution for managing attendance data efficiently.
Understanding the Core Components
- ESP8266 NodeMCU: A compact microcontroller with built-in Wi-Fi, ideal for IoT applications.
- RFID Technology: Uses electromagnetic fields to identify and track tags attached to objects. Popular modules include MFRC522.
- Google Sheets Integration: Provides a real-time, collaborative platform for storing and analyzing attendance records.
You can explore Adafruit’s ESP8266 Overview for more details on this microcontroller’s capabilities.
To understand how Google Sheets enables real-time data collection, Google Apps Script documentation offers a great starting point for automating data flow from devices.
Required Hardware and Software
Hardware:
- ESP8266 NodeMCU board
- RFID reader module (e.g., MFRC522)
- RFID tags/cards
- Breadboard and jumper wires
- Optional: LCD display, buzzer
Software:
- Arduino IDE
- ESP8266 and RFID libraries
- Google Apps Script (for Sheets integration)
Setting Up the Hardware
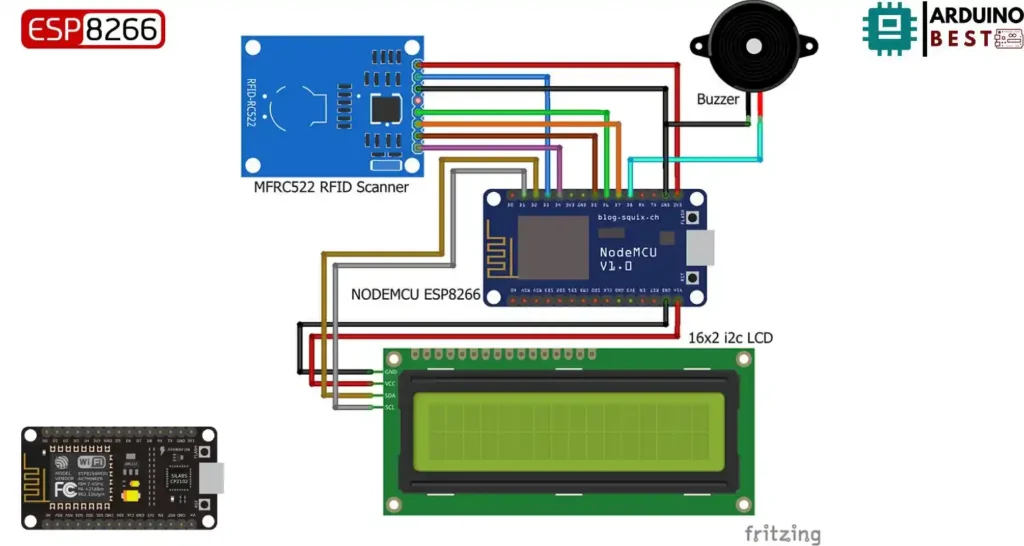
- Connect the RFID module to the ESP8266 using SPI pins
- Power the ESP8266 with a stable 3.3V supply
- Optionally, connect a buzzer or LCD for audio/visual feedback
- Test connections via the serial monitor in Arduino IDE
Programming the ESP8266
- Install the ESP8266 board package in Arduino IDE
- Include necessary libraries:
MFRC522.h,ESP8266WiFi.h,WiFiClient.h - Connect to Wi-Fi and read tag data from the RFID module
- Send scanned data as an HTTP POST to the deployed Google Apps Script URL
#include <SPI.h>
#include <MFRC522.h>
#include <Arduino.h>
#include <ESP8266WiFi.h>
#include <ESP8266HTTPClient.h>
#include <WiFiClient.h>
#include <WiFiClientSecureBearSSL.h>
#include <LiquidCrystal_I2C.h>
//-----------------------------------------
#define RST_PIN D3
#define SS_PIN D4
#define BUZZER D8
//-----------------------------------------
MFRC522 mfrc522(SS_PIN, RST_PIN);
MFRC522::MIFARE_Key key;
MFRC522::StatusCode status;
//-----------------------------------------
/* Be aware of Sector Trailer Blocks */
int blockNum = 2;
/* Create another array to read data from Block */
/* Legthn of buffer should be 2 Bytes more than the size of Block (16 Bytes) */
byte bufferLen = 18;
byte readBlockData[18];
//-----------------------------------------
String card_holder_name;
const String sheet_url = "Enter Google Script URL"; //Enter Google Script URL
//-----------------------------------------
// Fingerprint for demo URL, expires on Monday, May 2, 2022 7:20:58 AM, needs to be updated well before this date
//const uint8_t fingerprint[20] = {0x9a, 0x87, 0x9b, 0x82, 0xe9, 0x19, 0x7e, 0x63, 0x8a, 0xdb, 0x67, 0xed, 0xa7, 0x09, 0xd9, 0x2f, 0x30, 0xde, 0xe7, 0x3c};
//9a 87 9b 82 e9 19 7e 63 8a db 67 ed a7 09 d9 2f 30 de e7 3c
//-----------------------------------------
#define WIFI_SSID "XXXXXX" //Enter WiFi Name
#define WIFI_PASSWORD "XXXXXX" //Enter WiFi Password
//-----------------------------------------
//Initialize the LCD display
LiquidCrystal_I2C lcd(0x3F, 16, 2); //Change LCD Address to 0x27 if 0x3F doesnt work
/****************************************************************************************************
* setup() function
****************************************************************************************************/
void setup()
{
//--------------------------------------------------
/* Initialize serial communications with the PC */
Serial.begin(9600);
//Serial.setDebugOutput(true);
lcd.begin();
lcd.backlight();
lcd.clear();
lcd.setCursor(0, 0);
lcd.print(" Initializing ");
for (int a = 5; a <= 10; a++) {
lcd.setCursor(a, 1);
lcd.print(".");
delay(500);
}
//--------------------------------------------------
//WiFi Connectivity
Serial.println();
Serial.print("Connecting to AP");
WiFi.begin(WIFI_SSID, WIFI_PASSWORD);
while (WiFi.status() != WL_CONNECTED){
Serial.print(".");
delay(200);
}
Serial.println("");
Serial.println("WiFi connected.");
Serial.println("IP address: ");
Serial.println(WiFi.localIP());
Serial.println();
//--------------------------------------------------
/* Set BUZZER as OUTPUT */
pinMode(BUZZER, OUTPUT);
//--------------------------------------------------
/* Initialize SPI bus */
SPI.begin();
//--------------------------------------------------
}
/****************************************************************************************************
* loop() function
****************************************************************************************************/
void loop()
{
//--------------------------------------------------
lcd.clear();
lcd.setCursor(0, 0);
lcd.print(" Scan your Card ");
/* Initialize MFRC522 Module */
mfrc522.PCD_Init();
/* Look for new cards */
/* Reset the loop if no new card is present on RC522 Reader */
if ( ! mfrc522.PICC_IsNewCardPresent()) {return;}
/* Select one of the cards */
if ( ! mfrc522.PICC_ReadCardSerial()) {return;}
/* Read data from the same block */
//--------------------------------------------------
Serial.println();
Serial.println(F("Reading last data from RFID..."));
ReadDataFromBlock(blockNum, readBlockData);
/* If you want to print the full memory dump, uncomment the next line */
//mfrc522.PICC_DumpToSerial(&(mfrc522.uid));
/* Print the data read from block */
Serial.println();
Serial.print(F("Last data in RFID:"));
Serial.print(blockNum);
Serial.print(F(" --> "));
for (int j=0 ; j<16 ; j++)
{
Serial.write(readBlockData[j]);
lcd.clear();
lcd.setCursor(0, 0);
lcd.print("Hey " + String((char*)readBlockData) + "!");
//lcd.print(String((char*)readBlockData));
//lcd.print("!")
}
Serial.println();
//--------------------------------------------------
digitalWrite(BUZZER, HIGH);
delay(200);
digitalWrite(BUZZER, LOW);
delay(200);
digitalWrite(BUZZER, HIGH);
delay(200);
digitalWrite(BUZZER, LOW);
//--------------------------------------------------
//MMMMMMMMMMMMMMMMMMMMMMMMMMMMMMMMMMMMMMMMMMMMMMMMMMMMMMMMMMMMMMMMMMMMMMMMMMMMMMMMMMMMMMMMMMMMMMM
if (WiFi.status() == WL_CONNECTED) {
//-------------------------------------------------------------------------------
std::unique_ptr<BearSSL::WiFiClientSecure>client(new BearSSL::WiFiClientSecure);
//-------------------------------------------------------------------------------
//client->setFingerprint(fingerprint);
// Or, if you want to ignore the SSL certificate
//then use the following line instead:
client->setInsecure();
//-----------------------------------------------------------------
card_holder_name = sheet_url + String((char*)readBlockData);
card_holder_name.trim();
Serial.println(card_holder_name);
//-----------------------------------------------------------------
HTTPClient https;
Serial.print(F("[HTTPS] begin...\n"));
//-----------------------------------------------------------------
//NNNNNNNNNNNNNNNNNNNNNNNNNNNNNNNNNNNNNNNNNNNNNNNNNNNNNNNNNNNNNNNNNNNNNNNNNNNNNNNNNNNNNNNNN
if (https.begin(*client, (String)card_holder_name)){
//-----------------------------------------------------------------
// HTTP
Serial.print(F("[HTTPS] GET...\n"));
// start connection and send HTTP header
int httpCode = https.GET();
//-----------------------------------------------------------------
// httpCode will be negative on error
if (httpCode > 0) {
// HTTP header has been send and Server response header has been handled
Serial.printf("[HTTPS] GET... code: %d\n", httpCode);
// file found at server
lcd.setCursor(0, 1);
lcd.print(" Data Recorded ");
delay(2000);
}
//-----------------------------------------------------------------
else
{Serial.printf("[HTTPS] GET... failed, error: %s\n", https.errorToString(httpCode).c_str());}
//-----------------------------------------------------------------
https.end();
delay(1000);
}
//NNNNNNNNNNNNNNNNNNNNNNNNNNNNNNNNNNNNNNNNNNNNNNNNNNNNNNNNNNNNNNNNNNNNNNNNNNNNNNNNNNNNNNNNN
else {
Serial.printf("[HTTPS} Unable to connect\n");
}
//NNNNNNNNNNNNNNNNNNNNNNNNNNNNNNNNNNNNNNNNNNNNNNNNNNNNNNNNNNNNNNNNNNNNNNNNNNNNNNNNNNNNNNNNN
}
//MMMMMMMMMMMMMMMMMMMMMMMMMMMMMMMMMMMMMMMMMMMMMMMMMMMMMMMMMMMMMMMMMMMMMMMMMMMMMMMMMMMMMMMMMMMMMMM
}
/****************************************************************************************************
* ReadDataFromBlock() function
****************************************************************************************************/
void ReadDataFromBlock(int blockNum, byte readBlockData[])
{
//----------------------------------------------------------------------------
/* Prepare the ksy for authentication */
/* All keys are set to FFFFFFFFFFFFh at chip delivery from the factory */
for (byte i = 0; i < 6; i++) {
key.keyByte[i] = 0xFF;
}
//----------------------------------------------------------------------------
/* Authenticating the desired data block for Read access using Key A */
status = mfrc522.PCD_Authenticate(MFRC522::PICC_CMD_MF_AUTH_KEY_A, blockNum, &key, &(mfrc522.uid));
//----------------------------------------------------------------------------s
if (status != MFRC522::STATUS_OK){
Serial.print("Authentication failed for Read: ");
Serial.println(mfrc522.GetStatusCodeName(status));
return;
}
//----------------------------------------------------------------------------
else {
Serial.println("Authentication success");
}
//----------------------------------------------------------------------------
/* Reading data from the Block */
status = mfrc522.MIFARE_Read(blockNum, readBlockData, &bufferLen);
if (status != MFRC522::STATUS_OK) {
Serial.print("Reading failed: ");
Serial.println(mfrc522.GetStatusCodeName(status));
return;
}
//----------------------------------------------------------------------------
else {
Serial.println("Block was read successfully");
}
//----------------------------------------------------------------------------
}
Integrating with Google Sheets
- Create a Google Sheet and label columns (e.g., Timestamp, ID, Name)
- Use Apps Script to handle POST requests and append data
- Deploy script as a web app and set access to “Anyone, even anonymous”
- In your Arduino code, send RFID data using
WiFiClientand HTTP POST format
Enhancing the System
- Map tag IDs to names in code or a database
- Track entry and exit times with logic based on tag scan history
- Use services like IFTTT or Twilio to send email/SMS alerts for specific events
Troubleshooting and Best Practices
- Check all wiring connections if the RFID reader is unresponsive
- Ensure ESP8266 has strong Wi-Fi signal
- Review serial monitor for error logs
- Confirm Google Script permissions and deployment URL
FAQs – People Also Ask
How does an ESP8266 RFID attendance system work? It reads tag data using RFID, connects via Wi-Fi using ESP8266, and logs to Google Sheets using a web app.
Can I use different RFID modules? Yes, modules like PN532 or RC522 are commonly used, provided they support SPI or I2C interfaces.
Is offline attendance logging possible? Yes, data can be logged to EEPROM or SD card and synced later.
Is the data stored in Google Sheets secure? With proper access permissions and HTTPS, it is reasonably secure for general use.
Can this system support multiple users at once? Yes, multiple scans can be handled in rapid succession depending on code optimization.
What is the effective range of RFID readers? Typically 2-5 cm for low-frequency modules like MFRC522.
How do I protect attendance data from unauthorized access? Restrict Google Sheets and web app access, and use secure connections (HTTPS).
Can I link this system to Firebase or ThingSpeak? Yes, with minor code changes, it can send data to other cloud platforms.
Conclusion
Building an ESP8266 RFID attendance system with Google Sheets offers a scalable, affordable, and efficient solution for automating attendance tracking. With just a few components and cloud integration, you can create a powerful system that logs data in real time and improves administrative workflows.