
Table of Contents
Monitoring environmental conditions like temperature and humidity is crucial in various applications, from smart homes to agricultural systems. One of the most cost-effective and reliable ways to achieve this is by using the ESP8266 Nodemcu with temperature and humidity sensor dht11. This guide will walk you through everything you need to know to build your own IoT temperature and humidity monitoring system.
Understanding the Components
ESP8266 NodeMCU
The ESP8266 NodeMCU is a powerful, low-cost microcontroller with built-in Wi-Fi, perfect for Internet of Things (IoT) projects. Key features include:
- Integrated Wi-Fi module
- GPIO, PWM, I2C, and ADC functionality
- USB-to-serial built-in
This makes it an ideal platform for real-time data acquisition and remote monitoring.
DHT11 Sensor
The DHT11 is a digital sensor that can measure temperature and humidity. It’s easy to interface and comes with three pins: VCC, GND, and Data.
- Temperature range: 0 to 50 °C
- Humidity range: 20% to 90% RH
- Sampling rate: 1Hz (one reading per second)
For a more advanced comparison, you can check out this DHT11 Sensor Interfacing Guide.
Setting Up the Hardware
Required Components
- ESP8266 NodeMCU
- DHT11 sensor
- Breadboard and jumper wires
- USB cable
Wiring the Circuit
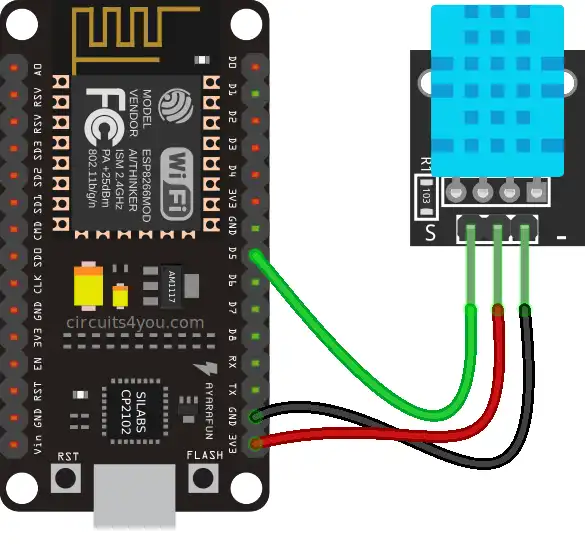
- DHT11 VCC to 3.3V on NodeMCU
- DHT11 GND to GND on NodeMCU
- DHT11 Data to D5 (GPIO2) on NodeMCU
Make sure to double-check your wiring to avoid errors.
Configuring the Software Environment
Installing Arduino IDE
Download and install the Arduino IDE from the official website. Then:
- Go to Preferences and add
http://arduino.esp8266.com/stable/package_esp8266com_index.jsonto the Additional Board Manager URLs. - Open the Boards Manager and install the ESP8266 board package.
To get a complete tutorial on setting up the web interface, check this ESP8266 Web Server Tutorial.
Installing Libraries
You’ll need:
- DHT sensor library
- Adafruit Unified Sensor library
Both can be installed from the Library Manager.
Writing and Uploading Code
Below is a basic sketch to get started:
#include "DHTesp.h"

#define DHTpin 14    //D5 of NodeMCU is GPIO14

DHTesp dht;

void setup()
{
  Serial.begin(115200);
  Serial.println();
  Serial.println("Status\tHumidity (%)\tTemperature (C)\t(F)\tHeatIndex (C)\t(F)");

  // Autodetect is not working reliable, don't use the following line
  // dht.setup(17);

  // use this instead:
  dht.setup(DHTpin, DHTesp::DHT11); //for DHT11 Connect DHT sensor to GPIO 17
  //dht.setup(DHTpin, DHTesp::DHT22); //for DHT22 Connect DHT sensor to GPIO 17
}

void loop()
{
  delay(dht.getMinimumSamplingPeriod());

  float humidity = dht.getHumidity();
  float temperature = dht.getTemperature();

  Serial.print(dht.getStatusString());
  Serial.print("\t");
  Serial.print(humidity, 1);
  Serial.print("\t\t");
  Serial.print(temperature, 1);
  Serial.print("\t\t");
  Serial.print(dht.toFahrenheit(temperature), 1);
  Serial.print("\t\t");
  Serial.print(dht.computeHeatIndex(temperature, humidity, false), 1);
  Serial.print("\t\t");
  Serial.println(dht.computeHeatIndex(dht.toFahrenheit(temperature), humidity, true), 1);
}
Reading and Displaying Sensor Data
Using the Serial Monitor
Upload the code and open the Serial Monitor to view:
- Humidity in percentage
- Temperature in Celsius
Optional: Displaying on OLED
You can use a 0.96-inch OLED display to visualize data in real time.
- Connect SDA to D1, SCL to D2
- Modify code using the Adafruit SSD1306 library
Creating a Web Server for Remote Monitoring
Setting Up Wi-Fi
Modify your code to connect the NodeMCU to your Wi-Fi network:
WiFi.begin("yourSSID", "yourPASSWORD");
while (WiFi.status() != WL_CONNECTED) {
  delay(1000);
}
Building the Web Server
- Serve a basic HTML page displaying temperature and humidity
- Auto-refresh the data every few seconds using JavaScript
Enhancing the Interface
Add CSS for better visuals and implement JavaScript for live updates.
Expanding the Project
Data Logging
- Store data on an SD card or
- Send it to the cloud (e.g., ThingSpeak)
Alerts and Notifications
- Set thresholds
- Use services like IFTTT for email/SMS alerts
Home Automation Integration
- Use MQTT protocol
- Compatible with Home Assistant and other smart home platforms
Troubleshooting and Best Practices
- Ensure stable power supply
- Place the sensor away from heat/humidity sources
- Use pull-up resistor on Data pin if needed
FAQs
What is the maximum distance between DHT11 and NodeMCU?
Usually under 20 meters, with signal degradation after 10 meters without amplification.
Can DHT11 measure negative temperatures?
No, DHT11 supports only 0°C and above.
How to calibrate the DHT11 sensor?
The DHT11 cannot be manually calibrated; use software-based correction if needed.
Why am I getting ‘NaN’ readings?
Check sensor wiring and library compatibility.
Can I use multiple DHT11 sensors with one NodeMCU?
Yes, but you’ll need to assign unique GPIOs and create separate instances in code.
Conclusion
The ESP8266 NodeMCU paired with a DHT11 temperature and humidity sensor is an ideal starting point for anyone venturing into the world of IoT and smart environmental monitoring. This powerful yet affordable combination allows you to create a fully functional system capable of capturing real-time data, displaying it on a web server, and even logging or sharing it to cloud platforms.
Through this project, you not only gain hands-on experience with hardware wiring and microcontroller programming, but you also learn how to integrate sensors into meaningful applications. The project can be completed with minimal components, making it suitable for students, hobbyists, and tech enthusiasts alike.
Moreover, this setup is highly extendable—allowing you to scale your project into a larger home automation or smart farming system by integrating more sensors, displays, and cloud services like ThingSpeak or IFTTT. From basic data display to automated alerts and cloud integration, the possibilities are wide open.
Whether you’re a beginner in electronics or exploring the practical uses of the ESP8266 and DHT11 sensor, this project offers a clear, guided path into IoT development—and lays the groundwork for more advanced innovations.
Projects ESP8266 nodemcu :
1- ESP8266 NodeMCU: A Comprehensive Guide to IoT Development
2- Control LED with ESP8266 NodeMCU: A Beginner’s Guide
3- Integrating a Joystick with ESP8266 NodeMCU: A Comprehensive Guide
4- esp8266 nodemcu with Flame Sensor
5- ESP8266 NodeMCU with Heartbeat Sensor
6- ESP8266 NodeMCU with KY-027 Magic Cup Light
7- ESP8266 NodeMCU with Hall Magnetic Sensor
8- ESP8266 NodeMCU with relay module 5v
9- ESP8266 NodeMCU with Linear Hall Sensor