
Table of Contents
ESP8266 Nodemcu with laser emitter module has become a go-to microcontroller board for DIY and IoT enthusiasts due to its built-in Wi-Fi capabilities, low cost, and ease of programming. Pairing it with a laser emitter module, such as the KY-008, opens up a wide range of creative and practical applications—from building a laser tripwire alarm to developing interactive devices.
In this comprehensive guide, you’ll learn everything you need to know about using the ESP8266 NodeMCU with a laser emitter module, including setup, coding, use cases, and best practices. If you’re new to ESP8266, check out this NodeMCU pinout guide to understand how its GPIO pins work. For more details on the laser emitter module, refer to the KY-008 Laser Module datasheet.
Understanding the Components
ESP8266 NodeMCU Overview
The NodeMCU is a development board featuring the ESP8266 microcontroller. It’s widely used in Wi-Fi-enabled IoT projects. Key features include:
- Built-in Wi-Fi with TCP/IP stack
- 11 digital GPIO pins
- Operates on 3.3V logic
- Supports Arduino IDE, MicroPython, and NodeMCU Lua
You can program the board easily via USB using the Arduino IDE. Learn how to set it up with this ESP8266 Arduino IDE guide.
Laser Emitter Module (KY-008)
The KY-008 is a commonly used laser module for Arduino and microcontroller projects. It emits a red laser beam with the following specifications:
- Operating voltage: 3V–5V
- Output wavelength: 650 nm
- Output power: <5mW
- Pin configuration: GND, VCC, and Signal (S)
Safety Tip: Even though the power output is low, avoid shining the laser directly into eyes or reflective surfaces. Always handle the module with care.
Setting Up the Hardware
To get started with the ESP8266 NodeMCU and KY-008 laser module, you’ll need the following components:
- 1 x ESP8266 NodeMCU board
- 1 x KY-008 laser emitter module
- Jumper wires
- Breadboard
- Optional: resistor (220Ω–330Ω) for added safety
Wiring Instructions
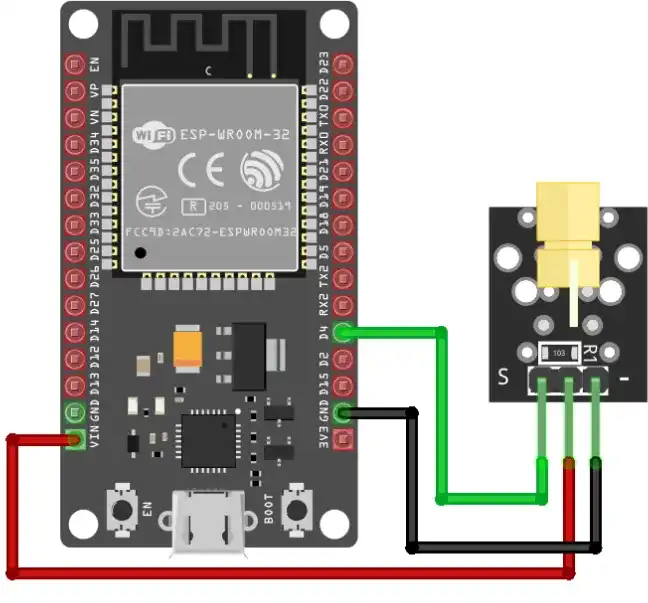
Connect the laser module to the NodeMCU as follows:
- VCC → 3.3V on NodeMCU
- GND → GND on NodeMCU
- Signal (S) → GPIO D1 (GPIO5)
Use a breadboard for easy prototyping. Optionally, place a resistor between the GPIO and signal pin for protection. Ensure all connections are secure to prevent power fluctuations.
Programming the ESP8266
Once the hardware is set up, you’ll need to write code to control the laser module.
Installing ESP8266 in Arduino IDE
If you haven’t already installed ESP8266 support in your Arduino IDE:
- Go to File > Preferences
- Enter the following URL in the “Additional Board Manager URLs”:
http://arduino.esp8266.com/stable/package_esp8266com_index.json - Open Boards Manager and install esp8266 by ESP8266 Community
Sample Code
cppCopyEdit#define LASER_PIN D1

void setup() {
  pinMode(LASER_PIN, OUTPUT);
}

void loop() {
  digitalWrite(LASER_PIN, HIGH);  // Turn laser ON
  delay(1000);                    // Keep ON for 1 second
  digitalWrite(LASER_PIN, LOW);   // Turn laser OFF
  delay(1000);                    // Keep OFF for 1 second
}
Code Explanation
LASER_PINdefines which GPIO pin the laser is connected to.setup()sets the pin as output.loop()toggles the laser on and off every second.
Uploading the Code
- Connect your NodeMCU via USB.
- Choose the correct board and port in the Arduino IDE.
- Upload the code.
- The laser should blink once per second if everything is correct.
Practical Applications
Laser Tripwire Security System
One of the most popular uses of this setup is creating a laser-based security system. Here’s how it works:
- The laser is aimed at a photoresistor (LDR) connected to another GPIO pin.
- When someone interrupts the beam, the LDR’s resistance changes, triggering an alert.
Steps:
- Align the laser to shine directly onto the LDR.
- Use analog or digital read to detect the interruption.
- Activate a buzzer or send a notification when the beam is broken.
Remote-Controlled Laser Pointer
Control the laser’s direction and power using your smartphone. This is done by:
- Attaching the laser to servo motors for directional control.
- Connecting the system to Blynk or another IoT platform.
You can follow this Blynk ESP8266 tutorial to integrate app-based controls.
Applications:
- Pet entertainment toys
- Presentation aids
- Remote alignment systems
Advanced Integrations
Wi-Fi Control and Remote Monitoring
Since the ESP8266 supports Wi-Fi, you can expand its functionality with remote control features:
- Turn the laser on/off via web servers or REST APIs.
- Use MQTT for lightweight messaging with platforms like Home Assistant.
Notifications and Automation
Integrate with services like IFTTT or Zapier to automate tasks:
- Send an email or SMS when the laser beam is interrupted.
- Log beam breaks to a spreadsheet or Google Sheet.
Data Logging with ThingSpeak
For more advanced data handling, connect your NodeMCU to ThingSpeak:
- Create visualizations for beam interruptions.
- Track timestamped logs.
- Analyze patterns over time.
Troubleshooting and Best Practices
Common Issues and Fixes
- Laser not powering on: Check VCC connection and ensure it’s 3.3V.
- Laser flickers: May be due to unstable power or loose connections.
- Upload errors: Press the “Flash” button on NodeMCU during upload.
Voltage and Current Considerations
- Do not exceed the voltage limit of the laser module (usually 5V).
- Use resistors to protect both the ESP8266 and laser.
Safety Precautions
- Never look directly into the laser.
- Avoid pointing it at people, animals, or reflective surfaces.
- Keep out of reach of children.
FAQs
Can I control the laser module remotely?
Yes, you can control it via a web server or IoT app like Blynk using the NodeMCU’s Wi-Fi capabilities.
What is the maximum range of the laser beam?
Typical KY-008 laser modules can go up to 100 meters in a dark environment, though the effective range for detection is shorter.
Is it safe to use laser modules in DIY projects?
When used responsibly, low-power laser modules like KY-008 are safe. Always follow basic safety guidelines.
How can I power the ESP8266 and laser module simultaneously?
You can use a USB power bank, lithium battery (with proper regulation), or an external 5V/3.3V power adapter.
Can I integrate multiple sensors with the ESP8266?
Yes. The ESP8266 has several GPIO pins available. You can add sensors like LDRs, motion detectors, or temperature sensors depending on your project.
Conclusion
Pairing an ESP8266 NodeMCU with a laser emitter module provides a flexible and accessible entry point into the world of IoT projects and DIY electronics. Whether you’re a hobbyist, student, or developer, this setup offers a wide range of practical applications—from blinking laser indicators to advanced laser-based security systems and remote-controlled devices.
The NodeMCU brings built-in Wi-Fi, multiple GPIO pins, and compatibility with platforms like Arduino IDE, making it ideal for wireless control and automation. Meanwhile, the KY-008 laser module adds a focused, visible light source that can be used for detection systems, signaling, or even interactive designs. With just a few components and simple code, you can begin building projects that respond to real-world input, log data online, or integrate with services like ThingSpeak or IFTTT.
This combination is not only cost-effective but also endlessly scalable. As you gain experience, you can add additional sensors, incorporate mobile apps for control, or expand your system into a complete smart home network. Whether you’re building for fun, learning, or prototyping real-world solutions, the ESP8266 with a laser emitter module is a perfect foundation for creativity and innovation. Keep experimenting—your next great project starts here.
Projects ESP8266 nodemcu :
1- ESP8266 NodeMCU: A Comprehensive Guide to IoT Development
2- Control LED with ESP8266 NodeMCU: A Beginner’s Guide
3- Integrating a Joystick with ESP8266 NodeMCU: A Comprehensive Guide
4- esp8266 nodemcu with Flame Sensor
5- ESP8266 NodeMCU with Heartbeat Sensor
6- ESP8266 NodeMCU with KY-027 Magic Cup Light
7- ESP8266 NodeMCU with Hall Magnetic Sensor
8- ESP8266 NodeMCU with relay module 5v
9- ESP8266 NodeMCU with Linear Hall Sensor