
Table of Contents
Using the ESP8266 Nodemcu with KY-038 Sound Sensor is a great way to integrate basic sound detection into your IoT projects. Whether you’re building a simple clap switch or a full-fledged noise monitoring system, this combination is cost-effective, beginner-friendly, and highly flexible.
This guide will walk you through understanding the components, wiring them up, writing code, and even building real-world applications. If you’re just starting out, this setup is perfect for learning about sound detection in microcontroller-based systems.
For more background on how sound sensors work, check out this KY-038 Sensor with Arduino Tutorial. If you’re looking to build a smart decibel meter, this IoT Decibel Meter project using the ESP8266 is an excellent reference.
Understanding the ESP8266 NodeMCU and KY-038 Sound Sensor
ESP8266 NodeMCU Overview
The ESP8266 NodeMCU is a Wi-Fi-enabled microcontroller that supports programming via the Arduino IDE. It’s widely used for Internet of Things applications due to its connectivity, GPIO support, and affordability.
Key features:
- Built-in Wi-Fi module
- Multiple digital and analog pins
- USB interface for programming
- Open-source firmware
KY-038 Sound Sensor Overview
The KY-038 Sound Sensor detects sound intensity using a condenser microphone and outputs signals via two pins: analog (AO) and digital (DO). It includes:
- A microphone
- An LM393 voltage comparator
- A potentiometer to adjust sensitivity
- Two output modes (digital and analog)
Required Components
- ESP8266 NodeMCU board
- KY-038 Sound Sensor module
- Breadboard and jumper wires
- USB cable for programming
- Optional: LED for output testing
Wiring the KY-038 to ESP8266
Use the following connections to interface the KY-038 with NodeMCU:
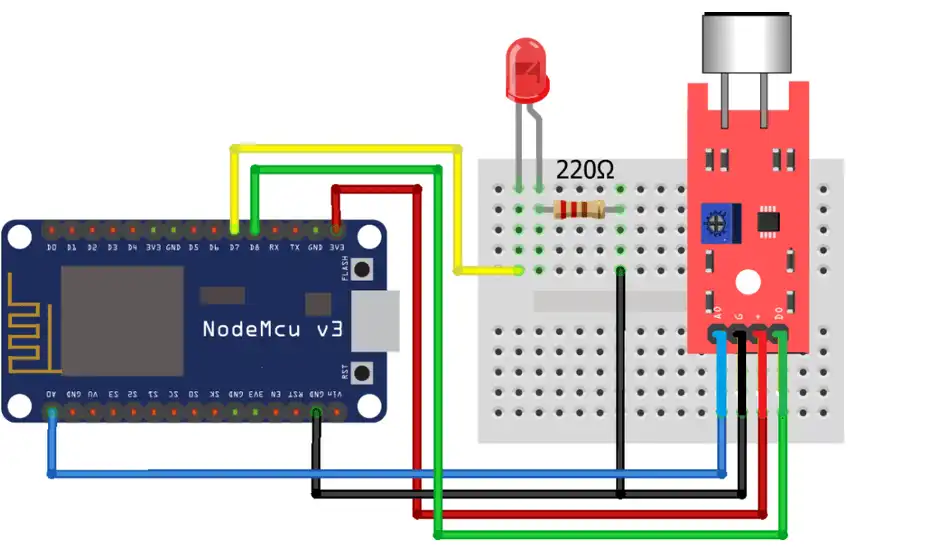
- VCC → 3.3V on ESP8266
- GND → GND on ESP8266
- DO → Digital GPIO (e.g., D5)
- AO → Analog pin A0 (optional)
Adjust the sensor’s potentiometer to modify the sound threshold. Turning it clockwise increases sensitivity.
Setting Up the Arduino IDE for ESP8266
To program the ESP8266, first set up the Arduino IDE:
- Open Preferences and add this board URL:
http://arduino.esp8266.com/stable/package_esp8266com_index.json - Go to Boards Manager, install ESP8266 by ESP8266 Community
- Select NodeMCU 1.0 (ESP-12E Module) as the target board
- Choose the correct COM port from Tools > Port
Coding the ESP8266 for Sound Detection
Using the Digital Output (DO)
This code reads the digital signal when sound exceeds the threshold:
#include "Timer.h"

Timer t;

int led_pin = D7;
int D0_Value = D8;
int raw_Value = A0;

int LED_State = 0;
int clap_counter = 0;
int Set_point = 120; //This is the value obtained from step 2

void setup(){
  Serial.begin(9600);
  pinMode(D0_Value, OUTPUT); // Set pin D8 as digital output
  pinMode(raw_Value, INPUT); //Set pin A0 as an input

  t.every(2000, Reset_Clap_counter);
 //Programed to call the function to reset clap counter every 2 seconds

}

void loop(){
  int val_digital = digitalRead(D0_Value);
  int val_analog = analogRead(raw_Value );


//This is optional. No need to show the values again
  Serial.print(val_analog);
  Serial.print("\t");
  Serial.println(val_digital);

  digitalWrite (led_pin, LED_State); //Variable LED_State commands the state of the LED

//Remember that the counter is running. After 2 second it will reset the Clap_counter
//So the claps must be done rapidly

  if(val_analog > Set_point){
    clap_counter ++;

      if (clap_counter == 2){
        LED_State = !LED_State;
        }
  }
//------------------------------------------------------------------------------------
//This setpoint came from the adjustment of the potenciometer.
//Can be interpreted like a sound limiar. Ths is optional and it is
//just a way for us to use this functionality

  if (val_digital){
    Serial.print("The room is very noisy");
    delay(500);
    }
}

//Function to reset counter every 2 second
void Reset_Clap_counter()
{
  clap_counter = 0;
}
Using the Analog Output (AO)
For precise sound intensity readings:
cppCopyEditconst int analogPin = A0;

void setup() {
  Serial.begin(9600);
}

void loop() {
  int soundValue = analogRead(analogPin);
  Serial.println(soundValue);
  delay(100);
}
Clap Switch Implementation
To create a clap-controlled LED:
- Monitor the digital output
- Use
millis()for debouncing - Toggle the LED based on timed claps
This allows you to control devices using sound as an input trigger.
Real-World Applications
IoT Sound Level Monitoring
Measure and upload sound data to cloud platforms like ThingSpeak:
- Read analog output
- Convert to decibel estimates
- Use Wi-Fi capabilities to send data
Smart Lighting Control
Turn on lights with a clap:
- Single clap → ON
- Double clap → OFF
This can be expanded using relays to control AC-powered devices.
Sound-Based Security System
Detect unexpected noise when you’re away:
- Use sound triggers to activate alarms
- Integrate with email or SMS alerts
- Combine with motion sensors for better accuracy
Troubleshooting Common Issues
Sensor Not Detecting Sound
- Ensure you’re using the 3.3V output (not 5V)
- Check wiring and GPIO pin mapping
- Confirm board and port selections in the IDE
Unstable or Inaccurate Readings
- Reduce electrical or environmental noise
- Use analog values and apply software filtering
- Recalibrate the potentiometer on the KY-038
Limited Sensitivity
- Adjust the potentiometer for higher sensitivity
- Replace KY-038 with a higher-quality module like the MAX4466
Frequently Asked Questions
How do I connect the KY-038 to ESP8266?
Connect VCC to 3.3V, GND to GND, DO to a digital pin, and AO to the analog pin.
What is the difference between DO and AO?
DO provides a binary signal when the sound exceeds a threshold. AO gives real-time analog sound intensity levels.
How do I adjust the KY-038 sensitivity?
Turn the onboard potentiometer to increase or decrease the detection threshold.
Why is my KY-038 always reading HIGH or LOW?
The potentiometer might be too tightly adjusted. Try setting it to a more neutral midpoint.
Can this sensor recognize specific words or commands?
No, the KY-038 only detects sound intensity. Use voice recognition modules for that purpose.
Is the KY-038 compatible with Arduino and ESP32?
Yes, it works with multiple microcontrollers, including Arduino UNO, Nano, Mega, and ESP32.
Conclusion
The ESP8266 NodeMCU combined with the KY-038 Sound Sensor offers a highly accessible and budget-friendly introduction to sound-based IoT applications. Whether you’re building a simple clap switch, a noise-triggered alarm, or a smart home feature, this sensor module provides a reliable way to detect sound and respond in real-time.
One of the key advantages of this setup is its flexibility. You can easily scale your project to include cloud data logging, smartphone control, or integration with platforms like ThingSpeak, Blynk, or Home Assistant. By using just a few components and basic Arduino code, you can create interactive systems that respond to sound input, monitor environmental noise, or even trigger automation sequences.
This makes the ESP8266 and KY-038 ideal for students, beginners, and hobbyists looking to experiment with microcontrollers and sensors. Plus, with built-in Wi-Fi, the ESP8266 is a solid foundation for any wireless project.
If you’re interested in extending this project with the ESP32, connecting it to cloud dashboards like ThingsBoard, or building mobile app control with Blynk, feel free to reach out for custom code and tutorials.
Start simple, and build smart—the possibilities are wide open.
Projects ESP8266 nodemcu :
1- ESP8266 NodeMCU: A Comprehensive Guide to IoT Development
2- Control LED with ESP8266 NodeMCU: A Beginner’s Guide
3- Integrating a Joystick with ESP8266 NodeMCU: A Comprehensive Guide
4- esp8266 nodemcu with Flame Sensor
5- ESP8266 NodeMCU with Heartbeat Sensor
6- ESP8266 NodeMCU with KY-027 Magic Cup Light
7- ESP8266 NodeMCU with Hall Magnetic Sensor
8- ESP8266 NodeMCU with relay module 5v
9- ESP8266 NodeMCU with Linear Hall Sensor