
Table of Contents
In today’s rapidly evolving health-tech landscape, real-time health monitoring is no longer a luxury—it’s a necessity. From fitness tracking to remote patient care, DIY electronics have empowered developers and hobbyists to create innovative health monitoring systems. Among the popular options, integrating an ESP8266 NodeMCU with Heartbeat Sensor offers an affordable, effective, and scalable solution for continuous heart rate tracking.
What is ESP8266 NodeMCU?
The ESP8266 NodeMCU is an open-source firmware and development board designed for IoT applications. Its low cost, built-in Wi-Fi, and support for the Arduino IDE make it an ideal choice for wireless sensor-based systems.
Key features include:
- Built-in Wi-Fi module
- GPIO pins for multiple sensor integrations
- Low power consumption
- Compatibility with Arduino libraries
Its versatility has made it the backbone of many IoT health devices, including heart monitoring projects.
Introduction to Heartbeat Sensors
Heartbeat sensors detect the pulse rate using either optical or electrical techniques. Commonly used sensors in DIY projects are:
- Pulse Sensor (Photoplethysmography – PPG): Uses light to measure changes in blood volume.
- MAX30100/MAX30102: Advanced sensors that detect heart rate and SpO2.
These sensors output analog signals corresponding to the pulse, which can be read and processed by microcontrollers like the ESP8266.
For a step-by-step tutorial on this setup, check out this NodeMCU heartbeat sensor tutorial for additional context and wiring diagrams.
Required Components
To build a heartbeat monitoring system using ESP8266 NodeMCU, you’ll need:
- ESP8266 NodeMCU development board
- Pulse Sensor or MAX30102 Heart Rate Sensor
- Jumper wires
- Breadboard
- USB cable for programming
- Arduino IDE (for programming)
You can also explore variations like the DIY MAX30102 Heart Health Monitor for more advanced capabilities.
Circuit Design and Connections
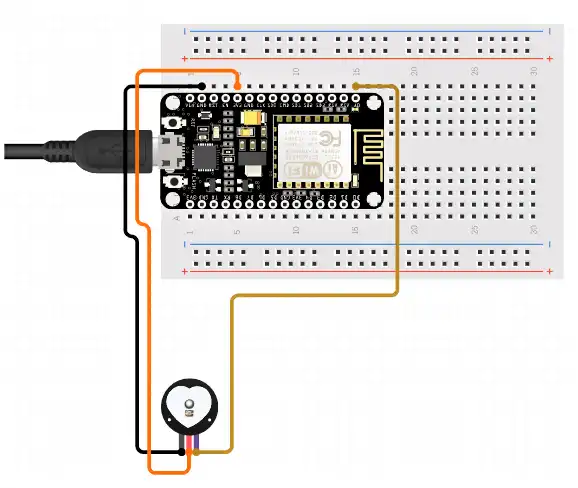
The connections between the ESP8266 and the sensor are straightforward:
- VCC of sensor to 3.3V of NodeMCU
- GND of sensor to GND of NodeMCU
- Signal/Data pin to A0 (analog pin)
Tips:
- Ensure tight connections to avoid noise in the readings
- Use resistors if voltage regulation is necessary
- Shield cables in noisy environments for stable signals
Programming the ESP8266 NodeMCU
You’ll need to prepare your Arduino IDE:
- Install the ESP8266 board package via Board Manager
- Install required libraries (e.g.,
PulseSensor Playground,Adafruit Sensor,ThingSpeak, etc.) - Connect NodeMCU via USB and select the correct COM port
Sample Code Overview
#include <PulseSensorPlayground.h>

const int PulsePin = A0;
PulseSensorPlayground pulseSensor;

void setup() {
  Serial.begin(9600);
  pulseSensor.analogInput(PulsePin);
  pulseSensor.begin();
}

void loop() {
  int myBPM = pulseSensor.getBeatsPerMinute();
  if (pulseSensor.sawStartOfBeat()) {
    Serial.println("Heartbeat detected!");
    Serial.print("BPM: ");
    Serial.println(myBPM);
  }
  delay(20);
}
Data Visualization
You can monitor real-time heart rate data via:
- Serial Monitor (built into Arduino IDE)
- OLED Display (connected to NodeMCU for portable display)
- Processing IDE for visual graphs
Optional Enhancement:
- Add an LED to blink with each detected pulse
- Include a buzzer alarm for abnormal heart rates
IoT and Cloud Integration
Thanks to the NodeMCU’s Wi-Fi capability, heart rate data can be pushed to the cloud for remote access.
- Use platforms like ThingSpeak to visualize and store data
- Connect to Wi-Fi using
WiFi.h - Send HTTP POST/GET requests to update cloud dashboards
You can follow this comprehensive IoT heartbeat monitoring system guide for exact cloud integration steps.
Applications
ESP8266 heartbeat sensor systems are used in:
- Fitness trackers
- Home care monitoring
- Remote hospital telemetry
- DIY wearable tech
Common Issues and Troubleshooting
- No signal detected: Check wiring and sensor placement
- Fluctuating readings: Use filters or average out BPM
- Connection issues: Ensure strong Wi-Fi signal
Future Enhancements
- Add SpO2, temperature, or ECG sensors
- Use battery-powered enclosures for portability
- Connect to mobile apps using MQTT or Blynk
FAQs
How accurate is this system?
The accuracy depends on the sensor and code. PPG sensors like Pulse Sensor are decently accurate for hobby projects.
Can this monitor continuously?
Yes, as long as power is maintained and Wi-Fi remains connected.
What is the range of NodeMCU Wi-Fi?
Typically 30-50 meters indoors, depending on obstructions.
Is my health data secure?
It can be, if encrypted protocols (like HTTPS or MQTT over TLS) are used.
Can I use it legally for medical purposes?
DIY systems are not certified for medical diagnostics. Use for educational or prototyping purposes only.
Conclusion
Integrating an ESP8266 NodeMCU with a heartbeat sensor is an excellent entry point into the world of DIY health monitoring and IoT projects. This setup not only provides a hands-on experience with electronics and coding, but also enables real-time tracking of vital signs like heart rate—an increasingly important metric in today’s wellness-focused world.
With its built-in Wi-Fi, the NodeMCU allows for easy cloud connectivity, enabling data visualization and logging from anywhere. Paired with sensors like the Pulse Sensor or MAX30102, the system can be scaled and customized to suit various health applications, from fitness trackers to remote patient monitoring.
Moreover, this project encourages a deeper understanding of how modern health devices work under the hood. By expanding on this setup, users can add features like SpO₂ detection, temperature sensors, or mobile integration using platforms like Blynk or MQTT.
Whether you’re a student, maker, or healthcare innovator, building a heart rate monitor with ESP8266 NodeMCU opens doors to countless possibilities in IoT healthcare. It’s a budget-friendly, educational, and practical project with real-world relevance—making it a must-try for anyone interested in modern health tech.
Projects ESP8266 nodemcu :
1- ESP8266 NodeMCU: A Comprehensive Guide to IoT Development
2- Control LED with ESP8266 NodeMCU: A Beginner’s Guide
3- Integrating a Joystick with ESP8266 NodeMCU: A Comprehensive Guide