
Table of Contents
The ESP8266 NodeMCU is a popular microcontroller among IoT developers, known for its built-in Wi-Fi and ease of use. Pairing it with a DS1307 Real Time Clock (RTC) module allows you to add accurate timekeeping to your projects, even when the power is off. This guide will walk you through everything you need to know—from wiring and coding to advanced features and troubleshooting—about integrating the DS1307 RTC with your ESP8266 NodeMCU.
Introduction to Real-Time Clocks and the DS1307 Module
In microcontroller projects, keeping track of the actual time is crucial for tasks like data logging, alarms, and scheduled operations. While the ESP8266 can track time temporarily, it loses the correct time during resets or power loss. That’s where an external RTC module like the DS1307 comes in.
The DS1307 maintains time with the help of a small coin-cell battery, which keeps it running even when your main system is powered off. It’s a cost-effective and widely supported module that communicates using the I2C protocol, making it an excellent choice for use with the ESP8266.
For more technical details, consult the DS1307 Datasheet. Also, ensure you are familiar with the I2C Communication Protocol Overview, as the DS1307 uses this protocol to interface with the ESP8266.
Understanding the DS1307 RTC Module
The DS1307 is an 8-pin integrated circuit that provides real-time clock/calendar functionality. It counts seconds, minutes, hours, days, date, month, and year.
Key features:
- I2C communication interface
- Timekeeping range from 2000 to 2099
- Leap year compensation
- 56 bytes of non-volatile RAM
- Operates with a 3V coin-cell battery
- Optional square-wave output
Pin configuration:
- VCC: +5V (can also work with 3.3V)
- GND: Ground
- SDA: Data line for I2C
- SCL: Clock line for I2C
- SQW/OUT: Square wave output (optional)
- Battery holder for backup
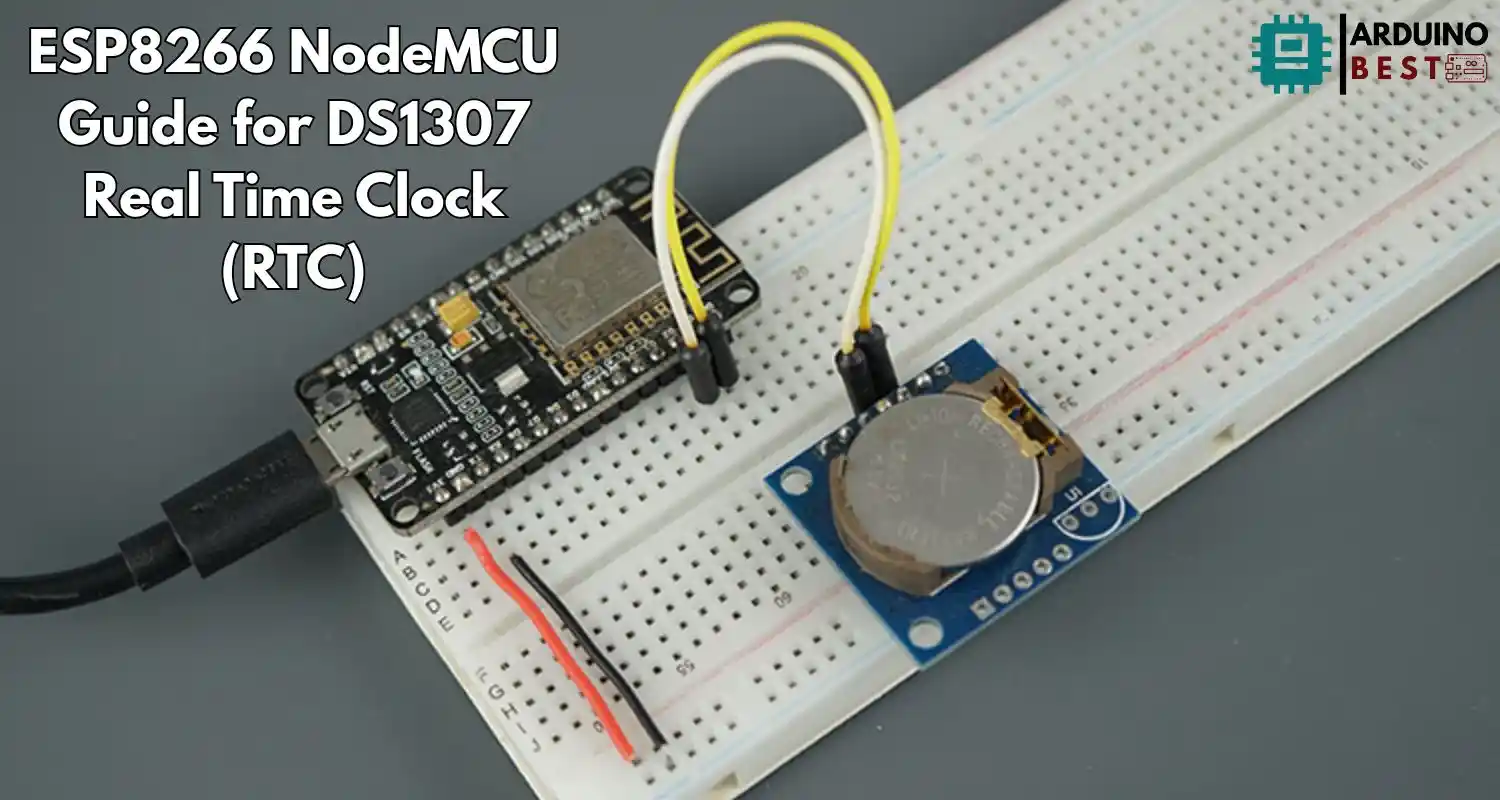
Wiring ESP8266 NodeMCU with DS1307
The ESP8266 NodeMCU has default I2C pins:
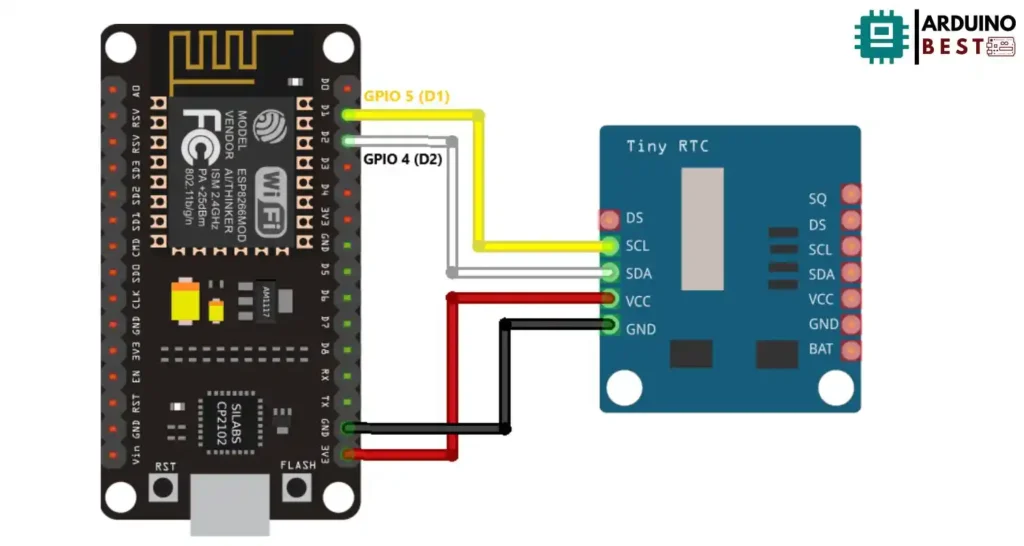
- SDA: GPIO4 (D2)
- SCL: GPIO5 (D1)
Wiring connections:
- DS1307 VCC → NodeMCU 3.3V
- DS1307 GND → NodeMCU GND
- DS1307 SDA → NodeMCU D2 (GPIO4)
- DS1307 SCL → NodeMCU D1 (GPIO5)
Tips for stable connection:
- Use short, shielded wires to reduce noise.
- Add 4.7kΩ pull-up resistors on SDA and SCL if the module doesn’t include them.
- Ensure the coin-cell battery is properly inserted to keep time during power loss.
Setting Up the Arduino IDE
To program the ESP8266 for DS1307 integration, you’ll need to set up your development environment.
Steps:
- Install the Arduino IDE.
- Go to Preferences and add the ESP8266 board URL: bashCopyEdit
http://arduino.esp8266.com/stable/package_esp8266com_index.json - Install the board package: Tools > Board > Boards Manager > Install ESP8266 by ESP8266 Community
- Install the RTClib library using the Library Manager or download it from RTClib Library by Adafruit.
Programming the DS1307 with ESP8266
With the wiring and IDE setup ready, you can start coding.
Code overview:
- Include the necessary libraries: cppCopyEdit
#include <Wire.h> #include "RTClib.h" RTC_DS1307 rtc; - Initialize the RTC in
setup(): cppCopyEditif (!rtc.begin()) { Serial.println("Couldn't find RTC"); while (1); } if (!rtc.isrunning()) { rtc.adjust(DateTime(F(__DATE__), F(__TIME__))); } - Read the time and display it: cppCopyEdit
DateTime now = rtc.now(); Serial.print(now.hour()); Serial.print(':'); Serial.print(now.minute()); Serial.print(':'); Serial.println(now.second());
Additional tips:
- Set the time only once or use a button to trigger setting it.
- Use the
rtc.adjust()function for manual time setting.
Displaying Time with an OLED
To visually display the time, you can add an OLED screen, such as the SSD1306.
Wiring:
- OLED VCC → 3.3V
- OLED GND → GND
- OLED SDA → D2 (GPIO4)
- OLED SCL → D1 (GPIO5)
Code snippets using the Adafruit SSD1306 library:
#include <ESP8266WiFi.h>
#include <time.h>
#include <RTClib.h>

// Enter your Wi-Fi credentials
const char* ssid = "REPLACE_WITH_YOUR_SSID";
const char* password = "REPLACE_WITH_YOUR_PASSWORD";

// NTP server details
const char* ntpServer = "pool.ntp.org";
const long gmtOffset_sec = 0;  // Offset for GMT in seconds
const int daylightOffset_sec = 3600;  // Daylight savings time in seconds

// RTC object (for DS1307 or DS3231)
RTC_DS1307 rtc;  // Change to RTC_DS1307 for DS1307 module

char daysOfTheWeek[7][12] = {"Sunday", "Monday", "Tuesday", "Wednesday", "Thursday", "Friday", "Saturday"};

// Global timeinfo struct and last sync timestamp
struct tm timeinfo;
unsigned long lastSyncMillis = 0;  // Last sync time in milliseconds

void setup() {
  Serial.begin(115200);
  initWiFi();

  // Initialize RTC
  if (!rtc.begin()) {
    Serial.println("Couldn't find RTC");
    while (1);
  }

  // Sync the RTC at startup
  syncTime();
}

void loop() {
  checkTimeAndSync();  // Check if 1 hour has passed and sync if necessary

  // Get current time from RTC
  DateTime now = rtc.now();

  // Getting each time field in individual variables
  String yearStr = String(now.year(), DEC);
  String monthStr = (now.month() < 10 ? "0" : "") + String(now.month(), DEC);
  String dayStr = (now.day() < 10 ? "0" : "") + String(now.day(), DEC);
  String hourStr = (now.hour() < 10 ? "0" : "") + String(now.hour(), DEC);
  String minuteStr = (now.minute() < 10 ? "0" : "") + String(now.minute(), DEC);
  String secondStr = (now.second() < 10 ? "0" : "") + String(now.second(), DEC);
  String dayOfWeek = daysOfTheWeek[now.dayOfTheWeek()];

  // Complete time string
  String formattedTime = dayOfWeek + ", " + yearStr + "-" + monthStr + "-" + dayStr + " " + hourStr + ":" + minuteStr + ":" + secondStr;

  // Print the complete formatted time
  Serial.println(formattedTime);

  Serial.println();
  delay(10000);
}

void initWiFi() {
  WiFi.begin(ssid, password);  // Connect to WiFi
  while (WiFi.status() != WL_CONNECTED) {
    delay(500);
    Serial.print(".");
  }
  Serial.println("\nWiFi connected.");
}

void syncTime() {
  configTime(gmtOffset_sec, daylightOffset_sec, ntpServer);  // Configure time with NTP server
  if (!getLocalTime(&timeinfo)) {
    Serial.println("Failed to obtain time");
    return;
  }
  Serial.println("\nESP8266 Time synchronized with NTP server.");

  // Format the current time as a string
  char timeStr[64];
  strftime(timeStr, sizeof(timeStr), "%A, %B %d %Y %H:%M:%S", &timeinfo);
  Serial.print("Current time: ");
  Serial.println(timeStr);

  // Sync the RTC with the NTP time
  rtc.adjust(DateTime(timeinfo.tm_year + 1900, timeinfo.tm_mon + 1, timeinfo.tm_mday,
                      timeinfo.tm_hour, timeinfo.tm_min, timeinfo.tm_sec));

  lastSyncMillis = millis();  // Record the last sync time in milliseconds
}

void checkTimeAndSync() {
  // Check if 1 hour has passed since the last sync (1 hour = 3600000 milliseconds)
  if (millis() - lastSyncMillis >= 3600000) {
    Serial.println("Synchronizing time with NTP...");
    syncTime();
  }
}
For help on setting up your OLED, refer to the OLED Display Guide for Arduino.
Advanced Applications of DS1307
Beyond simple timekeeping, the DS1307 offers additional features.
Square-wave output:
- Use the SQW/OUT pin for periodic interrupts
- Configurable for 1Hz, 4kHz, 8kHz, or 32kHz output
EEPROM usage:
- Store user preferences or last-read sensor values using the 56 bytes of SRAM
- Use
Wire.beginTransmission(0x68)andWire.write()functions for access
Practical projects:
- Digital alarm clock
- Time-stamped data logger
- Scheduled automation system
Troubleshooting Common Issues
Problem: RTC not keeping time
- Check if the backup battery is properly inserted.
- Replace the battery if it’s older than 2 years.
Problem: No response from module
- Confirm the I2C address is correct (default: 0x68).
- Use the I2C Scanner sketch to verify communication.
Problem: Wrong time readings
- Ensure you’re not setting the time repeatedly in
loop(). - Use a static flag or button to control time-setting.
Frequently Asked Questions
How do I set the time on the DS1307?
Use the rtc.adjust(DateTime()) function in your setup().
Can the DS1307 work without a battery?
Yes, but it won’t retain the time during power-offs.
How accurate is the DS1307 RTC?
It has modest accuracy and can drift by several seconds per day.
What’s the difference between DS1307 and DS3231?
DS3231 is more accurate with built-in temperature compensation. The DS1307 is less expensive and widely used for simple projects.
How do I synchronize DS1307 with NTP servers?
You can fetch time from an NTP server and use rtc.adjust() to sync it.
Conclusion
The combination of ESP8266 NodeMCU and DS1307 RTC offers a versatile and robust solution for time-critical IoT applications. By integrating the DS1307, you can ensure that your projects maintain accurate timekeeping, even during power outages, making it ideal for applications like data logging, alarms, and automated systems. The flexibility of I2C communication simplifies wiring, while the compatibility with OLED displays adds an additional layer of functionality for real-time monitoring.
Furthermore, advanced features such as EEPROM storage and square-wave output open up possibilities for even more complex projects, allowing for time-based events and enhanced control systems. Whether you’re creating a simple clock or developing an intelligent automation system, the ESP8266 and DS1307 provide a reliable and cost-effective foundation.
As you continue experimenting and exploring the capabilities of the ESP8266 NodeMCU, take advantage of these features to create more advanced and sophisticated embedded systems. With the right tools and knowledge, you can build projects that are not only functional but also efficient and scalable. Keep pushing the boundaries of your creativity with time-based logic and IoT solutions.
Projects ESP8266 nodemcu
1- ESP8266 NodeMCU: A Comprehensive Guide to IoT Development
2- Control LED with ESP8266 NodeMCU: A Beginner’s Guide
3- Integrating a Joystick with ESP8266 NodeMCU: A Comprehensive Guide
4- esp8266 nodemcu with Flame Sensor
5- ESP8266 NodeMCU with Heartbeat Sensor
6- ESP8266 NodeMCU with KY-027 Magic Cup Light
7- ESP8266 NodeMCU with Hall Magnetic Sensor
8- ESP8266 NodeMCU with relay module 5v
9- ESP8266 NodeMCU with Linear Hall Sensor