
Table of Contents
Smart lighting has become a cornerstone of modern home automation, offering both aesthetics and convenience. Among DIY enthusiasts, creating a custom Alexa-compatible RGB smart bulb using the ESP8266 microcontroller is an increasingly popular project. This guide will walk you through everything you need to build your own Wi-Fi-enabled RGB bulb controlled by voice using Alexa.
Understanding the ESP8266 Microcontroller
The ESP8266 is a low-cost Wi-Fi microchip with full TCP/IP stack and microcontroller capabilities. It’s widely used in IoT applications due to its versatility, affordability, and community support.
- Features:
- Built-in Wi-Fi capability
- GPIO pins for peripheral connection
- Compatible with Arduino IDE
- Compact and energy-efficient
Compared to other microcontrollers like the ESP32, the ESP8266 is simpler and more than sufficient for controlling a single RGB LED bulb through Alexa.
Components You Need for Your Alexa-Compatible RGB Bulb
To get started with your DIY RGB smart bulb, gather the following components:
- ESP8266 NodeMCU board
- WS2812B addressable RGB LED (strip or bulb)
- Power supply (5V, capable of handling the LED load)
- Jumper wires, resistors, and a small breadboard or PCB
- Micro-USB cable for programming
- Arduino IDE with the correct board drivers
- Necessary libraries: Adafruit NeoPixel, fauxmoESP
You can follow a full tutorial from Random Nerd Tutorials to visualize component usage and circuit setup in greater detail.
Step-by-Step Guide to Building the ESP8266 Alexa RGB Smart Bulb
Follow this process to build and program your RGB bulb:
1. Assemble the Circuit
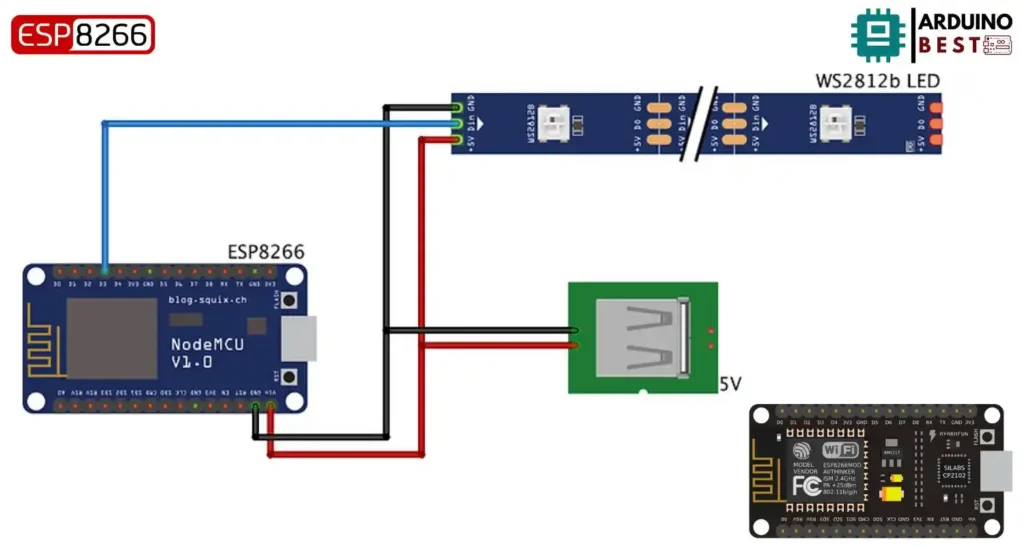
- Connect the ESP8266 to the WS2812B LED following the recommended pinout.
- Use a resistor (typically 330Ω) between the data pin and LED input.
- Add a capacitor (1000µF, 6.3V or higher) between power and ground near the LED to prevent startup issues.
2. Program the ESP8266
- Set up the Arduino IDE for ESP8266 development.
- Install the Adafruit NeoPixel and fauxmoESP libraries.
- Upload code to define color sequences and enable Alexa compatibility via WeMo emulation.
A helpful implementation is detailed in this guide by Adafruit, which explains how to simulate smart plugs for seamless Alexa integration.
3. Alexa Integration
- Use the Alexa app to discover devices.
- The fauxmoESP library makes your bulb appear as a WeMo device.
- Name your device for easy voice commands like:
- “Alexa, turn on the RGB bulb”
- “Alexa, set the bulb to blue”
Adding Features to Your DIY Smart Bulb
Expand the bulb’s capabilities by:
- Creating custom lighting scenes with predefined color presets.
- Adding support for dimming and smooth color transitions.
- Integrating with Home Assistant or OpenHAB for advanced automation.
- Setting timers and routines directly in the Alexa app.
Troubleshooting Common Issues
Even simple circuits can present challenges. Here’s how to fix common issues:
- Wi-Fi not connecting: Check your SSID and password in the code.
- Alexa doesn’t detect device: Ensure fauxmoESP is correctly implemented and the device isn’t already registered.
- LED flickering or wrong colors: Double-check power supply ratings and data connections.
Safety Tips and Best Practices
When dealing with electronics, always prioritize safety:
- Use heat shrink tubing or enclosures to avoid exposed wires.
- Don’t exceed the power limits of your power supply or microcontroller.
- Secure the LED and controller inside a non-flammable housing.
DIY vs. Commercial RGB Smart Bulbs
| Feature | DIY ESP8266 Bulb | Commercial Bulb |
|---|---|---|
| Cost | Low | Moderate |
| Customization | High | Limited |
| Setup Effort | Moderate-High | Low |
| Expandability | High | Moderate |
DIY projects offer more control and learning opportunities, but require time and some technical knowledge.
Future Upgrades and Enhancements
To evolve your smart lighting system:
- Replace the ESP8266 with an ESP32 for more performance.
- Add sensors like LDRs for ambient light control.
- Experiment with Google Assistant or IFTTT integrations.
Conclusion
Creating an ESP8266 Alexa RGB Smart Bulb is an accessible and rewarding project for any tech-savvy homeowner. It’s a great introduction to IoT, home automation, and voice-controlled devices. With the right tools, a bit of patience, and the tutorials linked above, you can bring custom smart lighting into your living space at a fraction of the retail cost.
Frequently Asked Questions
Can I use any RGB LED strip with the ESP8266?
No, you should use addressable RGB LEDs like the WS2812B for compatibility and individual LED control.
Do I need an Echo device to control the bulb?
Yes, either an Amazon Echo or the Alexa smartphone app is needed to issue voice commands.
How do I reset the ESP8266?
Press the onboard reset button, or re-flash the firmware using the Arduino IDE.
Can I control multiple bulbs?
Yes, by assigning unique device names and setting up separate GPIO pins, multiple bulbs can be individually controlled.
Can it work with other home automation platforms?
Yes, it can be integrated with platforms like Home Assistant, expanding its automation capabilities beyond Alexa.
Conclusion
Building your own ESP8266 Alexa RGB Smart Bulb is more than just a DIY project—it’s a step into the world of smart home automation and Internet of Things (IoT). With just a handful of affordable components and some open-source libraries, you can create a fully functional, voice-controlled RGB lighting solution tailored to your needs. Unlike commercial smart bulbs, this project offers full customization, greater flexibility, and a deeper understanding of how smart devices work behind the scenes.
You’ll gain hands-on experience with microcontroller programming, circuit design, and home assistant integration, all while crafting a practical tool you’ll use every day. Whether you’re new to electronics or a seasoned maker, the satisfaction of hearing “Alexa, turn on the light” and watching your custom RGB bulb respond is hard to beat.
This project isn’t just about saving money—it’s about empowerment through technology. With endless options to expand and enhance your setup, the journey doesn’t end with a single bulb. It’s the first step toward a smarter, more personalized home environment.
Projects ESP8266 nodemcu
1- ESP8266 NodeMCU: A Comprehensive Guide to IoT Development
2- Control LED with ESP8266 NodeMCU: A Beginner’s Guide
3- Integrating a Joystick with ESP8266 NodeMCU: A Comprehensive Guide
4- esp8266 nodemcu with Flame Sensor
5- ESP8266 NodeMCU with Heartbeat Sensor
6- ESP8266 NodeMCU with KY-027 Magic Cup Light
7- ESP8266 NodeMCU with Hall Magnetic Sensor
8- ESP8266 NodeMCU with relay module 5v
9- ESP8266 NodeMCU with Linear Hall Sensor