Table of Contents
Introduction
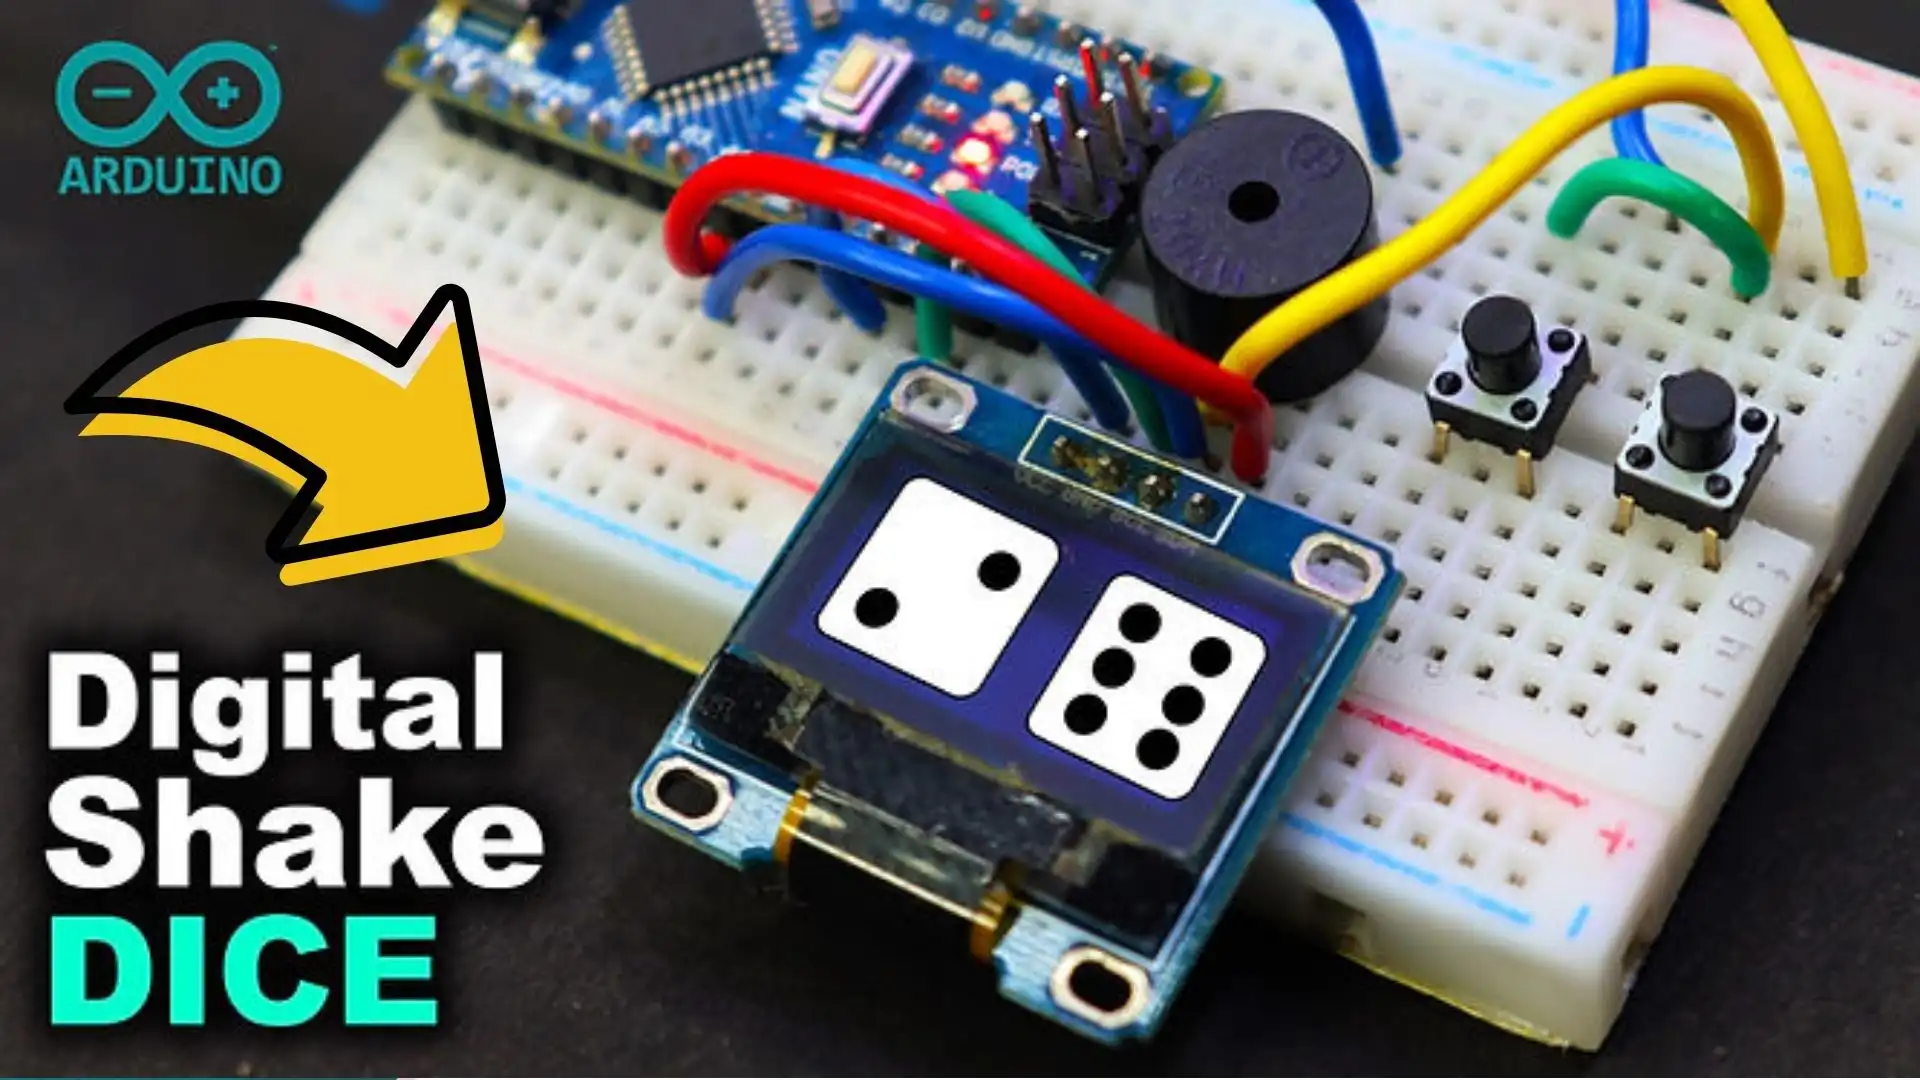
Creating an Arduino-powered digital dice that responds to shaking and displays results on an OLED screen is an exciting project that enhances both hardware and software skills. This interactive project combines an accelerometer, an OLED display, and an Arduino to generate random dice numbers based on motion detection.
Whether you’re a beginner learning about sensor integration or an experienced developer seeking a fun challenge, this project is a great way to explore Arduino programming and display technology. For a detailed guide on using OLED displays with Arduino, check out this tutorial.
Components Required
To build this project, you will need:
- Arduino Board (e.g., Arduino Uno, Arduino Nano)
- OLED Display (SSD1306) – For displaying the dice outcome
- Accelerometer (MPU6050 or ADXL335) – To detect shake motion
- Jumper wires – For circuit connections
- Breadboard – For easy prototyping
To understand how an MPU6050 accelerometer works with Arduino, refer to this accelerometer and gyroscope tutorial.
How It Works
- The accelerometer detects a shake motion.
- The Arduino processes the motion data.
- A random number between 1 and 6 is generated.
- The number is displayed on the OLED screen.
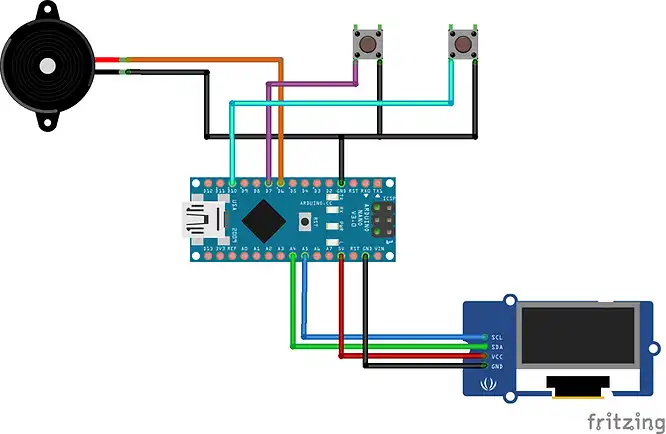
Circuit Diagram and Connections

Wiring Instructions
- OLED Display:
- VCC → 5V (or 3.3V, depending on the board)
- GND → GND
- SDA → A4 (on Arduino Uno)
- SCL → A5 (on Arduino Uno)
- Accelerometer (MPU6050):
- VCC → 3.3V
- GND → GND
- SDA → A4
- SCL → A5
Coding the Arduino Shake Dice
Required Libraries
Install the following libraries in the Arduino IDE:
Adafruit_GFX.hAdafruit_SSD1306.hWire.hMPU6050.h
Arduino Code
#include<U8g2lib.h>
#include <Wire.h>
#include<SPI.h>
#include <EEPROM.h>


U8G2_SSD1306_128X64_NONAME_2_HW_I2C oled(U8G2_R0, /*reset=*/ U8X8_PIN_NONE);
const byte BUTTON_PIN = 7;
const byte SELECT_PIN = 10;
const byte SHUTOFFPIN = 8;
const byte SOUND_PIN = 6;

unsigned long int time = millis();
const long int warningTime = 60000; //AutoShutoff time

byte startadress = 0; //EEPROM Startadress
const byte EEPROM_ID = 0x97;//to track valid data in EEPROM

byte rollMode = 1;
int dicenr1 = 1; // Dice random number 1
int dicenr2 = 1; //Dice random number 2
int dicenumber = 1; //Dice variable One or Two
boolean BUZZ = true;//Sound on


void setup(void) {
  //oled.setI2CAddress(0x3C * 2); //set display adress if needed (default 0x3C)
  oled.begin();

  ////////////////////Set POWER On Control////////////////
  pinMode(SHUTOFFPIN, OUTPUT);
  digitalWrite(SHUTOFFPIN, HIGH);
  ////////////////////////////////////////////////////////
  pinMode(SELECT_PIN, INPUT_PULLUP);
  pinMode(BUTTON_PIN, INPUT_PULLUP);
  pinMode(SOUND_PIN, OUTPUT);
  //Serial.begin(9600);


  randomSeed(analogRead(A0));
  ///////////////////////Check for valid data//////////////////
  byte id = EEPROM.read(startadress);
  if (id == EEPROM_ID) {
    dicenr1 = EEPROM.read(startadress + 1);
    dicenr2 = EEPROM.read(startadress + 2);
    dicenumber = EEPROM.read(startadress + 3);
    BUZZ = EEPROM.read(startadress + 4);
  } else {
    EEPROM.write(startadress, EEPROM_ID);
    EEPROM.write(startadress + 1, dicenr1);
    EEPROM.write(startadress + 2, dicenr2);
    EEPROM.write(startadress + 3, dicenumber);
    EEPROM.write(startadress + 4, BUZZ);
  }
  /////////////////////////////////////////////////////////////////
  Roll(); //Show last Dice before shutoff
  delay(1000);
}
void loop(void) {
  ///////////////Select one or Two Dice////////////

  if (digitalRead(SELECT_PIN) == LOW) {
    long SELECT_time = millis();
    while (digitalRead(SELECT_PIN) == LOW) {};
    if (millis() - SELECT_time < 1000) {
      dicenumber = (dicenumber % 2) + 1;
      if (BUZZ) {
        tone(SOUND_PIN, 500, 80);
        delay(200);
      }
    } else {
      tone(SOUND_PIN, 500, 80);
      BUZZ = ! BUZZ;
    }
  }

  /////////////check rollbutton//////////////////

  if (digitalRead(BUTTON_PIN) == LOW) {

    rollMode = 0;
    do {
      randomGenerator();
      Roll();
    }
    while (digitalRead(BUTTON_PIN) == LOW);
    slow();
    time = millis();
    rollMode = 2;
  }
  ///////////////////////////////////////////////

  Roll(); // Show Result

  Check_On_Time();
}

//////////////Check On Time and save data//////////////////
void Check_On_Time() {
  if (millis() - time > warningTime) {
    CleanScreen();
    Roll();
  }
  if (millis() - time > warningTime + 5000) {

    EEPROM.write(startadress + 1, dicenr1);
    EEPROM.write(startadress + 2, dicenr2);
    EEPROM.write(startadress + 3, dicenumber);
    EEPROM.write(startadress + 4, BUZZ);
    delay(50);
    digitalWrite(SHUTOFFPIN, LOW);
  }
}
///////////////////////////////////////////////////////////////

///////////////////Roll dice draw and display///////////////////
void Roll() {
  String number[25] = {"One", "Two", "Three", "Four", "Five", "Six"};

  int x;
  int x1;
  const int y = 2;
  oled.setFont(u8g_font_helvB10);

  oled.firstPage();
  do {
    if (rollMode == 1) {
      oled.drawStr(36, 64, "Last Roll");
    } else if (rollMode == 0) {
      oled.drawStr(36, 64, "Roll Dice");
    }

    switch (dicenumber) {

      case (1): //Two dice
        x = 76;

        oled.drawFrame(2 + x, y, 48, 48);
        if (dicenr1 == 1) {
          oled.drawDisc(26 + x, 24 + y, 4); //Center
          x1 = 13;
        } else if (dicenr1 == 2) {
          oled.drawDisc(12 + x, 10 + y, 4); //upper L
          oled.drawDisc(40 + x, 38 + y, 4); //lower R
          x1 = 14;

        } else if (dicenr1 == 3) {
          oled.drawDisc(26 + x, 24 + y, 4); //Center
          oled.drawDisc(12 + x, 10 + y, 4); //upper L
          oled.drawDisc(40 + x, 38 + y, 4); //lower R
          x1 = 7;

        } else if (dicenr1 == 4) {
          oled.drawDisc(12 + x, 10 + y, 4); //upper L
          oled.drawDisc(40 + x, 10 + y, 4); //upper R
          oled.drawDisc(12 + x, 38 + y, 4); //lower L
          oled.drawDisc(40 + x, 38 + y, 4); //lower R
          x1 = 11;

        } else if (dicenr1 == 5) {
          oled.drawDisc(12 + x, 10 + y, 4); //upper L
          oled.drawDisc(40 + x, 10 + y, 4); //upper R
          oled.drawDisc(12 + x, 38 + y, 4); //lower L
          oled.drawDisc(40 + x, 38 + y, 4); //lower R
          oled.drawDisc(26 + x, 24 + y, 4); //Center
          x1 = 13;

        } else if (dicenr1 == 6) {
          oled.drawDisc(12 + x, 10 + y, 4); //upper L
          oled.drawDisc(40 + x, 10 + y, 4); //upper R
          oled.drawDisc(12 + x, 38 + y, 4); //lower L
          oled.drawDisc(40 + x, 38 + y, 4); //lower R
          oled.drawDisc(12 + x, 24 + y, 4); //center L
          oled.drawDisc(40 + x, 24 + y, 4); //center R
          x1 = 16;
        }
        if (rollMode == 2) {

          oled.setCursor(x1 + x, 62 + y);
          oled.print(number[dicenr1 - 1]);

        }
      case (2)://one Dice

        if (dicenumber == 2) {
          x = 40;
        } else {
          x = 5;
        }
        oled.drawFrame(2 + x, y, 48, 48);

        if (dicenr2 == 1) {
          oled.drawDisc(26 + x, 24 + y, 4); //Center
          x1 = 13;

        } else if (dicenr2 == 2) {
          oled.drawDisc(12 + x, 10 + y, 4); //upper L
          oled.drawDisc(40 + x, 38 + y, 4); //lower R
          x1 = 14;

        } else if (dicenr2 == 3) {
          oled.drawDisc(26 + x, 24 + y, 4); //Center
          oled.drawDisc(12 + x, 10 + y, 4); //upper L
          oled.drawDisc(40 + x, 38 + y, 4); //lower R
          x1 = 7;

        } else if (dicenr2 == 4) {
          oled.drawDisc(12 + x, 10 + y, 4); //upper L
          oled.drawDisc(40 + x, 10 + y, 4); //upper R
          oled.drawDisc(12 + x, 38 + y, 4); //lower L
          oled.drawDisc(40 + x, 38 + y, 4); //lower R
          x1 = 11;

        } else if (dicenr2 == 5) {
          oled.drawDisc(12 + x, 10 + y, 4); //upper L
          oled.drawDisc(40 + x, 10 + y, 4); //upper R
          oled.drawDisc(12 + x, 38 + y, 4); //lower L
          oled.drawDisc(40 + x, 38 + y, 4); //lower R
          oled.drawDisc(26 + x, 24 + y, 4); //Center
          x1 = 13;

        } else if (dicenr2 == 6) {
          oled.drawDisc(12 + x, 10 + y, 4); //upper L
          oled.drawDisc(40 + x, 10 + y, 4); //upper R
          oled.drawDisc(12 + x, 38 + y, 4); //lower L
          oled.drawDisc(40 + x, 38 + y, 4); //lower R
          oled.drawDisc(12 + x, 24 + y, 4); //center L
          oled.drawDisc(40 + x, 24 + y, 4); //center R
          x1 = 16;
        }
        if (rollMode == 2) {
          oled.setCursor(x1 + x, 62 + y);
          oled.print(number[dicenr2 - 1]);
        }
        break;
    }
  } while (oled.nextPage());
  delay(100);
}
////////////////////////////////////////////////////////////////////////////

//////////////////////Slow down rolling dice///////////////////////////////

void slow() {
  int d = 0;
  for (int i = 0; i < (random(7, 30)); i++) {

    randomGenerator();
    Roll();
    delay(d);
    d = d + 50;
  }

  if (BUZZ) {
    tone(SOUND_PIN, 800, 500);
  }
}
////////////////////////////////////////////////////////////////////////

//////////////////////////Create Random Numbers////////////////////////

void randomGenerator () {

  dicenr1 = random(1, 7);
  dicenr2 = random(1, 7);

  if (BUZZ) {
    tone(SOUND_PIN, 700, 80);
  }

}

//////////////////////////////////////////////////////////////////////

/////////////////////////Clear Display////////////////////////////////
void CleanScreen() {
  if (BUZZ) {
    tone(SOUND_PIN, 1000, 20);
  }
  oled.firstPage();
  do {
  } while (oled.nextPage());
  delay(10);
}
Testing and Calibration
- Shake the device to trigger the dice roll.
- Adjust motion sensitivity by tweaking acceleration thresholds.
- Ensure the OLED display correctly updates the dice number.
Enhancements and Customizations
- Add sound effects using a buzzer.
- Use different display animations.
- Integrate Bluetooth to send dice results to a mobile app.
Troubleshooting
- OLED Not Displaying: Check I2C connections and address settings.
- No Dice Roll on Shake: Adjust accelerometer sensitivity thresholds.
- Random Numbers Not Updating: Ensure
randomSeed(analogRead(0));is properly initialized.
FAQs
How do I adjust shake sensitivity?
Modify the threshold values in the if(abs(ax) > 15000 || abs(ay) > 15000 || abs(az) > 15000) condition.
Can I use a different Arduino board?
Yes, but ensure compatibility with the OLED display and accelerometer.
What power source should I use?
A 9V battery or a USB power supply is recommended.
Can I display dice animations?
Yes, use the drawBitmap() function in the Adafruit GFX library.
Conclusion
The Arduino Shake Dice project is a perfect blend of hardware and software, demonstrating how an accelerometer, OLED display, and random number generation can work together to create a fun and interactive experience. Whether you’re a beginner or an experienced maker, this project helps you explore sensor integration, I2C communication, and Arduino programming.
One of the best aspects of this project is its expandability. You can enhance it by adding a buzzer for sound effects, incorporating Bluetooth to send dice results to a smartphone, or even programming multiple dice rolls for board games. With further modifications, you can integrate an LCD display, build a portable enclosure, or connect it to an IoT platform to track results remotely.
If your OLED display isn’t working or the shake sensor isn’t responding correctly, troubleshooting tips like adjusting motion sensitivity and verifying I2C connections can help resolve issues quickly.
By experimenting with different components and tweaking the code, you can take your Arduino skills to the next level and unlock more possibilities in sensor-based automation. So, grab your Arduino, start coding, and bring this digital dice project to life! 🎲🚀
Arduino Projects:
1- Complete Guide for DHT11/DHT22 Humidity and Temperature Sensor With Arduino
2- DHT11 – Temperature and Humidity Sensor
3- DHT22 – Temperature and Humidity Sensor (more accurate than DHT11)
4- BMP180 – Barometric Pressure and Altitude Sensor
5- BMP280 – Barometric Pressure & Temperature Sensor
6- BME280 – Temperature, Humidity, and Pressure Sensor
7- Arduino Flex Sensor Controlled Robot Hand
8- Arduino ECG Heart Rate Monitor AD8232 Demo
9- Arduino NRF24L01 Wireless Joystick Robot Car
10- Arduino Force Sensor Anti-Theft Alarm System
11- Arduino NRF24L01 Transceiver Controlled Relay Light
12- Arduino Rotary Encoder Controlled LEDs: A Complete Guide

