Table of Contents
Introduction
Traditional door locks are reliable but often lack smart features. The Arduino Secret Knock Pattern Door Lock introduces an innovative way to unlock doors using a predefined knock sequence. By integrating an Arduino, a piezo sensor, and a servo motor, this project allows users to unlock a door by knocking in a specific pattern, eliminating the need for keys or codes.
This project is an excellent combination of security, DIY electronics, and Arduino programming. For those looking for a beginner-friendly tutorial on similar smart lock projects, check out this guide on secret knock detecting door locks.
Components Required
To build this project, you will need:
- Arduino Board (Uno, Nano, or Mega)
- Piezo Sensor – Detects the knock pattern
- Servo Motor – Controls the door lock mechanism
- Push Button – Allows setting a new knock pattern
- LED Indicators – Provides visual feedback
- Resistors & Breadboard – For circuit stability
- Wires & Power Source – For connectivity
For more details on working with piezo sensors, refer to this tutorial on knock detection using Arduino.
How It Works
- The piezo sensor detects knock vibrations.
- The Arduino processes and compares the knocks with a stored pattern.
- If the pattern matches, the servo motor rotates to unlock the door.
- If the pattern is incorrect, access is denied.
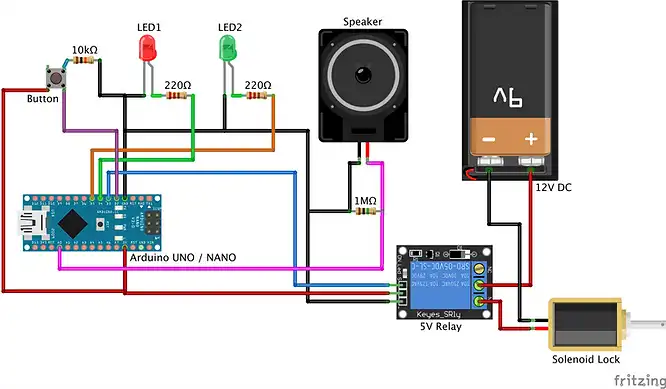
Circuit Design and Assembly

Wiring Instructions
- Piezo Sensor:
- Positive pin → Analog Pin A0
- Negative pin → GND
- Servo Motor:
- Signal pin → Digital Pin 9
- VCC → 5V
- GND → GND
- Push Button:
- One end → Digital Pin 2
- Other end → GND
Arduino Code for Secret Knock Door Lock
Required Libraries
Install the following libraries in the Arduino IDE:
const int knockSensor = 0;
const int programSwitch = 2;
const int lockMotor = 3;
const int redLED = 4;
const int greenLED = 5;

const int threshold = 3;
const int rejectValue = 25;
const int averageRejectValue = 15;
const int knockFadeTime = 150;
const int lockTurnTime = 2000;

const int maximumKnocks = 20;
const int knockComplete = 1200;

int secretCode[maximumKnocks] = {50, 25, 25, 50, 100, 50, 0, 0, 0, 0, 0, 0, 0, 0, 0, 0, 0, 0, 0, 0};
int knockReadings[maximumKnocks];
int knockSensorValue = 0;
int programButtonPressed = false;

void setup() {
  pinMode(lockMotor, OUTPUT);
  pinMode(redLED, OUTPUT);
  pinMode(greenLED, OUTPUT);
  pinMode(programSwitch, INPUT);

  Serial.begin(9600);
  Serial.println("Program start.");

  digitalWrite(greenLED, HIGH);
}

void loop() {
  knockSensorValue = analogRead(knockSensor);

  if (digitalRead(programSwitch)==HIGH){
    programButtonPressed = true;
    digitalWrite(redLED, HIGH);
  } else {
    programButtonPressed = false;
    digitalWrite(redLED, LOW);
  }

  if (knockSensorValue >=threshold){
    listenToSecretKnock();
  }
}

void listenToSecretKnock(){
  Serial.println("knock starting");

  int i = 0;
  for (i=0;i<maximumKnocks;i++){
    knockReadings[i]=0;
  }

  int currentKnockNumber=0;
  int startTime=millis();
  int now=millis();

  digitalWrite(greenLED, LOW);
  if (programButtonPressed==true){
     digitalWrite(redLED, LOW);
  }
  delay(knockFadeTime);
  digitalWrite(greenLED, HIGH);
  if (programButtonPressed==true){
     digitalWrite(redLED, HIGH);
  }
  do {
    knockSensorValue = analogRead(knockSensor);
    if (knockSensorValue >=threshold){
      Serial.println("knock.");
      now=millis();
      knockReadings[currentKnockNumber] = now-startTime;
      currentKnockNumber ++;
      startTime=now;
      digitalWrite(greenLED, LOW);
      if (programButtonPressed==true){
        digitalWrite(redLED, LOW);
      }
      delay(knockFadeTime);
      digitalWrite(greenLED, HIGH);
      if (programButtonPressed==true){
        digitalWrite(redLED, HIGH);
      }
    }

    now=millis();

  } while ((now-startTime < knockComplete) && (currentKnockNumber < maximumKnocks));

  if (programButtonPressed==false){
    if (validateKnock() == true){
      triggerDoorUnlock();
    } else {
      Serial.println("Secret knock failed.");
      digitalWrite(greenLED, LOW);
      for (i=0;i<4;i++){
        digitalWrite(redLED, HIGH);
        delay(100);
        digitalWrite(redLED, LOW);
        delay(100);
      }
      digitalWrite(greenLED, HIGH);
    }
  } else {
    validateKnock();
    Serial.println("New lock stored.");
    digitalWrite(redLED, LOW);
    digitalWrite(greenLED, HIGH);
    for (i=0;i<3;i++){
      delay(100);
      digitalWrite(redLED, HIGH);
      digitalWrite(greenLED, LOW);
      delay(100);
      digitalWrite(redLED, LOW);
      digitalWrite(greenLED, HIGH);
    }
  }
}


void triggerDoorUnlock(){
  Serial.println("Door unlocked!");
  int i=0;

  digitalWrite(lockMotor, HIGH);
  digitalWrite(greenLED, HIGH);

  delay (lockTurnTime);

  digitalWrite(lockMotor, LOW);

  for (i=0; i < 5; i++){
      digitalWrite(greenLED, LOW);
      delay(100);
      digitalWrite(greenLED, HIGH);
      delay(100);
  }

}

boolean validateKnock(){
  int i=0;

  int currentKnockCount = 0;
  int secretKnockCount = 0;
  int maxKnockInterval = 0;

  for (i=0;i<maximumKnocks;i++){
    if (knockReadings[i] > 0){
      currentKnockCount++;
    }
    if (secretCode[i] > 0){
      secretKnockCount++;
    }

    if (knockReadings[i] > maxKnockInterval){
      maxKnockInterval = knockReadings[i];
    }
  }

  if (programButtonPressed==true){
      for (i=0;i<maximumKnocks;i++){
        secretCode[i]= map(knockReadings[i],0, maxKnockInterval, 0, 100);
      }
      digitalWrite(greenLED, LOW);
      digitalWrite(redLED, LOW);
      delay(1000);
      digitalWrite(greenLED, HIGH);
      digitalWrite(redLED, HIGH);
      delay(50);
      for (i = 0; i < maximumKnocks ; i++){
        digitalWrite(greenLED, LOW);
        digitalWrite(redLED, LOW);
        if (secretCode[i] > 0){
          delay( map(secretCode[i],0, 100, 0, maxKnockInterval));
          digitalWrite(greenLED, HIGH);
          digitalWrite(redLED, HIGH);
        }
        delay(50);
      }
    return false;
  }

  if (currentKnockCount != secretKnockCount){
    return false;
  }
  int totaltimeDifferences=0;
  int timeDiff=0;
  for (i=0;i<maximumKnocks;i++){
    knockReadings[i]= map(knockReadings[i],0, maxKnockInterval, 0, 100);
    timeDiff = abs(knockReadings[i]-secretCode[i]);
    if (timeDiff > rejectValue){
      return false;
    }
    totaltimeDifferences += timeDiff;
  }
  if (totaltimeDifferences/secretKnockCount>averageRejectValue){
    return false;
  }

  return true;

}
Testing and Calibration
- Ensure the piezo sensor detects knocks properly.
- Adjust threshold values to filter out background noise.
- If the servo motor does not operate correctly, check power supply and connections.
Enhancements and Customizations
- Multiple User Patterns: Allow different users to set unique knock codes.
- Bluetooth Integration: Unlock the door via a mobile app.
- Fingerprint or RFID Module: Increase security with dual authentication.
Safety and Security Considerations
- Knock-Based Vulnerability: Someone can replicate the knock; consider two-factor authentication.
- Power Failure Issues: Use a battery backup.
- Sensor Sensitivity: Ensure it does not detect background noise as valid knocks.
FAQs
How reliable is the knock detection?
The piezo sensor is quite sensitive but may require calibration to avoid false triggers.
Can the system differentiate between similar knock patterns?
Yes, by adjusting the sensitivity threshold, it can recognize unique knock sequences.
What happens if the power fails?
A backup power source such as a battery pack ensures continuous operation.
Can I change the knock pattern?
Yes, you can modify the stored knock sequence using the push button.
How can I increase the security of this system?
Consider integrating RFID, fingerprint scanning, or Bluetooth authentication.
Conclusion
The Arduino Secret Knock Pattern Door Lock offers a creative and secure way to safeguard your home or office. By combining motion sensing, Arduino programming, and servo motor control, this project creates a customizable and interactive security system. It allows you to control access based on a unique knock pattern, ensuring that only those who know the sequence can unlock the door.
What makes this project particularly exciting is its potential for expansion. You can integrate Bluetooth connectivity for remote unlocking, add multiple knock patterns for different users, or even combine it with other security features like RFID or fingerprint scanning for an extra layer of protection.
The possibilities are endless, and experimenting with different configurations and security methods will deepen your understanding of Arduino and IoT-based security systems. Whether you’re a beginner or experienced, this project is a great way to enhance your skills and create a useful, real-world application.
Start building today and take your first step toward creating a smart access control system. With a bit of creativity and coding, you’ll be able to design a system that suits your needs and keeps your space safe. 🚪🔒
Arduino Projects:
1- Complete Guide for DHT11/DHT22 Humidity and Temperature Sensor With Arduino
2- DHT11 – Temperature and Humidity Sensor
3- DHT22 – Temperature and Humidity Sensor (more accurate than DHT11)
4- BMP180 – Barometric Pressure and Altitude Sensor
5- BMP280 – Barometric Pressure & Temperature Sensor
6- BME280 – Temperature, Humidity, and Pressure Sensor
7- Arduino Flex Sensor Controlled Robot Hand
8- Arduino ECG Heart Rate Monitor AD8232 Demo
9- Arduino NRF24L01 Wireless Joystick Robot Car
10- Arduino Force Sensor Anti-Theft Alarm System
11- Arduino NRF24L01 Transceiver Controlled Relay Light
12- Arduino Rotary Encoder Controlled LEDs: A Complete Guide

