
Table of Contents
Introduction
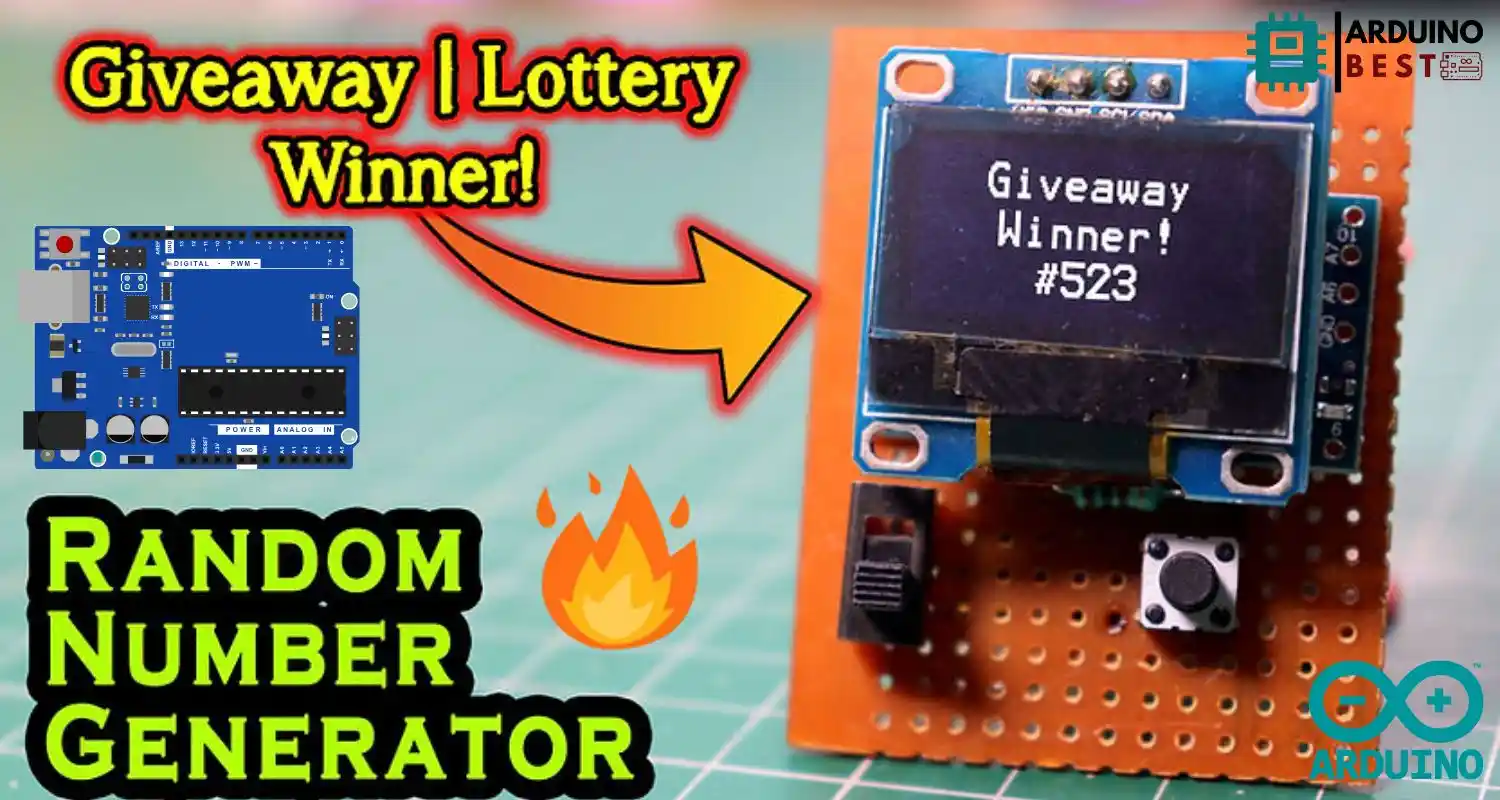
If you’re diving into the world of Arduino and want to add some interactive fun to your projects, integrating a random number generator (RNG) with an OLED display is a great starting point. This project allows you to generate random numbers and display them on a small screen, which can be applied in various scenarios such as games, simulations, and testing applications.
Why Arduino?
The Arduino platform has become one of the most popular choices for electronics enthusiasts due to its simplicity and flexibility. Whether you’re a beginner or an expert, Arduino offers the ability to create a wide range of applications, from basic LED projects to more complex systems. If you’re looking to enhance your Arduino skills, a Random Number Generator combined with an OLED display is a fun and engaging project.
For further information on getting started with Arduino, visit Adafruit’s guide on Arduino which offers step-by-step tutorials and projects for beginners.
In this guide, we will walk you through the entire process of building a random number generator with OLED display using an Arduino board. We’ll cover all the necessary components, the wiring setup, and the Arduino code to make your project come to life.
Understanding the Components
Before we get into the coding and wiring, it’s essential to understand the components we’ll be using.
Arduino Board
An Arduino board serves as the heart of this project, where the logic will be implemented. Common models like the Arduino Uno or Arduino Nano are ideal for beginners and easy to use. These boards come with pre-installed firmware that makes it easy to communicate with sensors, motors, and displays.
OLED Display
The OLED display is a compact screen that will show the random number generated by your Arduino. Unlike traditional LCDs, OLEDs offer high contrast, low power consumption, and faster refresh rates. The most commonly used OLED displays for Arduino projects are based on the SSD1306 module, which uses the I2C communication protocol. This makes it easy to connect with just two wires, simplifying the setup.
You can learn more about the technical aspects of OLED displays in this OLED tutorial.
Random Number Generation in Arduino
Generating random numbers is a fundamental task in many projects, especially in games or simulations. Arduino provides the random() function to generate random numbers. By using randomSeed(), you can ensure that the random numbers vary with every run. Understanding how this works will be crucial for setting up your RNG system.
Setting Up the Hardware
In this section, we’ll focus on the physical setup of the hardware components.

Wiring the OLED Display
To connect the OLED display to your Arduino, you’ll be using the I2C protocol, which allows for easy communication between devices with just two wires: SDA (data) and SCL (clock). This makes the setup process less complex. Here’s how to wire it:
- SDA Pin of the OLED goes to A4 on the Arduino.
- SCL Pin of the OLED goes to A5 on the Arduino.
- VCC connects to 5V, and GND connects to GND on the Arduino.
Ensure the OLED is powered correctly for the display to function.
Integrating the Push Button
To interact with the system, you’ll use a push button to trigger the random number generation. You can wire the button to any digital input pin on the Arduino, but it’s typically connected to pin 2. The button should be connected in a way that it pulls the input pin to LOW when pressed.
You can refer to this wiring guide for more details on button wiring.
Power Supply
Your Arduino can be powered using a USB cable, but if you want your project to be portable, you may opt for a battery pack. When using a battery, ensure the voltage is suitable for your Arduino board, typically 5V.
Writing the Arduino Code
Now that your hardware is set up, it’s time to dive into the code. We’ll use the Arduino IDE to write and upload the code.
Initializing Libraries
To control the OLED display, you’ll need to include a few libraries in your Arduino code:
#include <Wire.h>
#include <Adafruit_SSD1306.h>
#include <Adafruit_GFX.h>
The Wire library is used for I2C communication, and the Adafruit_SSD1306 and Adafruit_GFX libraries are necessary to control the OLED display.
Setting Up the OLED Display
Next, you’ll need to initialize the display in your setup function. Here’s an example of the initialization code:
#include <Wire.h>
#include <Adafruit_GFX.h>
#include <Adafruit_SSD1306.h>

#define SCREEN_WIDTH 128 // OLED display width, in pixels
#define SCREEN_HEIGHT 64 // OLED display height, in pixels

// Declaration for an SSD1306 display connected to I2C (SDA, SCL pins)
Adafruit_SSD1306 display(SCREEN_WIDTH, SCREEN_HEIGHT, &Wire, -1);
long radnum;
int button = 6; //D6 for Tactile Switch
int val = LOW;
void setup() {
  Serial.begin(115200);
  Serial.begin(9600);
  pinMode(button,INPUT);
   randomSeed(analogRead(A0));

  if(!display.begin(SSD1306_SWITCHCAPVCC, 0x3C)) { // Address 0x3D for 128x64
    Serial.println(F("SSD1306 allocation failed"));
    for(;;);
  }
    display.clearDisplay();
    display.setTextSize(1);
  display.setTextColor(WHITE);
  display.setCursor(25, 5);
  display.println("Viral Science");
  display.setTextSize(2);
  display.setCursor(15, 20);
  display.println("Giveaway");
  display.setCursor(30, 50);
  display.setTextSize(1);
  display.println("500 Entries");   //Enter total number of Entries
  display.display();
      }

void loop() {
  val = digitalRead(button);  // read input value
  if (val == HIGH)

  {
    delay(1000);
    display.clearDisplay();
    display.setTextSize(2);
  display.setTextColor(WHITE);
  display.setCursor(25, 10);
  display.println("Winner!");

  radnum = random(500);            //Enter total number of Entries
  Serial.println(radnum);

  display.setTextSize(2);
  display.setTextColor(WHITE);
  display.setCursor(45, 40);
  display.println(radnum);
   display.display();

  val=LOW;
  }

}
Generating Random Numbers
The core of the project is generating random numbers. To ensure that the random number is different each time, you’ll use randomSeed() with an analog input to provide a unique value.
cppCopyEditrandomSeed(analogRead(A0)); // Using a floating pin to seed the random function
After that, the random() function can be used to generate random numbers. Here’s an example:
cppCopyEditint randomNum = random(1, 100); // Generates a random number between 1 and 100
Displaying Output on the OLED
Finally, you’ll display the random number on the OLED screen. This can be done using the display.print() and display.display() commands:
cppCopyEditdisplay.clearDisplay();
display.setCursor(0, 0);
display.print("Random Number: ");
display.print(randomNum);
display.display();
Enhancing the Project
Once you have the basic setup working, you can enhance your project by adding extra features.
Adjustable Random Range
You can modify the random number range by allowing the user to choose the minimum and maximum values. This can be done by adjusting the random() function parameters.
Multiple Dice Rolls
A fun enhancement is to simulate multiple dice rolls. You can generate a series of random numbers and display them in sequence.
cppCopyEditint diceRoll = random(1, 7); // Simulate a dice roll
Visual Effects
You can add basic animations on the OLED display for an engaging user interface. For example, you can animate the number as it is generated, or show a loading bar before displaying the result.
Troubleshooting and Optimization
While the project is simple, there are a few common issues you might face. Here are some troubleshooting tips:
- Display not turning on?: Double-check your wiring and ensure that the OLED is receiving power.
- Random numbers not varying?: Make sure you are using
randomSeed()to initialize the random function with a varying value. - Debounce the button: If the button is being triggered multiple times from a single press, implement software debouncing to prevent multiple activations.
Additionally, optimizing your code for efficiency and memory management can improve performance. Regularly test your hardware to ensure reliability.
Real-World Applications
The Arduino Random Number Generator with OLED display has many practical applications:
- Educational Tool: Use it to teach programming and electronics to beginners.
- Games: Integrate the RNG into board games or as a dice roll simulator.
- Testing: Generate random values for testing purposes in experimental setups.
FAQs
What is an Arduino Random Number Generator?
An Arduino Random Number Generator is a program that generates random values using the Arduino board, often displayed on an OLED screen for user interaction.
How do I connect an OLED display to Arduino?
To connect an OLED display to Arduino, use the I2C protocol by connecting the SDA and SCL pins to the corresponding pins on the Arduino.
Can I generate random numbers without a button?
Yes, random numbers can be generated automatically in the loop() function without the need for user input.
Why is my OLED display not showing anything?
Ensure the wiring is correct, the libraries are installed, and the display is receiving sufficient power.
How can I customize the random number range?
You can customize the range by adjusting the parameters in the random() function.
This comprehensive guide walks you through building an Arduino Random Number Generator with an OLED display, and we hope you now have the knowledge to create your own project.
Conclusion
In this guide, we explored how to create a random number generator (RNG) using an Arduino and display the results on an OLED display. We covered all the essential components, from the Arduino board and OLED display to the wiring, coding, and troubleshooting tips. Whether you’re a beginner or an experienced enthusiast, this project offers a hands-on way to learn about electronics, programming, and random number generation.
The project also serves as a foundation for expanding into more complex applications, such as adding custom features, improving the user interface, or applying the RNG in real-world scenarios like games or simulations. By using the I2C communication protocol for the OLED and the straightforward Arduino functions for generating random numbers, you can quickly create interactive and engaging devices.
The skills gained here can be easily applied to other Arduino projects, giving you the confidence to explore even more advanced systems. Remember, the key to mastering Arduino is practice and experimentation, so don’t hesitate to modify the code and make the project your own. Happy building!