
Table of Contents
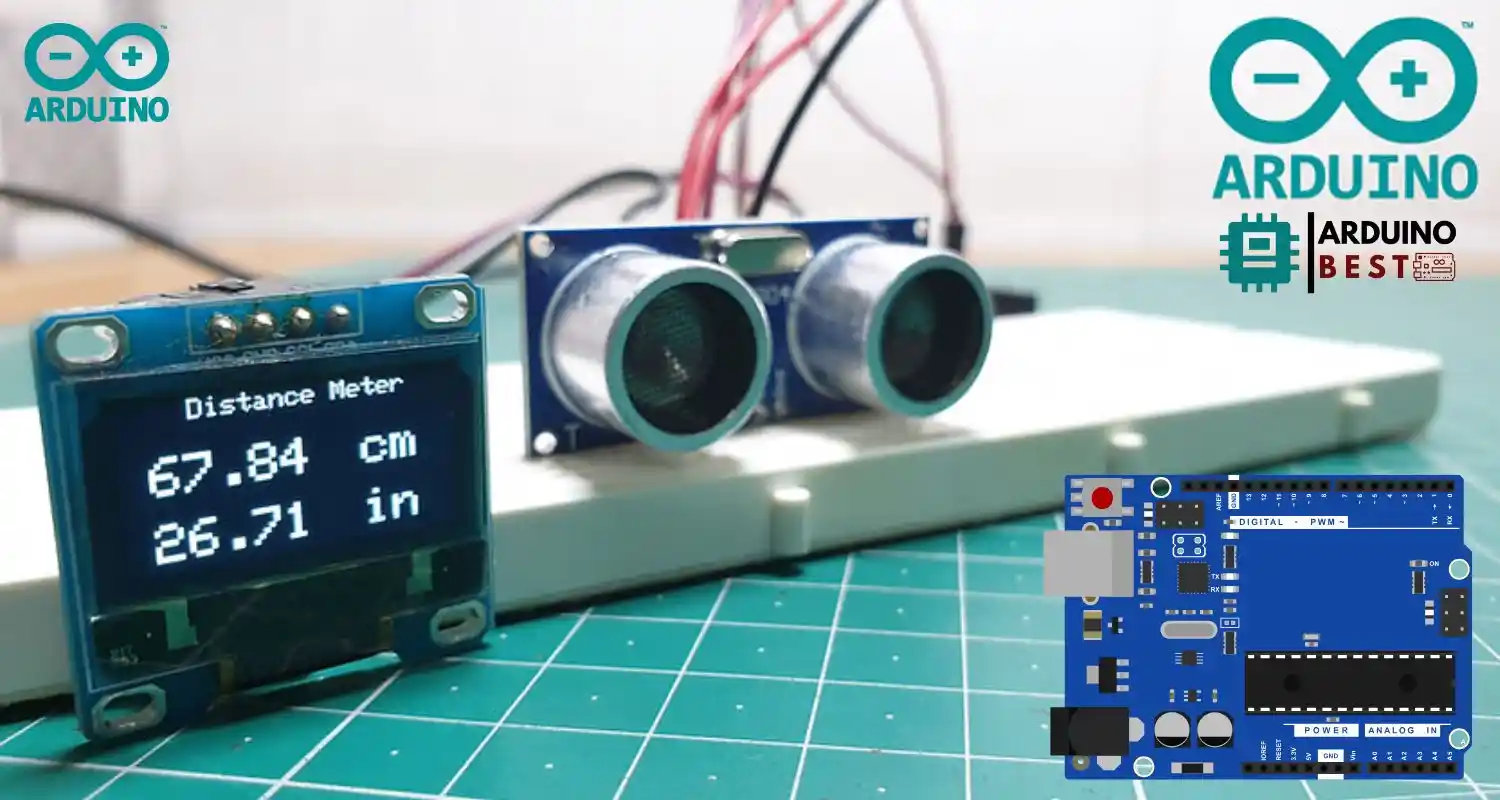
Creating an Arduino Distance Meter is an exciting project for electronics enthusiasts and makers. Using an OLED display and the popular Ultrasonic Sensor HC-SR04, you can build a precise, easy-to-read distance measuring device. This article will guide you through everything from understanding the components to building and programming the full project.
Understanding the HC-SR04 Ultrasonic Sensor
What is the HC-SR04?
The HC-SR04 is a widely used ultrasonic distance sensor that measures the time it takes for sound waves to bounce off an object and return to the sensor. It is ideal for projects requiring non-contact distance measurements, such as obstacle avoidance in robotics or liquid level monitoring.
Technical Specifications
- Operating Voltage: 5V DC
- Measuring Range: 2 cm to 400 cm
- Measuring Angle: 15 degrees
- Accuracy: ±3 mm
Working Principle
The HC-SR04 operates by emitting an ultrasonic burst from the transmitter. When this burst hits an object, it reflects back to the receiver. By calculating the time interval between transmission and reception, the distance to the object is determined.
Pin Configuration
- VCC: 5V Power Supply
- Trig: Trigger Input Pin
- Echo: Echo Output Pin
- GND: Ground
For a complete guide to the HC-SR04 Ultrasonic Sensor, you can refer to this in-depth tutorial.
Introduction to OLED Displays
What is an OLED Display?
An OLED display (Organic Light Emitting Diode) is a type of screen that emits light through organic compounds. It offers sharper images, lower power consumption, and better contrast compared to traditional LCD displays.
Types of OLED Displays
Common OLED displays for Arduino include:
- 0.96″ 128×64 pixel I2C OLEDs
- 1.3″ 128×64 pixel OLEDs
Most use either I2C or SPI communication protocols.
You can find a full tutorial on integrating an OLED display in your project here.
Interfacing OLED with Arduino
- I2C Communication: Only uses two wires (SDA, SCL)
- SPI Communication: Faster but requires more pins
Components Required
Before getting started, gather the following materials:
- Arduino Uno (or compatible board)
- HC-SR04 Ultrasonic Sensor
- OLED Display (I2C recommended)
- Breadboard
- Jumper wires
- 5V Power Supply or USB cable
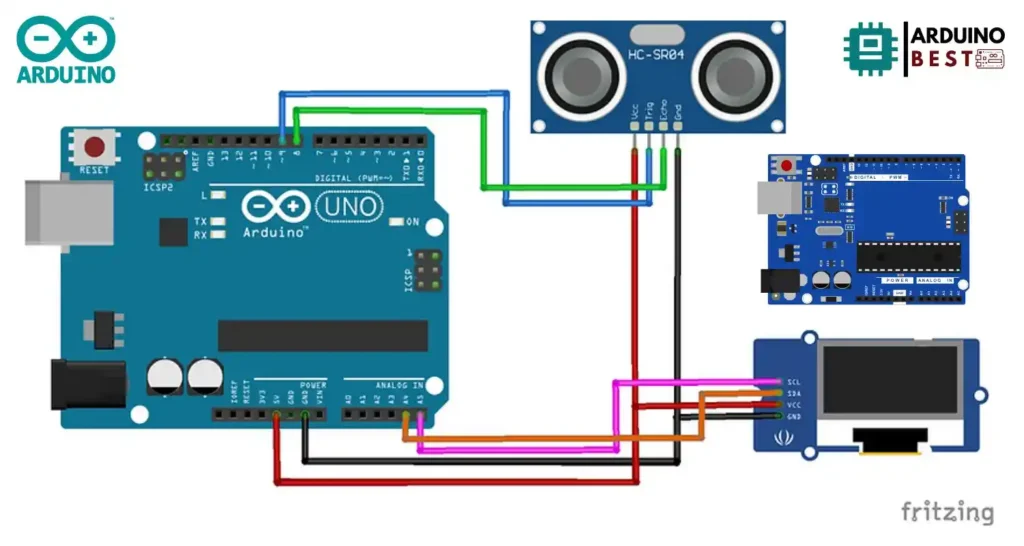
Circuit Diagram and Wiring
Wiring the HC-SR04 to Arduino
- VCC to 5V
- GND to GND
- Trig to Digital Pin (e.g., D9)
- Echo to Digital Pin (e.g., D10)
Wiring the OLED Display to Arduino
- VCC to 5V
- GND to GND
- SDA to A4 (on Uno)
- SCL to A5 (on Uno)
Complete Circuit Diagram
Use a breadboard to neatly connect the components. Double-check connections to avoid common mistakes like swapped Trig and Echo pins.
Programming the Arduino
Required Libraries
Install these libraries through Arduino IDE:
- Adafruit_SSD1306
- Adafruit_GFX
Writing the Code
- Initialize the OLED display and HC-SR04 sensor.
- Send a pulse from the Trig pin.
- Measure the time for the Echo pin.
- Calculate distance based on sound speed.
- Display the distance on the OLED screen.
Code Explanation
Each part of the code handles specific functions:
- Setup initializes the pins and display.
- Loop continuously measures and updates the distance.
- Conditional checks handle out-of-range readings.
Code Arduino
#include <SPI.h>
#include <Wire.h>
#include <Adafruit_GFX.h>
#include <Adafruit_SSD1306.h>

#define trigPin 9
#define echoPin 8

#define OLED_RESET 4
Adafruit_SSD1306 display(OLED_RESET);

void setup() {
Serial.begin (9600);
pinMode(trigPin, OUTPUT);
pinMode(echoPin, INPUT);
display.begin(SSD1306_SWITCHCAPVCC, 0x3C); //initialize with the I2C addr 0x3C (128x64)
display.clearDisplay();

}

void loop() {
float duration;
float distance_cm;
float distance_in;

digitalWrite(trigPin, LOW); //PULSE ___|---|___
delayMicroseconds(2);
digitalWrite(trigPin, HIGH);
delayMicroseconds(10);
digitalWrite(trigPin, LOW);

duration = pulseIn(echoPin, HIGH);

distance_cm = (duration/2) / 29.1;
distance_in = (duration/2) / 73.914;

display.setCursor(25,0); //oled display
display.setTextSize(1);
display.setTextColor(WHITE);
display.println("Distance Meter");

display.setCursor(10,20); //oled display
display.setTextSize(2);
display.setTextColor(WHITE);
display.println(distance_cm);
display.setCursor(90,20);
display.setTextSize(2);
display.println("cm");

display.setCursor(10,45); //oled display
display.setTextSize(2);
display.setTextColor(WHITE);
display.println(distance_in);
display.setCursor(90,45);
display.setTextSize(2);
display.println("in");
display.display();

delay(500);
display.clearDisplay();

Serial.println(distance_cm);
Serial.println(distance_in);
}
Uploading and Testing
Connect your Arduino to the computer via USB, upload the sketch, and observe the distance readings displayed on your OLED.
Enhancing the Project
Adding a Buzzer for Alerts
You can add a buzzer that sounds when an object comes within a specified range, offering instant audio feedback.
Implementing Temperature Compensation
Using a DHT11 temperature sensor can adjust measurements for more accuracy, compensating for the speed of sound variations due to temperature.
Data Logging
Store distance data to an SD card module for later analysis. This is useful for scientific experiments or tracking changes over time.
Troubleshooting Common Issues
Inaccurate Readings
- Verify clean, stable power supply.
- Check for object surfaces that poorly reflect ultrasonic waves.
OLED Display Not Working
- Confirm correct wiring for SDA and SCL.
- Reinstall or update the required libraries.
Sensor Not Responding
- Check voltage levels (must be 5V).
- Ensure proper connection of Trig and Echo pins.
Applications of Arduino Distance Meters
- Obstacle detection in robotics
- Water level measurement in tanks
- Smart parking systems
- Home automation for security
FAQs
Q1: What is the maximum range of the HC-SR04 sensor?
The maximum measurable distance is approximately 400 cm.
Q2: Can I use multiple HC-SR04 sensors with one Arduino?
Yes, by assigning separate pins for each sensor and carefully timing the triggers to avoid interference.
Q3: Why is my OLED display showing random characters?
Common causes include wiring issues, power instability, or outdated libraries.
Q4: How can I improve the accuracy of distance measurements?
Implementing temperature compensation and ensuring clean, stable power can significantly improve accuracy.
Conclusion
Building an Arduino Distance Meter with an OLED Display and HC-SR04 Ultrasonic Sensor is a rewarding project that combines fundamental electronics, sensor integration, and microcontroller programming. By following the steps outlined in this guide, you learn how to measure distance accurately and display the results in real-time on a compact screen. The project uses affordable, widely available components, making it accessible for beginners and hobbyists alike.
Beyond basic distance measurement, this project can be expanded in numerous ways. Adding features like audible alerts, temperature compensation, or wireless data logging can transform a simple build into a highly sophisticated system. With applications ranging from robotic obstacle detection to smart home automation, mastering the use of the HC-SR04 sensor and OLED display opens the door to a variety of creative designs.
This project not only helps develop technical skills such as circuit design, coding, and troubleshooting, but also fosters a deeper understanding of how embedded systems interact with the physical world. Whether you are starting your journey with Arduino or looking to improve your existing skills, creating a distance meter is a fantastic way to gain hands-on experience and set the foundation for even more complex DIY electronics projects.