
Table of Contents
The Arduino Cyclone Arcade LED Chaser Game is a fun and engaging DIY electronics project that combines elements of programming, circuitry, and arcade-style gaming. Whether you’re a hobbyist, student, or someone looking to explore interactive electronics, this project is an excellent way to practice working with LEDs, push buttons, and the Arduino platform.
This article walks you through everything you need to know—from understanding how the game works to building it step by step and enhancing the experience with creative modifications. You’ll also find answers to frequently asked questions and tips for troubleshooting common issues.
Inspired by the classic arcade Cyclone game, this DIY version mimics the same concept using an Arduino and addressable LEDs. The goal is simple: press a button at just the right moment to stop the chasing LED on a designated “win” position. For a visual reference, check out this Cyclone LED Arcade Game Tutorial that demonstrates the project in action. To control the LED strip precisely, we’ll use the FastLED Library, a powerful tool for managing addressable LEDs in Arduino projects.
Understanding the Cyclone Arcade Game Concept
The original arcade version of Cyclone is known for its fast-paced, addictive gameplay. Players must hit a button when a moving light lands on a specific LED in a ring. The Arduino-based version replicates this mechanic using code and hardware:
- A ring of WS2812B addressable LEDs cycles rapidly
- A single button serves as the trigger
- The player wins if they stop the LED on the correct position
The simplicity of the concept makes it perfect for learners and tinkerers alike, while offering lots of room for customization.
Required Components and Tools
To get started, you’ll need the following:
Electronics:
- Arduino Uno or Arduino Nano
- WS2812B or WS2811 addressable LED strip (minimum 12–24 LEDs recommended)
- Tactile push button
- 10KΩ resistor (pull-down for the button)
- 470Ω resistor (for LED data line)
- Capacitor (e.g., 1000µF to protect the LEDs)
- Power supply (5V, 3A recommended for the LEDs)
Additional Materials:
- Breadboard or solderable PCB
- Jumper wires
- Enclosure (plastic housing or recycled object)
- Soldering tools (iron, solder, flux)
- Optional: OLED display for score display, buzzer for audio feedback
Circuit Design and Assembly
Wiring the Components
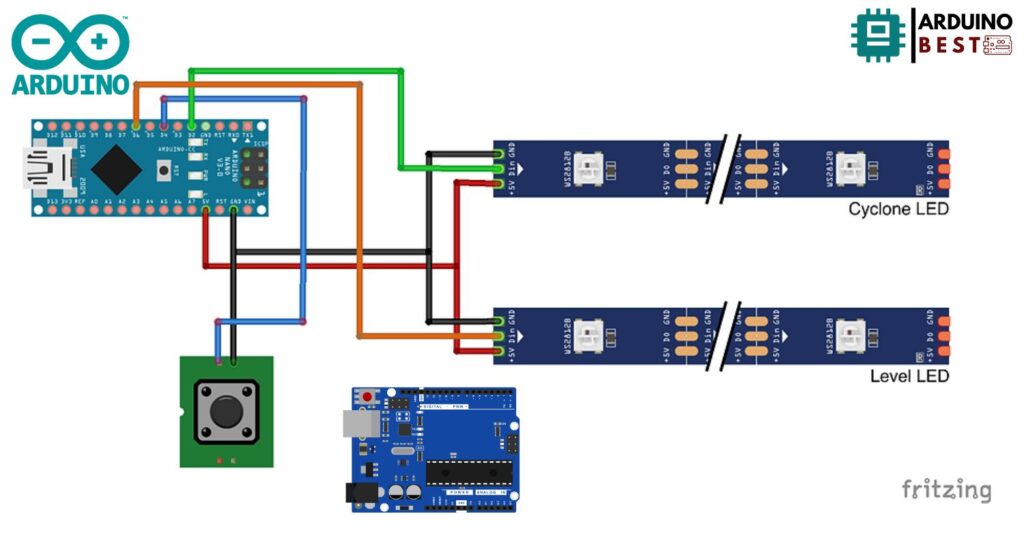
- Connect the data input of the LED strip to a digital output pin on the Arduino (usually pin 6)
- Power the LED strip with a stable 5V source
- Ground the Arduino and LED strip together
- Hook up the push button to another digital pin with a 10KΩ pull-down resistor
Assembly Tips
- Keep wiring short to reduce voltage drops
- If using many LEDs, inject power at multiple points
- Mount components securely using hot glue or screws inside the enclosure
Visual Aids (if documenting your project)
- Use circuit diagrams for clarity
- Take photos during assembly to aid others and for future debugging
Programming the Arduino
You’ll use the FastLED library to control the LED animations. Start by installing it via the Arduino IDE’s Library Manager.
Core Logic:
- Create a loop that cycles through the LEDs with a delay
- Monitor the push button state
- If the button is pressed when a designated LED is active, register a win
Basic Functions to Implement:
- LED cycling loop
- Button press detection with debounce
- Game state logic: start, win, lose
Sample Code Snippet:
#include "FastLED.h"  //FastLED.h Library Download
#define NUM_LEDS 48  //Total Number of LED
#define DATA_PIN 2   //Cyclone LED Strip D2
#define SCORE_PIN 6  //Level LED Strip D6
#define SCORE_LEDS 4

CRGB leds[NUM_LEDS];
CRGB sleds[NUM_LEDS];

bool reachedEnd = false;
byte gameState = 0;
//byte ledSpeed = 0;
int period = 1000;
unsigned long time_now = 0;
byte Position = 0;
byte level = 0;

const byte ledSpeed[4] = {50, 40, 35, 20};

//Debounce
bool findRandom = false;
byte spot = 0;

void setup() {
  // put your setup code here, to run once:
  FastLED.addLeds<WS2812B, DATA_PIN, GRB>(leds, NUM_LEDS);
  FastLED.addLeds<WS2812B, SCORE_PIN, GRB>(sleds, SCORE_LEDS);
  pinMode(4, INPUT_PULLUP);                                           //Push Button D4
  Serial.begin(9600);
  Serial.println("Reset");
}

void loop() {
  // put your main code here, to run repeatedly:
  if (gameState == 0) {
    fill_rainbow(leds, NUM_LEDS, 0, 15); //2 = longer gradient strip
    fill_rainbow(sleds, SCORE_LEDS, 0, 7); //2 = longer gradient strip
    if (digitalRead(4) == LOW) {
      Position = 0;
      findRandom = true;
      delay(500);
      for (byte i = 0; i < NUM_LEDS; i++) {
        leds[i].setRGB(0, 0, 0);
        delay(40);
        FastLED.show();
      }
      for (byte i = 0; i < SCORE_LEDS; i++) {
        sleds[i].setRGB(0, 0, 0);
        delay(100);
        FastLED.show();
      }
      gameState = 1;
    }
    FastLED.show();
  }
  if (gameState == 1) {
    period = ledSpeed[0];
    if (millis() > time_now + period) {
      time_now = millis();
      if (findRandom) {
        spot = random(44) + 3;              //Total Cyclone LED - 4
        findRandom = false;
      }
      leds[spot - 1].setRGB(255, 140, 0);
      leds[spot].setRGB(0, 255, 0);
      leds[spot + 1].setRGB(255, 140, 0);
      sleds[0].setRGB(0, 0, 255);
      PlayGame(spot-1, spot+1);
    }
    if (digitalRead(4) == LOW) {
      delay(300);
      findRandom = false;
      if (Position > spot - 1 && Position < spot + 3) {
        level = gameState;
        gameState = 98;
      } else {
        gameState = 99;
      }
    }
  }
  if (gameState == 2) {
//    period = 320;
    period = ledSpeed[1];
    if (millis() > time_now + period) {
      time_now = millis();
      if (findRandom) {
        spot = random(44) + 3;              //Total Cyclone LED - 4
        findRandom = false;
      }
      leds[spot - 1].setRGB(255, 140, 0);
      leds[spot].setRGB(0, 255, 0);
      leds[spot + 1].setRGB(255, 140, 0);
      sleds[1].setRGB(0, 0, 255);
      PlayGame(spot-1, spot+1);
    }
    if (digitalRead(4) == LOW) {
      delay(300);
      if (spot - 1 && Position < spot + 3) {
        level = gameState;
        gameState = 98;
      } else {
        gameState = 99;
      }
    }
  }
  if (gameState == 3) {
    period = ledSpeed[2];
    if (millis() > time_now + period) {
      time_now = millis();
      if (findRandom) {
        spot = random(44) + 3;              //Total Cyclone LED - 4
        findRandom = false;
      }
      leds[spot].setRGB(0, 255, 0);
      sleds[2].setRGB(0, 0, 255);
      PlayGame(spot, spot);
    }
    if (digitalRead(4) == LOW) {
      delay(300);
      if (Position == spot+1) {
        level = gameState;
        gameState = 98;
      } else {
        gameState = 99;
      }
    }
  }
  if (gameState == 4) {
    period = ledSpeed[3];
    if (millis() > time_now + period) {
      time_now = millis();
      if (findRandom) {
        spot = random(44) + 3;              //Total Cyclone LED - 4
        findRandom = false;
      }
      leds[spot].setRGB(0, 255, 0);
      sleds[3].setRGB(0, 0, 255);
      PlayGame(spot, spot);
    }
    if (digitalRead(4) == LOW) {
      delay(300);
      if (Position == spot+1) {
        level = gameState;
        gameState = 98;
      } else {
        gameState = 99;
      }
    }
  }
  if (gameState == 98) {
    winner();
  }
  if (gameState == 99) {
    loser();
  }
}
void PlayGame(byte bound1, byte bound2) {
  leds[Position].setRGB(255, 0, 0);
  if (Position < bound1 + 1 || Position > bound2 + 1) {
    leds[Position - 1].setRGB(0, 0, 0);
  }
  FastLED.show();
  Position++;
  if (Position >= NUM_LEDS) {
    leds[Position - 1].setRGB(0, 0, 0);
    Position = 0;
  }
}

void winner() {
  for (byte i = 0; i < 3; i++) {
    for (byte j = 0; j < NUM_LEDS; j++) {
      leds[j].setRGB(0, 255, 0);
    }
    FastLED.show();
    delay(500);
    clearLEDS();
    FastLED.show();
    delay(500);
  }
  findRandom = true;
  Position = 0;

  gameState = level + 1;
  if (gameState > 4) {
    gameState = 0;
  }
}
void loser() {
  for (byte i = 0; i < 3; i++) {
    for (byte j = 0; j < NUM_LEDS; j++) {
      leds[j].setRGB(255, 0, 0);
    }
    FastLED.show();
    delay(500);
    clearLEDS();
    FastLED.show();
    delay(500);
  }
  gameState = 0;
}
void clearLEDS() {
  for (byte i = 0; i < NUM_LEDS; i++) {
    leds[i].setRGB(0, 0, 0);
  }
}
void winAll(){

}
Enhancing the Game Experience
Once the basic game works, add features to improve engagement.
Additions:
- Speed scaling: gradually reduce delay time to increase difficulty
- Visual effects: use different colors for wins and losses
- Audio cues: add a buzzer that sounds for hits/misses
- Display: show current level or score using an OLED display
- High score tracking: store values in EEPROM for persistence
Designing the Enclosure
The look and feel of your game can be dramatically improved with a creative enclosure.
Ideas:
- Reuse a round wall clock to mount LEDs in a circle
- Use acrylic sheets or 3D-printed parts to create a custom frame
- Include cutouts for the button, display, and USB access
Practical Tips:
- Allow ventilation if LEDs generate heat
- Ensure easy access for code updates and repairs
- Label buttons or screens for user clarity
Troubleshooting Common Issues
LED Problems:
- Check power supply: insufficient power causes flickering
- Confirm data line is connected to the first LED
- Add a 470Ω resistor on the data pin and a large capacitor across power lines
Button Problems:
- Add software debounce to prevent multiple triggers
- Verify ground connection and resistor placement
Code Errors:
- Verify FastLED library is correctly installed
- Print debug statements using
Serial.println()to monitor button states and LED indexes
Frequently Asked Questions
What is the best Arduino board for this project?
The Arduino Uno is a common choice, but the Arduino Nano is more compact and works equally well.
Can I use non-addressable LEDs?
No. You need individually addressable LEDs like WS2812B to achieve the chaser effect.
How do I change the difficulty of the game?
Adjust the delay in the LED loop. Lower delays make the game faster and more challenging.
Can I make it multiplayer?
Yes. Add additional buttons and track which player presses first using separate input pins.
How do I display scores?
Use a small OLED screen and update it with the score using I2C communication.
Conclusion
The Arduino Cyclone Arcade LED Chaser Game is a rewarding project that blends creativity with technical learning. From setting up the circuit to programming game logic and enhancing the experience with displays or sounds, it’s a perfect introduction to interactive hardware.
Take this foundation and make it your own—add levels, track scores, or design a two-player mode. Once you’ve built your own, don’t hesitate to share your creation with others in the maker community.