

Table of Contents
Creating an Arduino Automatic Candy Dispenser Machine is a rewarding and practical DIY electronics project. It merges the world of fun with automation and is a great introduction to working with sensors, motors, and microcontrollers. Whether you’re looking to distribute treats at parties or reduce touch contact with snacks in public spaces, this project offers both utility and creativity.
In this comprehensive guide, you’ll learn how to build your own touchless candy dispenser using Arduino Uno, ultrasonic sensors, and a servo motor. This project is suitable for beginners and enthusiasts alike. For deeper insight into similar creative builds, check out this detailed candy dispenser tutorial on Instructables.
If you’re new to Arduino or want to understand how microcontrollers interact with sensors and actuators, explore Adafruit’s Learning System for foundational tutorials on electronics.
Understanding the Basics
Before diving into construction, it’s important to grasp a few core concepts:
- What is Arduino?
Arduino is an open-source microcontroller platform used to build electronics projects. It reads input (like a hand detected by a sensor) and triggers an output (such as rotating a motor). - Why use Arduino for automation?
Arduino offers simplicity, scalability, and a supportive community. Its open-source nature makes it perfect for both beginners and advanced users. - How sensors and actuators work
- Sensors like the HC-SR04 ultrasonic module detect proximity.
- Actuators such as servo motors perform actions like rotating a flap to release candy.
Components Required
To build an Arduino Automatic Candy Dispenser, gather the following:
Hardware
- Arduino Uno or compatible board
- HC-SR04 ultrasonic sensor
- Servo motor
- Breadboard and jumper wires
- Power source (USB or 9V battery)
- Candy container or custom dispensing module
Software
- Arduino IDE (available from Arduino’s official website)
- Required libraries:
Servo.h,NewPing.h(if using advanced features)
Designing the Dispenser Mechanism
The mechanical design is crucial for consistent and jam-free candy dispensing. You can choose from:
- Rotating disk mechanism: A circular disk with holes aligns with an opening to drop a candy.
- Sliding gate design: A servo moves a panel to allow one piece to fall.
- Spiral dispenser: A spiral screw pushes candy forward with each motor turn.
Materials you can use
- 3D-printed parts (recommended for durability)
- Cardboard for low-budget prototyping
- Plastic containers repurposed as candy bins
Ensure the mechanism suits the size and shape of your candy, as irregular shapes may cause jams.
Circuit Assembly and Wiring
Connect your components step-by-step:
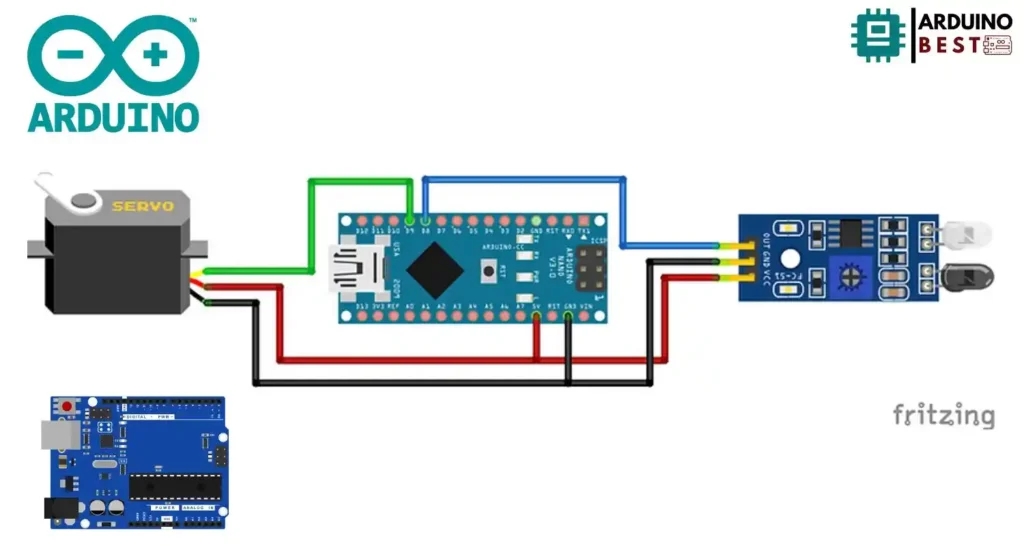
- Connect the trigger and echo pins of the ultrasonic sensor to digital pins on the Arduino
- Connect the servo motor signal wire to a PWM-enabled pin (like D9)
- Use the breadboard to simplify connections and power distribution
Tips
- Use color-coded jumper wires for clarity
- Avoid crossing wires to reduce confusion during troubleshooting
Programming the Arduino
The code brings the machine to life. Here’s how it works:
- The ultrasonic sensor constantly checks for nearby objects
- If a hand is detected within a preset distance (e.g., 10 cm), the servo motor activates
- The motor rotates to release one candy, then resets
Key programming tasks
- Setup sensor pins and motor control
- Create a conditional loop for detection
- Add delays to prevent double dispenses
- Include serial monitoring for debugging
Sample code snippet:
#include <Servo.h>
Servo servo;
int pos;
int Signal = 8;
int servopin = 9;

void setup() {
    pinMode(Signal, INPUT);
    servo.attach(servopin);
    servo.write(0);         //close cap on power on
    delay(1000);
    servo.detach();
     }
void loop() {
    int buttonState = digitalRead(Signal);
     delay(1);
    if (buttonState == 0)
    {
  servo.attach(servopin);
  delay(1);
  servo.write(90);
  delay(3000);       //wait 5 seconds
  servo.write(0);
  delay(1000);
  servo.detach();
    }
    }
Testing and Calibration
To ensure proper functionality:
- Adjust the distance threshold until the sensor responds accurately to hand movement
- Modify the servo angles to dispense just one piece of candy
- Test different candy types for compatibility
Troubleshooting tips
- Sensor not detecting? Check wiring and angle
- Candy not releasing? Adjust dispenser hole size or motor delay
Enhancements and Customizations
Personalize your candy dispenser with fun features:
- Add LED lights or buzzers for feedback
- Use an LCD screen to display messages
- Integrate Wi-Fi or Bluetooth modules for app control
- Build a sleek enclosure using laser-cut acrylic or 3D printed parts
Advanced users can add features like:
- Candy count tracking
- Voice activation
- Coin acceptor modules for vending
Safety and Maintenance Tips
Ensure long-term usability by:
- Insulating wires and securing connections
- Using food-safe materials near edible parts
- Cleaning the candy tray and dispenser regularly
- Avoiding prolonged power supply without supervision
Conclusion
Creating an Arduino Automatic Candy Dispenser Machine is more than just a fun weekend project—it’s an engaging introduction to the world of DIY electronics, automation, and problem-solving. Whether you’re building it for a school fair, a tech showcase, or just for the fun of it, this project blends creativity with hands-on learning in a way that’s both rewarding and practical.
Through this build, you get to explore how sensors detect movement, how servos can create motion, and how simple code can bring physical components to life. It’s a great way to reinforce programming logic, circuitry knowledge, and design thinking—all while ending up with a functional and entertaining gadget.
Beyond the technical knowledge, this project offers a chance to explore real-world applications like touchless interfaces, automated vending concepts, and interactive machines. Plus, there’s plenty of room for customization—add sound effects, lights, Bluetooth control, or even integrate a small display to show quirky messages or candy counts.
Whether you’re a beginner looking to learn or a maker seeking a fun twist on automation, this candy dispenser is a sweet start. Keep experimenting, improving, and learning—and who knows? Your next project might just be a fully-featured vending robot!
Frequently Asked Questions
How does the ultrasonic sensor detect hand presence?
The HC-SR04 sensor emits sound waves and measures the time they take to bounce back. If an object (like a hand) comes within a specified range, it triggers the servo motor.
Can I use different types of candy?
Yes, but size and shape matter. Choose uniformly sized candies like M&Ms or Skittles to avoid jamming the mechanism.
What if the dispenser doesn’t release candy?
Check the servo angles and ensure the mechanism isn’t blocked. Also verify that the sensor correctly triggers the motor.
How can I make the dispenser more hygienic?
Use a sealed container, minimize direct contact with internal parts, and include a cover that opens only when dispensing.
Is it possible to add a payment system?
Yes. You can integrate coin acceptors or use modules like RFID or Bluetooth for digital payments, though this adds complexity.