
Table of Contents
Integrating the ESP8266 NodeMCU with the MPU-6050 sensor opens the door to creating intelligent, connected devices capable of motion detection, orientation sensing, and temperature monitoring. With the popularity of Arduino-based IoT applications, this combination provides a powerful platform for real-time data collection and wireless communication.
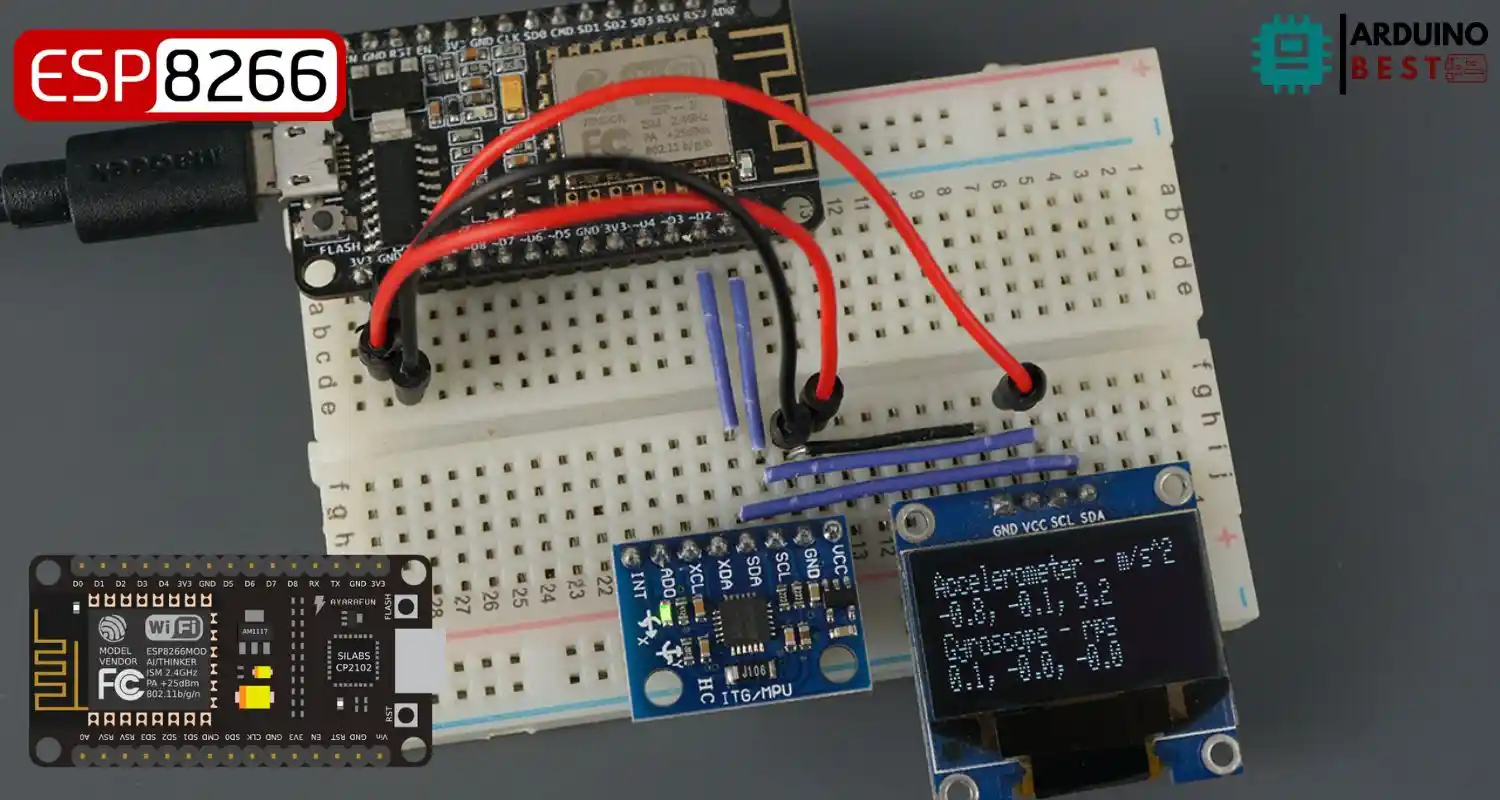
In this guide, we’ll walk through how to connect the MPU-6050 to an ESP8266 NodeMCU, write the required Arduino code, and even visualize the sensor data on an OLED display.
For technical documentation on the NodeMCU ESP8266, you can refer to the ESP8266 NodeMCU Technical Reference. To get started with the MPU-6050 sensor library, check out the Adafruit MPU6050 Library.
Understanding the Hardware
ESP8266 NodeMCU
- Wi-Fi-enabled microcontroller board
- Based on the ESP8266 chip
- Compatible with the Arduino IDE
- Ideal for low-power, IoT applications
MPU-6050 Sensor
- 3-axis accelerometer
- 3-axis gyroscope
- Integrated temperature sensor
- Communicates over I2C protocol
- Suitable for motion sensing and orientation detection
Setting Up Your Development Environment
1. Install the Arduino IDE
- Download from the official Arduino website
- Install necessary board packages for ESP8266
2. Install Required Libraries
Use the Arduino Library Manager to install:
- Adafruit MPU6050
- Adafruit Unified Sensor
- Adafruit BusIO
Wiring the ESP8266 NodeMCU with MPU-6050
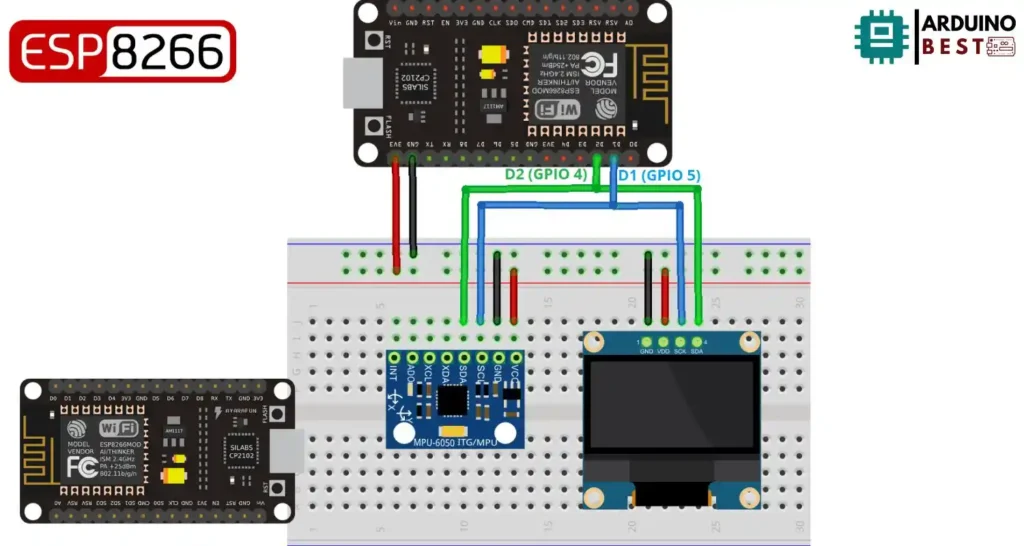
Connect the following pins:
- MPU-6050 VCC to NodeMCU 3.3V
- MPU-6050 GND to NodeMCU GND
- MPU-6050 SDA to NodeMCU D2 (GPIO4)
- MPU-6050 SCL to NodeMCU D1 (GPIO5)
Use a breadboard and jumper wires for stable connections.
Writing and Uploading the Arduino Code
Initialize the Sensor
In your Arduino sketch:
#include <Wire.h>
#include <Adafruit_MPU6050.h>
#include <Adafruit_Sensor.h>

Adafruit_MPU6050 mpu;

void setup() {
  Serial.begin(115200);
  if (!mpu.begin()) {
    Serial.println("MPU6050 not found!");
    while (1);
  }
}
Read Sensor Data
void loop() {
  sensors_event_t a, g, temp;
  mpu.getEvent(&a, &g, &temp);

  Serial.print("Accel X: "); Serial.println(a.acceleration.x);
  Serial.print("Gyro Z: "); Serial.println(g.gyro.z);
  Serial.print("Temp: "); Serial.println(temp.temperature);

  delay(1000);
}
Displaying Data on an OLED Screen
Connect the OLED
Wire the OLED screen to your NodeMCU:
- OLED VCC to 3.3V
- OLED GND to GND
- OLED SDA to D2
- OLED SCL to D1
Update Code for OLED Output
Install Adafruit_SSD1306 and Adafruit_GFX libraries. Modify your loop:
#include <Adafruit_MPU6050.h>
#include <Adafruit_SSD1306.h>
#include <Adafruit_Sensor.h>

Adafruit_MPU6050 mpu;
Adafruit_SSD1306 display = Adafruit_SSD1306(128, 64, &Wire);

void setup() {
  Serial.begin(115200);
  // while (!Serial);
  Serial.println("MPU6050 OLED demo");

  if (!mpu.begin()) {
    Serial.println("Sensor init failed");
    while (1)
      yield();
  }
  Serial.println("Found a MPU-6050 sensor");

  // SSD1306_SWITCHCAPVCC = generate display voltage from 3.3V internally
  if (!display.begin(SSD1306_SWITCHCAPVCC, 0x3C)) { // Address 0x3C for 128x64
    Serial.println(F("SSD1306 allocation failed"));
    for (;;)
      ; // Don't proceed, loop forever
  }
  display.display();
  delay(500); // Pause for 2 seconds
  display.setTextSize(1);
  display.setTextColor(WHITE);
  display.setRotation(0);
}

void loop() {
  sensors_event_t a, g, temp;
  mpu.getEvent(&a, &g, &temp);

  display.clearDisplay();
  display.setCursor(0, 0);

  Serial.print("Accelerometer ");
  Serial.print("X: ");
  Serial.print(a.acceleration.x, 1);
  Serial.print(" m/s^2, ");
  Serial.print("Y: ");
  Serial.print(a.acceleration.y, 1);
  Serial.print(" m/s^2, ");
  Serial.print("Z: ");
  Serial.print(a.acceleration.z, 1);
  Serial.println(" m/s^2");

  display.println("Accelerometer - m/s^2");
  display.print(a.acceleration.x, 1);
  display.print(", ");
  display.print(a.acceleration.y, 1);
  display.print(", ");
  display.print(a.acceleration.z, 1);
  display.println("");

  Serial.print("Gyroscope ");
  Serial.print("X: ");
  Serial.print(g.gyro.x, 1);
  Serial.print(" rps, ");
  Serial.print("Y: ");
  Serial.print(g.gyro.y, 1);
  Serial.print(" rps, ");
  Serial.print("Z: ");
  Serial.print(g.gyro.z, 1);
  Serial.println(" rps");

  display.println("Gyroscope - rps");
  display.print(g.gyro.x, 1);
  display.print(", ");
  display.print(g.gyro.y, 1);
  display.print(", ");
  display.print(g.gyro.z, 1);
  display.println("");

  display.display();
  delay(100);
}
For more help on OLED usage, see Using OLED Displays with ESP8266.
Real-World Applications
- Gesture-controlled robotics
- Fitness and motion tracking devices
- Environment-aware smart devices
- Orientation-based user interfaces
Troubleshooting Tips
- If the MPU-6050 is not detected:
- Double-check wiring
- Confirm I2C address is correct (typically
0x68)
- Unstable readings:
- Add small delays
- Power the sensor with a clean 3.3V supply
- I2C errors:
- Use pull-up resistors on SDA and SCL lines
Frequently Asked Questions
What is the MPU-6050 sensor used for?
It’s a motion-tracking sensor that includes a 3-axis accelerometer, 3-axis gyroscope, and a temperature sensor. Ideal for motion, tilt, and orientation detection.
How do I connect the MPU-6050 to the ESP8266 NodeMCU?
Use I2C communication: connect SDA to D2 and SCL to D1, powered by 3.3V.
Which libraries are required to interface MPU-6050 with Arduino?
You need:
- Adafruit MPU6050
- Adafruit Sensor
- Wire.h
How can I display MPU-6050 data on an OLED screen?
Use the Adafruit_SSD1306 and Adafruit_GFX libraries to format and output sensor readings on the OLED.
What are common issues when interfacing MPU-6050 with ESP8266?
Typical problems include:
- Wrong wiring
- Power supply instability
- Missing libraries
- Incorrect I2C address
Conclusion
Combining the ESP8266 NodeMCU with the MPU-6050 sensor allows for efficient and wireless motion sensing applications. With proper setup, coding, and visualization, you can create interactive and responsive systems suitable for modern IoT projects. Start building and explore the endless possibilities of embedded motion sensing.
Projects ESP8266 nodemcu
1- ESP8266 NodeMCU: A Comprehensive Guide to IoT Development
2- Control LED with ESP8266 NodeMCU: A Beginner’s Guide
3- Integrating a Joystick with ESP8266 NodeMCU: A Comprehensive Guide
4- esp8266 nodemcu with Flame Sensor
5- ESP8266 NodeMCU with Heartbeat Sensor
6- ESP8266 NodeMCU with KY-027 Magic Cup Light
7- ESP8266 NodeMCU with Hall Magnetic Sensor
8- ESP8266 NodeMCU with relay module 5v
9- ESP8266 NodeMCU with Linear Hall Sensor