Table of Contents
1. Introduction
The ability to measure weight accurately is crucial in many applications, from industrial settings to home projects. With Arduino and the HX711 load cell module, you can build a digital weight scale that is both cost-effective and highly precise.
1.1 Overview of Digital Weight Measurement Systems
Traditional weighing scales use mechanical or analog methods, whereas digital weight measurement utilizes electronic load cells to measure force and convert it into an electrical signal.
1.2 Importance of Precision in Weight Measurement
Precision is critical for applications such as food measurement, industrial weighing systems, and laboratory experiments. Using the HX711 load cell module allows for high-resolution measurements, making it a preferred choice among makers and professionals.
For a deep dive into how digital weighing scales work, check out this technical guide.
1.3 Introduction to Arduino-Based Weight Measurement
With Arduino, building a custom weight measurement system becomes simple. The HX711 amplifier module ensures the raw data from the load cell is accurately processed and displayed.
To understand the HX711 module in detail, refer to this technical document.
2. Understanding Load Cells
2.1 What is a Load Cell?
A load cell is a transducer that converts force or weight into an electrical signal. It consists of strain gauges that detect deformation when weight is applied.
2.2 Types of Load Cells
- Strain Gauge Load Cells – Most common, uses electrical resistance changes.
- Pneumatic Load Cells – Uses air pressure.
- Hydraulic Load Cells – Uses liquid pressure.
2.3 Applications of Load Cells
Load cells are used in:
- Retail scales (grocery stores, jewelry scales)
- Industrial applications (bulk material weighing)
- Medical scales (patient weight monitoring)
3. Introduction to the HX711 Load Cell Amplifier Module
3.1 Overview of the HX711 Module
The HX711 is a 24-bit analog-to-digital converter (ADC) designed for precision weight measurement.
3.2 Features and Specifications
- Two differential input channels
- Adjustable gain (32, 64, or 128)
- Low-noise, high-accuracy measurement
3.3 Advantages of Using HX711 with Load Cells
- High precision and resolution
- Easily interfaces with Arduino
- No need for an external ADC
4. Components Required for Building a Digital Weight Scale
4.1 Arduino Board Selection
- Arduino Uno (Recommended for beginners)
- Arduino Nano (Compact alternative)
4.2 Load Cell Selection
Choose based on:
- Weight capacity (e.g., 5kg, 10kg, 50kg)
- Shape (bar, S-type, shear beam)
4.3 HX711 Module
Used to amplify and digitize load cell signals.
4.4 Additional Components
- LCD Display (16×2 or OLED)
- Resistors and Jumpers
- Power Supply (5V)
5. Setting Up the Load Cell and HX711 Module
5.1 Mechanical Assembly of the Load Cell
- Ensure the load cell is mounted on a flat, stable surface.
- Attach a known weight for calibration.
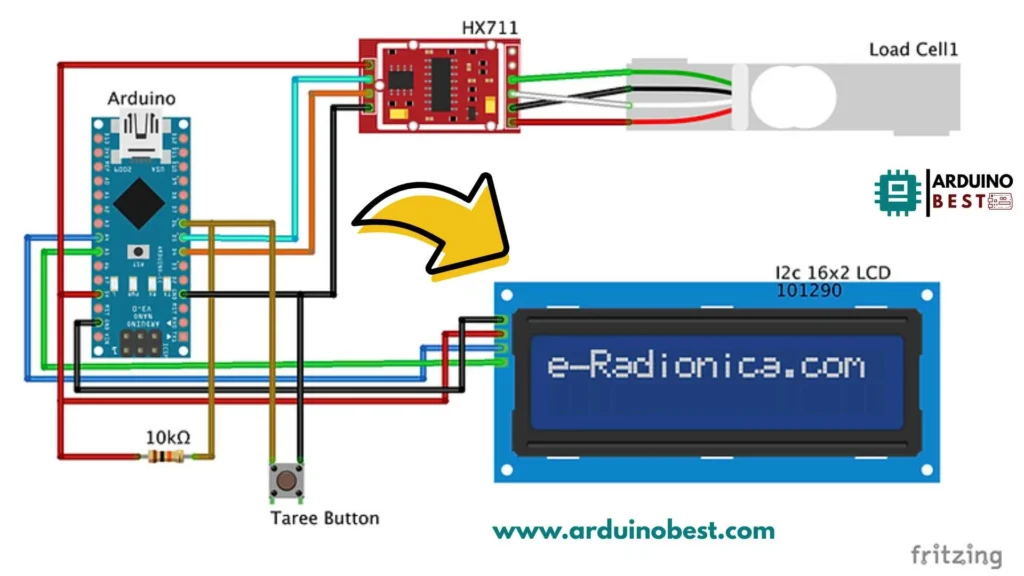
5.2 Wiring the Load Cell to the HX711 Module
| Load Cell Wires | HX711 Pins |
|---|---|
| Red (E+) | E+ |
| Black (E-) | E- |
| White (A-) | A- |
| Green (A+) | A+ |
5.3 Connecting the HX711 Module to the Arduino
| HX711 Pins | Arduino Pins |
|---|---|
| VCC | 5V |
| GND | GND |
| DT | Digital Pin 3 |
| SCK | Digital Pin 2 |

6. Programming the Arduino for Weight Measurement
6.1 Installing Necessary Libraries
#include "HX711.h"
HX711 scale(3, 2);  // DT, SCK
6.2 Writing the Calibration Code
scale.set_scale();  // Adjust this after calibration
scale.tare();  // Reset scale to zero
6.3 Implementing the Weight Measurement Code
void loop() {
    Serial.print("Weight: ");
    Serial.println(scale.get_units(), 2);
    delay(500);
}
#include <HX711_ADC.h> // https://github.com/olkal/HX711_ADC
#include <Wire.h>
#include <LiquidCrystal_I2C.h> // LiquidCrystal_I2C library
HX711_ADC LoadCell(4, 5); // dt pin, sck pin
LiquidCrystal_I2C lcd(0x27, 16, 2); // LCD HEX address 0x27
int taree = 6;
int a = 0;
float b = 0;

void setup() {
  pinMode (taree, INPUT_PULLUP);
  LoadCell.begin(); // start connection to HX711
  LoadCell.start(1000); // load cells gets 1000ms of time to stabilize

  /////////////////////////////////////
  LoadCell.setCalFactor(375); // Calibarate your LOAD CELL with 100g weight, and change the value according to readings
  /////////////////////////////////////

  lcd.begin(); // begins connection to the LCD module
  lcd.backlight(); // turns on the backlight
  lcd.setCursor(1, 0); // set cursor to first row
  lcd.print("Digital Scale "); // print out to LCD
  lcd.setCursor(0, 1); // set cursor to first row
  lcd.print(" 5KG MAX LOAD "); // print out to LCD
delay(3000);
lcd.clear();
}
void loop() {
  lcd.setCursor(1, 0); // set cursor to first row
  lcd.print("Digital Scale "); // print out to LCD
  LoadCell.update(); // retrieves data from the load cell
  float i = LoadCell.getData(); // get output value
 if (i<0)
 {
  i = i * (-1);
  lcd.setCursor(0, 1);
  lcd.print("-");
   lcd.setCursor(8, 1);
  lcd.print("-");
 }
 else
 {
   lcd.setCursor(0, 1);
  lcd.print(" ");
   lcd.setCursor(8, 1);
  lcd.print(" ");
 }

  lcd.setCursor(1, 1); // set cursor to secon row
  lcd.print(i, 1); // print out the retrieved value to the second row
  lcd.print("g ");
  float z = i/28.3495;
  lcd.setCursor(9, 1);
  lcd.print(z, 2);
  lcd.print("oz ");

  if (i>=5000)
  {
    i=0;
  lcd.setCursor(0, 0); // set cursor to secon row
  lcd.print("  Over Loaded   ");
  delay(200);
  }
  if (digitalRead (taree) == LOW)
  {
    lcd.setCursor(0, 1); // set cursor to secon row
    lcd.print("   Taring...    ");
    LoadCell.start(1000);
    lcd.setCursor(0, 1);
    lcd.print("                ");
  }
}
6.4 Displaying Weight Readings on LCD
Modify the loop to display readings on an LCD/OLED screen.
7. Calibrating the Digital Weight Scale
7.1 Importance of Calibration
Calibration ensures accurate weight measurements by setting a scaling factor.
7.2 Step-by-Step Calibration Process
- Place a known weight.
- Adjust the scaling factor in the code.
- Re-test with different weights.
8. Testing and Troubleshooting
8.1 Initial Testing Procedures
- Check wiring.
- Ensure Arduino is receiving data from HX711.
8.2 Common Issues and Solutions
- Fluctuating readings? Use a stable power source.
- No output? Verify load cell and HX711 wiring.
9. Advanced Features and Enhancements
9.1 Adding a Tare Function
scale.tare(); // Resets to zero
9.2 Data Logging Capabilities
- Save readings to an SD card
- Transmit data via Wi-Fi/Bluetooth
9.3 Integrating Multiple Load Cells
- Combine multiple load cells for higher weight capacity.
10. Applications and Use Cases
- Kitchen Scales – Precise ingredient measurement.
- Health and Fitness – Smart weight tracking.
- Industrial Weighing – Bulk weight management.
11. FAQs
11.1 How does a load cell work with an Arduino?
A load cell sends an analog signal to the HX711 module, which converts it to digital format for the Arduino.
11.2 How can I improve accuracy?
- Use shielded cables.
- Perform regular calibration.
12. Conclusion
By using an Arduino, HX711 module, and a load cell, you can build a highly accurate and reliable digital weight scale. With proper calibration and setup, this project can be used in various applications from personal use to industrial measurements.
13. Arduino Projects:
1- Complete Guide for DHT11/DHT22 Humidity and Temperature Sensor With Arduino
2- DHT11 – Temperature and Humidity Sensor
3- DHT22 – Temperature and Humidity Sensor (more accurate than DHT11)
4- BMP180 – Barometric Pressure and Altitude Sensor
5- BMP280 – Barometric Pressure & Temperature Sensor
6- BME280 – Temperature, Humidity, and Pressure Sensor
7- Arduino Flex Sensor Controlled Robot Hand
8- Arduino ECG Heart Rate Monitor AD8232 Demo
9- Arduino NRF24L01 Wireless Joystick Robot Car
10- Arduino Force Sensor Anti-Theft Alarm System
11- Arduino NRF24L01 Transceiver Controlled Relay Light
12- Arduino Rotary Encoder Controlled LEDs: A Complete Guide

