
Table of Contents
Introduction
The 7 segment display is one of the most iconic components in the world of electronics. These simple yet effective devices are used everywhere to show numerical data clearly and brightly. You can spot them in devices like clocks, calculators, meters, and digital counters.
Understanding how a 7 segment display works, its types, and how to integrate it into your projects is essential knowledge for anyone interested in electronics.
What is a 7-Segment Display?
A 7 segment display is an electronic display device for displaying decimal numerals. It is composed of seven individual light segments that can be lit in different combinations to represent numbers and some letters.
First developed in the early 20th century, these displays became widely popular due to their simplicity and effectiveness. Compared to other display types like dot-matrix or full LCD screens, 7 segment displays are simpler, cheaper, and easier to drive electronically.
You can find a detailed historical and technical overview of 7-segment displays to better understand their development.
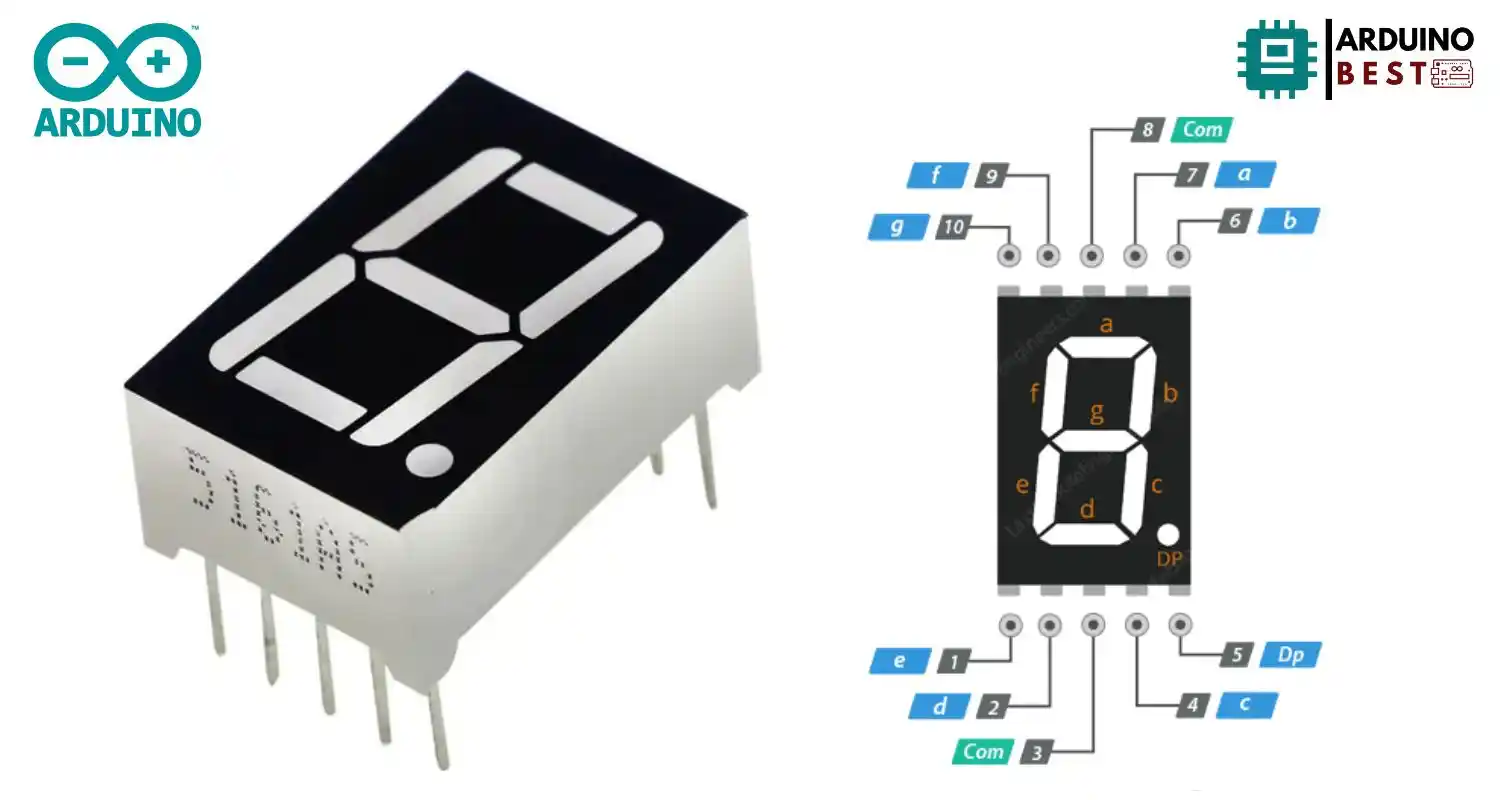
Anatomy of a 7-Segment Display
The standard 7 segment display consists of:
- Seven segments labeled A through G
- An optional eighth segment for the decimal point (DP)
- A specific arrangement that allows for easy numeral formation
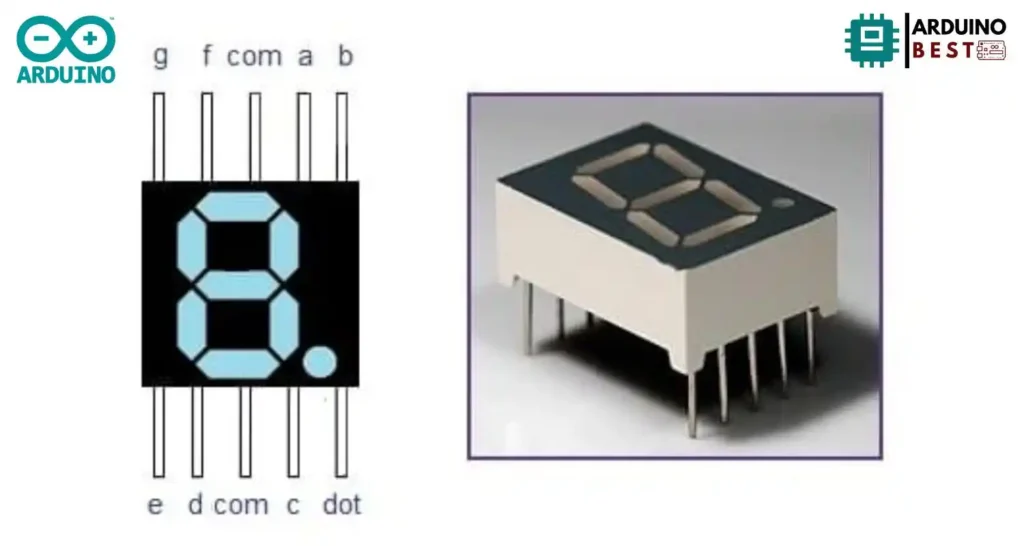
Each segment is an LED (Light Emitting Diode) and can be turned on or off individually to form digits. Displays come in two main configurations:
- Common Cathode: all negative terminals of LEDs are connected together
- Common Anode: all positive terminals are connected together
Each type requires different wiring and control logic, which you can learn about from this comprehensive guide on 7-segment displays.
Understanding the pinout and the right way to wire the display is crucial to ensure correct operation.
Types of 7-Segment Displays
There are several types of 7 segment displays, each suited to different applications:
- Single-Digit Displays: Show one digit at a time
- Multi-Digit Displays: Combine several 7-segment units into one module
- LED Displays: The most common type, offering bright, long-lasting output
- LCD Displays: Used where lower power consumption is important
- Incandescent/Electromechanical Displays: Older, rarely used today
Each type has its own advantages and limitations regarding power usage, visibility, and cost.
How a 7-Segment Display Works
The working principle of a 7 segment display is straightforward:
- Each segment lights up when an electrical current flows through it.
- Current-limiting resistors are used to prevent damage to LEDs.
- The segments are lit in patterns to form numbers or letters.
Driving methods include:
- Direct Drive: Each segment is connected directly to a control pin
- Multiplexing: Efficiently control multiple digits by lighting them sequentially at high speed
In more advanced setups, a display driver IC like the 74LS47 or MAX7219 is used to simplify control and reduce pin usage.
Multiplexing is especially important in systems requiring multiple 7 segment displays to work efficiently.
Interfacing with Microcontrollers
Modern microcontrollers like Arduino and Raspberry Pi make working with 7 segment displays even easier. Typical interfacing steps include:
- Connecting the segments to the microcontroller pins
- Using resistors to protect LEDs
- Writing simple code to control the display
Helpful libraries are available to simplify this even further. You can refer to this tutorial on interfacing 7-segment displays with microcontrollers for hands-on examples and code snippets.
Common challenges include:
- Managing current limits
- Correctly identifying pin configuration (common cathode vs. common anode)
- Handling multiple displays using shift registers or driver ICs
Following best practices ensures smooth and reliable display operation.
Displaying Numbers and Characters
The 7 segment display primarily shows numbers from 0 to 9 by lighting specific segments. With careful control, it can also display:
- Hexadecimal digits (A–F)
- A few alphabetic characters (e.g., E, H, L, P)
However, due to its design, displaying full text is limited. Some creative techniques include:
- Scrolling Text: Rapidly changing displayed characters
- Custom Symbols: Lighting up non-standard segment combinations
Fun uses like calculator spelling have historically made use of these capabilities for creative expression.
Practical Applications and Projects
7 segment displays are found in a wide range of real-world applications:
- Digital clocks
- Scoreboards
- Counters
- Measurement displays
In DIY and educational projects, they are widely used for:
- Building simple clocks
- Making countdown timers
- Displaying sensor readings like temperature or humidity
If you’re interested in hands-on learning, check out this DIY big 7-segment display project for inspiration.
The accessibility and simplicity of 7 segment displays make them an excellent choice for learning electronics.
Advantages and Limitations
Advantages:
- Easy to understand and implement
- Inexpensive and widely available
- Clear visibility in most environments
Limitations:
- Limited to numbers and a few letters
- Brightness can be an issue in direct sunlight
- Requires careful wiring and control when multiplexing
Compared to newer technologies like OLED or TFT displays, 7 segment displays are limited but still highly useful for specific applications.
Future Trends and Developments
While 7 segment displays are a mature technology, there are interesting trends:
- Integration with IoT devices for smart home readouts
- Development of flexible, printed displays
- Improved energy efficiency for battery-operated devices
Even as more advanced displays become available, 7 segment displays continue to be relevant in many embedded systems.
FAQs
What is a 7-segment display?
A simple display device using seven LEDs to form numbers and some letters.
How does a 7-segment display work?
Each segment lights up based on electrical input to display numerals.
What is the difference between common cathode and common anode?
In common cathode, all negative terminals are connected together; in common anode, all positive terminals are.
Can a 7-segment display show letters?
Yes, but only a limited set such as A, C, E, F, H, L, P, etc.
How do you connect a 7-segment display to an Arduino?
Use GPIO pins with appropriate resistors and control segments through digitalWrite functions or libraries.
What are the applications of 7-segment displays?
Commonly used in clocks, counters, meters, and various electronics.
How do you control multiple 7-segment displays?
By using multiplexing techniques or display driver ICs.
What are the limitations of 7-segment displays?
They can only show simple numbers and limited characters and are less readable in bright light.
How do you choose the right 7-segment display for your project?
Consider factors like the number of digits, size, brightness, and voltage requirements.
Are there alternatives to 7-segment displays for alphanumeric output?
Yes, alternatives include dot-matrix displays, OLED screens, and LCDs for full alphanumeric output.
Conclusion
The 7 segment display remains a vital component in electronics design, valued for its simplicity, affordability, and effectiveness. Whether you’re building a DIY project or designing a professional product, understanding how to work with 7 segment displays opens up a wide range of creative possibilities.
Experiment with different wiring methods, try out multiplexing, and explore advanced display drivers to unlock the full potential of these versatile devices.
For more in-depth tutorials and project ideas, explore further resources and continue building your skills.